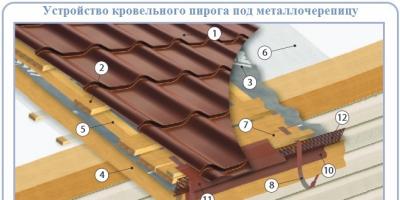
Metal roofing is a modern and popular solution, easy to install and affordable. The material has good performance characteristics and can be used on roofs of various configurations. Compliance with installation technology allows you to create a durable roof that provides a high level of protection of the under-roof space and premises from wind, cold and precipitation. The installation of metal tiles should be carried out by qualified specialists to ensure the best results. The process of laying this material has some distinctive features. When arranging such a roof, you need to decide in advance on the type of material and insulation.
Metal tiles are most often used for roofing Source orgtorg.org
Online roofing calculator
To find out the approximate cost of different types of roofing, use the following calculator:
Cold or warm roof
There are two types of roofing using this material, which differ in their characteristics. Cold roofing does not use insulation; it is suitable for cases where insulation can be laid in the attic floor. Warm roofing is done in cases where the living space is located directly under the roof.
Cold roof.
Two layers of materials are used - waterproofing (to protect the interior from possible condensation) and metal tiles. Both layers are separated from each other by counter-lattice and sheathing, and ventilation is provided at the junction of the slopes. For waterproofing, PVC or a thick film is used; the material should not be fully tensioned; the film should sag by about 25 mm, which improves moisture drainage. The waterproofing layer is attached to the rafters and fixed under the sheathing.

It is used in houses where the attic space will not be used as a living space Source proroofer.ru
Warm roof.
The basis of this type of construction is insulation, which additionally performs the function of sound insulation. For this, various types of insulation can be used. The thickness of the insulation depends on the characteristics of the building and the climate of the region, generally its layer is at least 15 cm. Another important indicator of insulation is fire resistance. Thermal insulation is located in the space between the rafters; a vapor barrier layer is used below the thermal insulation and waterproofing. Small gaps are made between the layers to ensure ventilation. All layers at the same time must be sufficiently dense (so that there are no voids where moisture accumulates) and not thick (so as not to interfere with ventilation).

This scheme is used to arrange a warm room under the roof Source remoo.ru
When purchasing materials, it is necessary to maintain the cross-section of the boards so that repairs will not be necessary in the near future. To equip the roof, metal roof tiles, additional elements, boards, screws and other consumables are purchased. The price of the structure will depend on the type of coating chosen, insulation, size and shape of the roof. The average cost of one meter of roof is 1-1.5 thousand rubles. Counting the amount of materials should be left to qualified craftsmen.

The shape of the roof plays an important role in determining the price Source oooarsenal.ru
On our website you can find contacts of construction companies that offer turnkey roof design, installation and repair services. You can communicate directly with representatives by visiting the “Low-Rise Country” exhibition of houses.
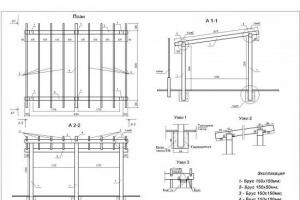
Preparatory work and calculation of materials
At the first stage, all walls are measured and discrepancies are eliminated - the most even frame eliminates the need to adjust the rafters. The lumber must be dried well. Next is carried out measuring materials and amounts to roof plan:
accurate wall length, which will allow you to determine the area of the slopes;
location is determined placement of roof windows, ventilation, chimney and so on.
After this, the timber and sheets are calculated, the amount of this material is determined from the roof area, as well as the established slope angle. In most cases, they make a gable roof with a slope of 35 degrees. The boards for the rafters are determined by the pitch of their installation, the size of the planned roof and its height. Basically, the distance between the rafters is 100 cm. The number of rafters required is determined based on the length of the wall divided by the step, one is added and rounded up. A roof made of metal tiles can be made without additional reinforcement under the rafters. Next, you need to calculate the material for the sheathing, which is mounted with a distance between each other from 35 to 40 cm.
The main purpose of the lathing is to support the frame, which is formed using rafters. Also, metal tiles are attached to the sheathing, waterproofing, and creates natural ventilation.

The metal tiles are fastened to the lathing Source udec.ru
The sheathing can be:
sparse– a certain distance is made between the boards, the step between the mounted boards is determined by the interval of the waves of the tiles;
solid– the boards are attached to each other without gaps, the strength of the frame increases, but more money is required to purchase materials.
Basically, sparse lathing is used, since the metal tile itself is strong and does not require strengthening the frame.
Rafter system, hydro- and thermal insulation, lathing and angle of inclination
Installation of a metal roof begins with the installation of a rafter system.
The process is carried out as follows technologies:
for anchor bolts or studs attach the mauerlat;
are installed rafters on the support beam, fixed with corners, from above they are cut at an angle and connected in pairs by crossbars and steel strips.
If the roof is high or has a large area, then a ridge beam is installed, the rafters are attached above it and everything is pulled together with corners.

A high roof requires additional installation of ridge beams Source krsk.au.ru
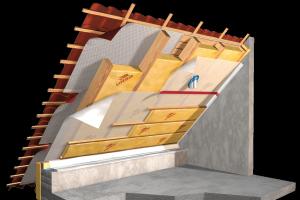
Almost always, the roof is insulated with special materials, which increases its performance characteristics and functionality. The support for the insulation is the sheathing, and the top is covered with waterproofing. For the lathing, wide boards are used, the distance between the first lower strips is up to 15 cm. Fastening to the rafters using two nails to create the most reliable base for metal tiles.

The roof arrangement scheme is quite complex Source pinterest.com
The installation of metal roofing is carried out with acceptable standards for the angle of inclination. At the same time, the angle of inclination determines other indicators of the roof, such as the type of metal tile, frame design, and the weight of the roofing pie. The greater the slope, the more materials will be required due to the increased area of the slope, while the windage of the structure increases. The optimal angle is 22 degrees, the minimum is 14 degrees; if you make it smaller, then it is impossible to use the attic space and the necessary strength of the entire structure is not ensured.
Installation of metal tiles
The metal tiles are attached to the sheathing with special roofing screws, which have a soft padding; they are screwed into the cavities of the waves. Some types of tiles have hidden fastenings; in this case, self-tapping screws with a press washer are used. The screwing force must be optimal: if the screwing force is insufficient, moisture will get under the screw and lead to corrosion; if you screw it too tightly, then the gasket will deform and its seal will be compromised.
Video description
The video will show you how to install metal tiles:
There are mandatory roof installation rules:
before When fastening metal tiles, you need to check the reliability and symmetry of the installed sheathing;
screws must be screwed in in the bottom wave of the sheet, inserted only perpendicular to the board;
overlaps are connected using shortened screws in rising waves;
fastening of sheets begins from the lower left corner and rises up.
Self-tapping screws are screwed into all the waves around the perimeter of the slope, inside in a checkerboard pattern.
Additional elements and ventilation
Installing a metal tile roof over a wooden sheathing involves the use of various additional elements. These are special products that hold together different parts of the roof, making it as safe and easy to use as possible.

To make the roof look complete and not be afraid of moisture, it is supplemented with protective materials Source bta.ru
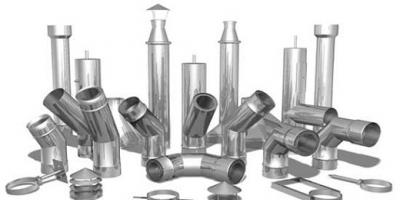
These include the following elements:
cornice strip– made from the same material as metal tile sheets, used to protect front boards from possible getting wet during precipitation;
snow holders– protect against falling snow masses from the roof;
junction strip– used to strengthen the joints of sheets with the surfaces of ventilation shafts and furnaces, parapets, walls;
end strip– protection of the outer parts from moisture, prevents breakdowns from high wind loads;
horse- is a bent sheet that connects metal tiles at the fractures of the slopes.
Given the design features, it requires good ventilation of the internal space. The type of ventilation depends on the type of roof chosen - cold or warm. Having installed a warm roof, you should prepare for the fact that there may be some problems with air exchange. The air will flow out in waves through the installed skates. In this case, air exchange may stop as a result of the formation of an ice crust in cold weather. It appears in the internal space due to strong temperature changes. Therefore, this option is considered not the best.
Video description
Preparing the roof for installation of metal tiles begins with sheathing:
When installing a cold roof, you can create better ventilation. Pipes are installed that lead from the attic through the roof to the outside, and dormer windows are made on the slopes. This type of ventilation entails additional waste, but is very reliable.
Conclusion
The installation of a metal roof has its own characteristics and advantages. The material is durable, light and hardy. But its installation requires experience and knowledge, compliance with technology and certain requirements. It is very important to adhere to all norms and standards, which will allow you to achieve high-quality results. For greater safety and convenience, special additional elements are installed on the roof.
Additional elements for roofing made of metal tiles are mandatory components of the roof covering. They serve to give the junctions the necessary tightness and prevent atmospheric moisture, dust, all kinds of debris, insects, etc. from entering under the roof. Components (additional) parts are used to decorate the ridge, cornices, edges of gables, valleys, internal corners, and pipe passages. For complex roofs you may need a large number of accessories, but for simple ones - only a few items. For example, for a small gable roof, a ridge, gable and eaves strips are sufficient.
Let's look at the types of additional parts for metal tiles, their functions and installation methods.
Extensions (components) are galvanized strips that are installed at roof joints and transitions. The length of the products is usually 2 m, the thickness of the steel sheet is 0.4-0.7 mm. The width may vary, depending on the dimensions of the mounting shelves used.
Extensions can have a polymer coating in the color of the metal tile, which slightly increases their cost, but increases their decorative effect.
As a rule, when designing joints that are “in plain sight”, for example, ridges or upper ends, products with a polymer layer are used. They fit perfectly into the overall appearance of the roof, matching the color of the tiles. But decorative value does not matter when covering joints located under sheets of metal tiles.
For example, for lower valleys it is more practical to use ordinary galvanized strips without a colored coating. This will save money and at the same time achieve the necessary tightness, but not overpay for decorative elements, which will one way or another be hidden under the sheets of tiles.
The following types of additional elements are used for metal tiles:
- cornice strip;
- end (wind) strip;
- skate;
- valley (upper and lower);
- junction strips;
- snow retainers.
Let's take a closer look at each of them.

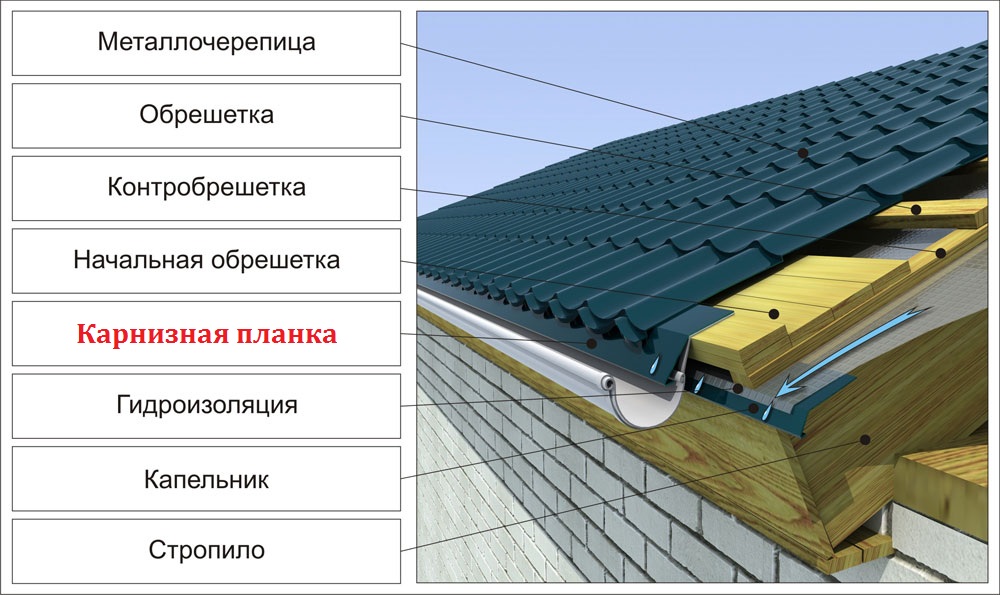
Element #1. Cornice strip
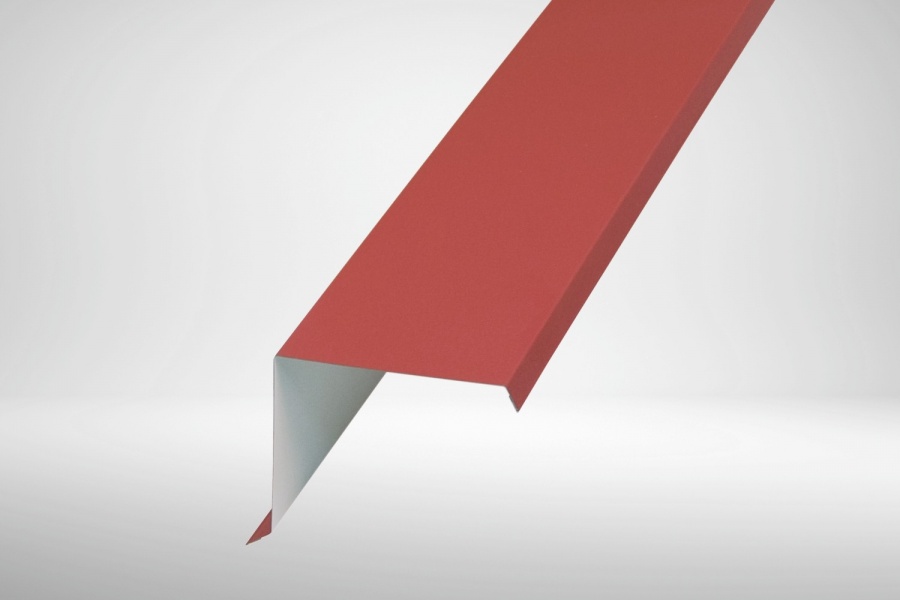
Cornice strip is a steel corner designed to decorate the lower part of the roof along the cornice. Serves to protect the frontal (eaves) board from moisture and to drain water that has entered the under-roof space into the gutter. Another function is to give the cornice line a finished look.

Installation of the strip is carried out before the installation of metal tiles, but after attaching the drainage system. The mounting shelf is fixed to the sheathing on top of the gutter holders. Fastening elements are galvanized self-tapping screws, screwed in every 300 mm.
To decorate the entire length of the cornice, as a rule, several cornice strips are used. They are connected to each other by inserting one strip into another with an overlap of 50-100 mm.
How to fix the eaves strip and bring it into the gutter, watch the video:
Element #2. End strip
The end (pediment) plank also has the form of a corner with mounting shelves. It is installed along the overhangs on the gables to protect the ends of the sheathing and the under-roof space from water, litter, insects and birds, and wind exposure.

The end strips are fixed at the final stage of roofing work, on top of the metal tiles. Installation is carried out along the overhangs of the gables from the bottom up, while overlapping the end edges of the roofing sheets. The planks are secured to the end board with self-tapping screws in increments of 0.5-0.6 m. The overlap along the length is 100 mm.
It is necessary that the end strip is in contact with the upper ridges of the metal tile, overlapping them. This blocks the access of moisture under the sheets of tiles, and also eliminates metal rattling during gusts of wind. To ensure a tight fit, it is possible to bend the edges of the tiles upward.
The classic method of attaching end strips is shown in a short video:
Element #3. Horse
The ridge strip covers the joint between the sheets of metal tiles formed along the ridge line connecting the slopes. Serves to protect against moisture, debris, insects and small birds getting under the roof. It is also part of the ventilation system, starting air movement in the ventilation gap under the tile sheets. Due to this, the roof elements are ventilated.
Ridge strips can be straight or round. Straight ones have a triangular or trapezoidal cross-section, and round ones have a semicircular cross-section. Round planks require the installation of plugs - flat semicircular or conical.

When installing a ridge strip, gaps are formed between its mounting flanges and the ridges of the metal tile. Manufacturers of metal tiles recommend covering them by filling them with a sealant (universal, profile with holes or self-expanding). However, this solution worsens the ventilation capabilities of the ridge, partially blocking the exit of air from the under-roof space. The problem can be solved by installing additional pitched or ridge point aerators.
The sealant is glued (as a rule, most of them are equipped with a self-adhesive surface) to the ridge strip or sheets of metal tiles. Then the bar is mounted, fixing it with self-tapping screws through the wave into the upper ridge. Fastening can be done through the lathing (this option is the most reliable) or only to metal tiles.
Extension of a straight ridge is carried out by overlapping by 100 mm. The round ridge strips are joined along stamping lines.
Principle of installation of ridge strips:
Element #4. Valley planks
The endow is a kind of gutter-tray formed in the inner corners of the roof, along the line of connection of the slopes. During the operation of the roof, it is subject to a huge load associated with accumulations of snow masses and storm flows. Therefore, to seal the internal corners of the roof, two valley strips are used - lower and upper.

The lower valley plank is a corner with wide shelves bent at the angle where the slopes meet. Its installation is carried out before installing the tile sheets.
Mount the plank on a continuous sheathing of 150x25 mm boards, packed on both sides of the joint of the internal corner to a width of 300 mm. First, waterproofing is laid along the sheathing, then the lower valley strip is secured by screwing in self-tapping screws in increments of 300 mm. To join the planks, they overlap by 100 mm.
If the junction of the slopes forms an almost flat angle, it is more difficult to seal it. In this case, it is advisable to use an additional layer of waterproofing.
For sealing purposes, a porous sealant is also laid between the lower valley strip and the tile sheets.
After installing the metal tile sheets, the joint of the internal corner is covered with another plank - the upper valley. It serves not only to drain water from the inner corner of the roof, but also gives the joints a decorative appearance. Therefore, the upper valley strip, as a rule, has a polymer coating that matches the color of the metal tile used.
The upper valley is placed at the joint of the inner corner and secured with self-tapping screws so that they do not pierce the middle of the lower valley plank. If this happens, the sealing of the joint will be broken, and accordingly, the roof will leak at the point of the breakdown. The gaps between the top strip and the metal tile profile are filled with a porous sealant.
The sequence of installation of the upper and lower valley strips and the nuances of their fastenings are shown in the video:
Element #5. Junction strips
They are used at the junctions of the roof with other surfaces, for example, with a chimney, wall, ventilation shaft, parapet.
The junction strips, depending on their location relative to the roofing sheets, can be upper or lower.
The bottom strip has the shape of a corner with bent longitudinal edges, which allow you to securely fix the part in a brick or concrete wall. The edges of the top bar are rolled.
Both options for junction strips are used when joining metal tiles to a chimney (bypass). To completely seal the joint, internal and external “aprons” are formed using these strips. The bypass arrangement is performed as follows:
- Apply a layer of waterproofing 50 mm (minimum) to the walls of the pipe, the sections are fixed to the pipe with adhesive tape.
- Installation of the internal “apron” begins from the bottom of the pipe. The lower junction strip is applied to the pipe wall, and the line of its upper edge is marked.
- A groove about 15 mm deep is cut along the intended line so that it turns out to be slightly beveled upward (to create a barrier from moisture). Act carefully so as not to catch the seams in the brickwork; cutting grooves in the seams is strictly prohibited!
- The bent edges of the internal junction strips are inserted into the groove and the connection is sealed with a heat-resistant sealant.
- A “tie” is placed under the inner apron from below - a kind of trough made of a steel sheet with curved edges (flanging). It is led either to the valley or to the cornice. This detail will allow water trapped between the flashing and shingles to flow down the slope.
- The planks are fixed to the sheathing and pipe wall with self-tapping screws.
- In the same way, the junction strips are mounted first to the side walls of the pipe, and then to its upper part.
- Metal tile sheets are mounted on top of the inner “apron” of the contour.
- The upper joint strips are secured in the same order as the lower strips. And they are mounted in the same way, with the exception of placing the upper edges into grooves. The outer apron is, to a greater extent, a decorative element that masks the cuts of the tile sheets.

The connection to the wall is done in the same way:
- Place the waterproofing on the wall 50 mm upward.
- Place a top strip on the wall and mark its top edge. A groove is cut along the line.
- The upper edge of the junction strip is inserted into the groove, and the groove is sealed with sealant.
- The bottom shelf of the plank is secured to the sheathing and wall with self-tapping screws.
- The gaps between the plane of the strip and the profile of the metal tile are filled with a sealant - universal or self-expanding.
Item #6. Snow guards
Snow guards are barrier products that serve to prevent snow layers and ice from falling off slopes. They retain snow masses, which can become dangerous for people and animals, and also lead to damage to property (cars, for example).
The following types of snow retainers are used for metal tiles:
Tubular barriers consist of brackets fixed to the roof, through the holes of which 2 rows of pipes are passed. This is the most common type of snow guard.
Lattice products also consist of brackets, between which there are not just pipes, but lattice sections made of pipes or angles.
Corner snow barriers are rigid barriers in the form of corners made of bent steel sheets. They are used for roofs with a small slope angle – up to 30°.

When installing tubular systems, proceed as follows:
- Determine the position of the snow retainers on the roof. This is done first, at the stage of installing the sheathing, since reinforced sheathing is required under the brackets.
- The brackets are fixed in the deflection of the tile waves and secured with long screws to the sheathing. The distance between the brackets is 0.5-1 m.
- Pipes are installed in the holes of the brackets, the ends of which are closed with plastic plugs. To set the required length, the pipes are connected to each other with bolts.
- If the length of the slope is more than 5.5 m, a second row of snow stops is installed, at a distance of 2.5-3.5 m from the first.
The installation of lattice systems is carried out in a similar way, only lattice sections are inserted between the brackets instead of pipes.

To install corner snow guards:
- A lining corner is mounted on the metal tile, fastened to every second crest of the wave, which serves for a more durable fit of the snow stop.
- The corner barrier is installed on top of the backing corner and fixed to the metal tiles and sheathing with long self-tapping screws. The fastening is carried out through the wave, into every second ridge.
- If necessary, install a second row of snow guards.
We invite you to watch a video on installing snow guards:
It remains to add that, despite the high cost of most components for metal tiles, it is not worth saving on them. The use of high-quality additions ensures a decent appearance and durability of the roof, which allows less frequent repairs during operation and simplifies maintenance.
Wow, this was a useful read. I’m going to re-tile the roof, I’ve already purchased metal tiles, bought a ridge, but somehow I didn’t realize that I’d need strips to protect the joints from moisture and dirt. Again, it’s good that it’s written down which strip should be installed at what stage of the work. Logically, you can guess, but rather than rack your brains, it’s better to figure out the sequence of work in advance. But I can most likely manage without snow guards.
As far as I understand, all roofing elements do not have to be made of the same material. As for the aesthetic component, different elements should be painted in colors and shades that are compatible with each other. In practice, as for me, the main thing is high-quality snow holders, since they are most directly related to safety.
Review of additional elements for installing metal roofing
In order for a roof made of a modern metal profile to have a neat and finished look, it is necessary to purchase components for metal tiles in advance. These are all kinds of corners, skates and other elements. The components not only make the covering a single whole and perform a decorative function, but also as a result prevent moisture, debris and dust from getting between the profile sheets, forming strong metal roofing units. This means they prevent the destruction of the entire roof over time. Read about the types of additional elements and their purpose on the roof in the material below.
Types of additional components for metal tiles

If you are interested in metal roofing elements, then it is worth knowing that the very first of them is the ridge strip. This element is designed to join two roof slopes at an angle and in the same plane. That is, the ridge forms a logical completion of the roof at its very top.
Modern profile manufacturers offer ridge strips in the following shapes:
- Radius ridge (semicircular). In most cases it is used on metal tile roofing. Can have a radius from 70 to 125 mm.
- Trapezoidal skate. It is universal and can be used on any roof.
- Figured horse. It also harmonizes perfectly with any other roofing material.
Important: for a figured and trapezoidal ridge, the offset of one wing can vary between 150-300 mm depending on the roof configuration and the slope angle of the slopes. Moreover, regardless of the shape of the skate, its length is always 2 m.
However, the ridge is not the only main element of the peak part of the roof. To completely complete the ridge assembly, you need to purchase the following components:
- T-shaped and Y-shaped adapter. The first one is necessary for connecting the ridge strips on a hip roof, and the T-shaped one is intended for perpendicular connection of the hip roof strips.
- Cap for ridge strip. This element applies only to the semicircular ridge. In this case, the plug can have a flat, conical or tent-shaped appearance. Such mesh plugs prevent birds, as well as debris or dirt, from entering the existing space under the roof.
- Sealant-backing for metal tiles. Provides a tighter fit of the metal profile to the roof and prevents it from rattling in the wind. In addition, it performs a waterproofing function.

Such an element of metal tiles is necessary if the roof has a broken configuration. Valley planks are laid in the inner (negative) corners of the roof. Such a fragment of the roof is designed to absorb the flow of precipitation from two adjacent roof slopes and drain it freely into the drainage system. The valley looks like a plank curved at an angle inwards. There are the following types of valleys:
- Internal (lower). Designed for laying directly on the sheathing before installing the profile sheet. That is, it needs to be placed under the metal tiles. After installation of the roof it will not be visible. At the same time, it is important not to forget that when fixing the lower valley, a substrate for metal tiles should be used.
- Outer (upper) valley. It is installed on top of an already installed roof and performs a decorative function. It has the same configuration as the internal additional element for metal roofing.
- Figured valley. Acts as a top bar, but at the same time has an attractive appearance. Precipitation flows along it to a lesser extent than along the lower fragment.
Important: like the ridge, the valley strip has a standard length of 2 m.
End strip

It is often also called a wind bar. Such a fragment is attached to the gable part of the roof at the ends. As a rule, the wind strip has the form of a profile sheet bent along the length. The main function of the end strip is to protect the roofing material from possible disruption under gusts of wind. In addition, the wind strip protects the under-roof space from birds entering it and at the same time performs a decorative function. The length of the overhangs of such a plank can vary from 10 to 25 cm. At the same time, the length of the plank itself remains unchanged - 2 meters.
Tip: to visually complete the roof space, you can buy either a smooth wind strip or a more attractive embossed one.
This fragment, together with the cornice strip, forms a complete cornice assembly. The drip line is mounted along the gable board of the rafter system/sheathing in order to prevent drops of water from entering the tree when rainwater drains into the drainage system. The standard dimensions of the drip are 40-50x100-110 mm with a length of 2 meters.
Cornice strip

This fragment for a metal tile roof is also indispensable in the overall roof structure. In its form, it is a kind of ebb with a bend on it. This strip additionally protects the eaves boards from excess moisture and is mounted on a drip film. As a rule, the cornice strip has the following parameters for the cornice wing - 70x100 mm or 100x150 mm. The length of the product is also 2 meters.
Junction strips
Such roofing components allow you to combine the roofing covering and elements protruding on the roof, such as chimneys, protruding turrets, etc., into a single structure. The abutment strip prevents water from getting between the metal tiles and protruding roof fragments. In addition, such an element performs a decorative function and forms a roof space that is uniform in color and shape.
Snow guards

It is worth knowing that the components for metal tiles do not end with the above. Such a fragment as a snow retainer is no less important. Its main function is to delay the sudden sliding of layers of snow along the tiles to the eaves during its seasonal icing over time. Since the crust of snow can turn into a slightly icy crust under the sun, its sudden descent from the roof with some melting can cause damage to both the profile itself and the drainage system. That is, roughly speaking, if a block of ice slides off the roof, it will not benefit the roof.
According to the form of execution, such elements for metal tiles can be:
- Pointed. They can be placed on the roof in a checkerboard pattern over the entire surface of the roof.
- Lattice. Simple lattice parts, snow guards, are mounted at the bottom of the slope.
- Tubular. They are placed in one line in the lower third of the roof slope.
Advice: you shouldn’t skimp on additional elements for metal roofing. Coating components that are not technically completed will eventually lead to the destruction of the entire coating. And these are more significant costs than purchasing components for the roof.
Additional elements for metal roofing
When purchasing metal tiles, you should especially carefully select additional elements for a metal tile roof, because the quality of installation and durability of the roof depend on this.

When roofing a roof made of metal tiles, you should especially carefully select additional elements, because the quality of installation and the durability of the roof depend on this.
Additional elements for metal tiles are special roofing parts that are installed at joints and transitions to enhance the reliability of the roof in such places.
Additional components for the roof - an end strip, lower and upper valley strips, a semicircular or flat ridge, an abutment strip, eaves and snow-retaining strips.
End strip
End strips for metal tile roofing serve to protect its internal layers from dust, dirt and weather precipitation. Its additional function is decorative; the strip can be of any size and shape. On the outside, the end additional element has a special anti-corrosion coating.
Structure of a metal tile sheet.
The use of end strips allows you to increase the service life of the roof and protect structures from the aggressive influence of external factors. End strips protect the gables from the wind. The absence of wind bars on the roof in windy weather can lead to the destruction of the roof.
The end strip is installed after the final installation of the metal tile roof, but before installing the ridge. Secure it with wood screws with rubber seals every 45-55 cm.
The planks are mounted overlapping with a pitch of 100 mm and in such a way that the upper crest of the wave of the tile sheet is closed and rainwater does not fall on the roof.
Semicircular and flat skates are most often used. They are installed at the junction of slopes for two- and four-slope surfaces. Plugs are installed at the ends of the skates. They protect the under-roof area from moisture, debris and snow.
Lower and upper valley strips
Additional roofing elements (valleys) protect the internal corner formed at the joints of the roof slopes. With the help of a valley, precipitation is removed from the roof surface. But despite all the usefulness of the valley, it significantly loads the roofing system, so its installation should be carried out very carefully and the assembly must be sealed efficiently.
The upper valley strip has a decorative function and gives the roof an aesthetically attractive appearance. Installation of the upper valley completes the external design of the roof. The lower strip is installed at the joints that form a negative angle. The main function of the lower valley is to protect the attic from moisture.

Scheme of additional elements.
The bottom strip is installed before laying roofing materials. The ideal material for valleys is galvanized steel. The use of galvanized steel valleys increases the service life of the entire roof.
Valleys are of the following types:
The difference between them is in the contact, connection and interweaving of pitched roofing structures.
Features of installation of the valley assembly:
- installation of sheathing in the form of a continuous structure on both sides of the roof slopes;
- laying waterproofing over a wooden gutter to protect the under-roof space from moisture;
- making an overlap of 10 cm between the valley strips for surfaces with horizontal joints, and for flat roofs an additional layer of waterproofing is performed;
- A self-expanding seal is installed under the metal tile;
- valleys of intertwined and closed forms are installed on roofs with steep slopes;
- When installing an open-type valley, an additional layer of waterproofing may not be installed.
Tools for roof installation

Installation of roofing material.
The following tools are used to install the roof:
To install the roof you need:
- self-tapping screws with rubber seals;
- wooden beam for the valley;
- waterproofing materials (valley carpet with bitumen impregnation).
Skate bar
The roof ridge is the upper edge of the roof; its main function is to provide ventilation and remove air from the under-roof space and create normal conditions for the operation of the roof. It is made from a metal sheet of rectangular profile with flanged edges. To install it, you must select the following accessories:

Roofing diagram.
The ridge is made from roofing material and practically does not stand out on it. Ridge accessories provide it with tightness. An additional function of the ridge strip is decorative. The element covers the junction of the slopes.
Skates come in several varieties (depending on the type of roof). Main varieties:
Junction strip. The final stage in the construction of the roof is the installation of abutment strips. This element is installed after attaching the roofing sheets and wind strips. The abutment strip fixes the valley carpet on a vertical plane and closes the joints at the junction of the roofing sheets with the chimney and ventilation ducts.
When installing a ridge under a metal tile, use a ridge strip and a sealant under it.
The seal prevents debris and precipitation from getting under the roof. It should follow the configuration of the roof, which will ensure good sealing of the space under the roof. Seals are available in the following varieties:
- universal, made of polyurethane film;
- profile, made of foamed polyethylene;
- self-expanding, material - polyurethane foam with polymer impregnation.
The construction of the skate is carried out in stages:
- checking the evenness of the junction line of the slopes, the curvature should not exceed 20 mm;
- installation of seal;
- installation of plugs for semicircular skates;
- fastening the planks begins from the end;
- for metal tiles, the ridge is fixed at the same level with the outermost sheet of the roofing surface;
- Constant monitoring of correct installation ensures the quality of the roof;
- Correct and reliable screwing of the screws will ensure a long service life of the roof.
Cornice strip. The eaves strip is designed to protect the front eaves boards. It is an oblong product made of the same material from which the roof is made. Installation of the plank begins after securing the front board.
Sometimes they use a board with fastenings on the rafters in special grooves. The eaves overhang is hemmed with tongue and groove boards or corrugated sheets. The second support is a support beam, which is attached to the wall of the house. Before installing the cornice strip, brackets for gutters are attached to the cornice board or rafters. The plank is secured with self-tapping screws, the distance between them is 30-35 cm. The eaves elements are installed before installing the metal tiles.
There are lower and upper joining strips. Much attention is paid to the installation of the top strip, since it covers the joint on the back side of the pipe and serves as an obstacle to precipitation. To attach the plank to the wall, a horizontal groove is made into which the upper part of the plank is inserted. The upper strip is inserted under the roofing material, and the lower element is left above the surface and screwed to the pipe with self-tapping screws.
Snow barrier. Several types of snow guards for roofs are available:
- yokes;
- snow-retaining log;
- tubular;
- lattice, solid, network;
- corners with stops.
Snow guards are installed in a checkerboard pattern. The number of slats is calculated based on the average amount of snow falling in winter. Experts recommend installing one row of elements on each slope, along the entire perimeter.
Additional elements for metal roofing: dimensions, description (video)
When purchasing metal tiles, you should especially carefully select additional elements for a metal tile roof, because the quality of installation and durability of the roof depend on this.
Additional elements are an essential part of a metal roof. They are designed to ensure the tightness of adjacent parts, as well as to prevent any debris, dust, insects, etc. from getting under the roof. Additional elements may be needed for the ridge, cornices, gable edges, valleys, internal corners, and pipe passages. In this article we will talk about components for metal roofing, that is, additional elements.
What components are needed
Extensions are galvanized steel strips installed where the roofing material is joined, as well as in transition areas. These products most often have a length of 2 m, and their thickness ranges from 0.4 to 0.7 mm. The width varies quite a lot, and is determined by the dimensions of the mounting shelves used. The additions can be coated with polymers to match the color of the metal tiles, which leads to a slight increase in price, however, such material becomes much more beautiful.
Often, when connecting ridges or upper valleys that are in a visible place, it is polymer-coated products that are installed. They fit best into the overall picture, complementing the color of the tiles. Naturally, if there is an overlap of the joints under the sheets of metal tiles, then in this case we are not talking about decorativeness.

For example, for the lower crowns it is more advisable to install simple galvanized strips without coating. This way you can save some money and still ensure a sufficient seal.
There are the following components for a metal tile roof:
- cornice strip;
- wind bar;
- skate;
- valleys;
- abutment strips;
- snow retainers.
It is worth considering each component in detail.
What is a curtain rod
This product is nothing more than a steel corner used to decorate the lower part of the roof along the entire length of the eaves. The eaves strip is necessary to protect the eaves board from water, as well as to drain it if it is under the roof. One more point - it is necessary so that the cornice line takes on a finished look.

Install such a strip before laying the metal tiles, but after installing the drainage system. The mounting shelf is secured to the sheathing on top of the gutter holders. To do this, you will need galvanized screws, which are screwed in at intervals of 30 cm. For the entire cornice, you will need several of these strips, connected to each other with an overlap of 5-10 cm.
Pediment (wind) strip for metal roofing
This bar is also made in the form of a corner. are carried out along the entire length of the gable overhang to protect the ends of the sheathing and the space under the roof from moisture, various debris, birds and insects, as well as from the effects of wind.
The end strip is attached at the very end of the roofing work, on the metal tiles. Installation is carried out from top to bottom, overlapping the ends of the sheets of roofing material. This one is screwed on with self-tapping screws, which are screwed in every 50-60 cm with an overlapping length of 10 cm.

It is worth making sure that the end strip touches the upper ridges of the roofing material, slightly overlapping them. Thus, by installing a windbreak on the roof, you can protect the bottom of the metal tile sheet from moisture. In addition, the material will stop rattling when exposed to strong winds. To obtain a tight fit, the edges of the roofing material can be slightly bent upward.
The purpose of the roof ridge
Another component for metal tiles is the ridge. A ridge strip is necessary to bridge the joint between sheets of roofing material. Such a joint is formed along the ridge line when connecting the slopes. The ridge is necessary to prevent the penetration of moisture under the roof, various debris, birds and insects. In addition, it is an element of the ventilation system - it supplies air through the ventilation gap under the sheets of metal tiles. This ensures ventilation of the roof components.

There are round and straight ridge strips. The first type requires the installation of conical or flat semicircular plugs.
During the installation of the ridge strip, gaps inevitably appear between the ridges of the roofing material and the fastening shelves. Manufacturers of metal tiles advise sealing them with insulation. However, this approach impairs ventilation. To eliminate this problem, you can install auxiliary pitched or ridge point aerators.

The sealing material is glued to the ridge strip or roofing sheets. Next, install the bar, securing it with self-tapping screws to the top of the wave. Fixation can also be done through the lathing.
The extension of a straight ridge is done by an overlap of 10 cm. The connections of the round ridge strips are made using stamping lines.
Some information about valleys
The complete set of metal tiles with valley strips is necessary to seal the internal corners of the roof. They are a kind of gutter-tray, which is formed inside the corner of the roof along the slope. During the operation of the roof, it will support very large loads resulting from the accumulation of snow precipitation, as well as during heavy rains.
The lower valley has wide bent strips, the angle of which is determined by the conjugation of the slopes. Its installation is carried out before laying the metal tiles.

The planks are fastened to a continuous sheathing assembled from 150×25 mm boards. First of all, waterproofing is laid on the sheathing, after which the lower valley strip is secured with self-tapping screws every 30 cm. In this case, the individual elements are joined to an overlap of 10 cm.
If at the junction of the slopes there is an almost flat angle, it will be somewhat more difficult to seal it. For sealing, you can use porous insulation.

After the sheets of metal tiles are laid, another plank is installed over the formed joint of the internal corner - the upper valley. It is necessary to get rid of water from the inside of the roof corner. The plank also makes the joints presentable. In this regard, the material from which the upper valley is made must have a polymer layer of the same color as the metal tile sheets.
The upper valley is placed on the end of the inner corner and secured with self-tapping screws so that they do not pass through the middle of the lower valley strip. Otherwise, the tightness of the connection will be compromised, and the risk of leaks will significantly increase. The gaps formed between the top strip and the roofing are covered with porous insulation.
Junction strips are an indispensable accessory
Such components for Monterrey metal tiles are installed where joints between the roof and other surfaces are formed - a chimney, a wall, a ventilation shaft and parapets.
Based on the locations in relation to the sheets of roofing material the abutment strips will be installed, they can be upper and lower. The bottom strip is made in the form of a corner with inverted longitudinal edges, which makes it possible to qualitatively fix the element in a wall made of concrete or brick. The top bar has rolled edges.
Both types of junction strips are used in places where sheets of metal tiles meet the edge. To obtain maximum joint tightness, internal and external aprons are created using such strips.

The contour is made in this way:
- Lay a layer of waterproofing, making sure that it extends more than 5 cm onto the pipe wall. The sections are attached to the pipe using adhesive tape.
- Proceed to installing the inner apron from the bottom of the pipe. The lower junction bar is applied to it, and a line is drawn.
- Along this line, a slightly beveled upward groove is made to a depth of approximately 1.5 cm. At the same time, make sure that all actions are carried out with the utmost care so as not to damage the seams in the brickwork. Making grooves between bricks is strictly prohibited.
- After this, the curved edges of the internal abutment strips are inserted into the groove, and the seam is sealed with a heat-resistant sealant.
- From below, under the inner apron, a “tie” is placed. It can be connected both to the valley and to the cornice. This element will allow water trapped between the apron and the roofing to flow down the slope.
- The planks are fastened to the sheathing and pipe walls using self-tapping screws.
- In the same way, the abutment strips are secured to the side and top of the pipe.
- Roofing sheets are installed on the inner apron.
- The upper and lower abutment strips are fixed in the same sequence. The external apron, by and large, has a decorative purpose and is necessary to hide the cuts of metal tile sheets.

The connection to the wall is made in the same way:
- Place the waterproofing material on the wall 5 cm upward.
- Place the top strip on the wall and make a mark along its top edge. After that I make a groove along it.
- The upper edge of the adjacent strip is inserted into the groove, after which the groove is sealed with sealant.
- Take self-tapping screws and use them to sew the bottom flange of the plank to the sheathing.
- The gap between the plank and the roofing material is closed with a sealant.
Snow guards
Accessories for metal tiles such as snow retainers are barriers to prevent snow and ice from falling off the roof.
Snow guards come in tubular, lattice and corner types.
Tubular products are brackets that are attached to the roof. Two rows of pipes are passed through the holes in them. This type of snow retainer is used most often.
Lattice types also have brackets, between which there are not pipes, but lattice elements made of pipes or angles.

Corner barriers are made in the form of rigid steel curved corners. Used in places where slopes have a slope of up to 30°.
Installation of tubular snow retention systems is carried out in the following sequence:
- Calculate the placement of barriers on the roofing material. This must be done at the stage of installation of the sheathing.
- The brackets are fastened at the bottom of the wave using self-tapping screws. The gap between the brackets varies and ranges from 50 to 100 cm.
- Pipes are threaded through the holes in the brackets, after which they are terminated with plastic plugs.
- If the length of the slope exceeds 550 cm, then install a second row of snow barriers, maintaining a distance of 250-350 cm from the first.
The same method is used to install lattice systems.

Corner snow guards are mounted in this way:
- An underlay carpet is installed on the sheets of metal tiles, and the fastening is carried out at every second top of the wave.
- The snow retainer is attached to the lining corner using long self-tapping screws. They are screwed through the wave, at its highest point.
- If required, install an additional row of barriers.
Finally, it is worth noting that, despite the high price of a larger number of components for metal tiles, it is advisable not to save money on them. If you use high-quality additions, this will not only give your building an ideal appearance, but will also make the roof as durable as possible, so that during its operation you will spend a minimum of time on its maintenance.
The popularity of metal roofs is explained by their reliability, durability and beautiful appearance. Additional elements used for metal tiles differ in their shape, size and purpose. They are necessary to protect against dust and moisture getting under the roof, and also allow you to decorate the roof and give it a finished appearance. For the manufacture of metal roofing elements, the same materials are most often used as for the main covering.
The main elements of a metal roof
In order for a metal tile roof to serve for a long time and reliably protect the roof and house from the negative effects of external factors, all joints, abutments and eaves must be covered with special elements. They are usually made of the same material as the main covering, and not only protect the roof from leaks, but also significantly improve its appearance.
Additional elements allow you to increase the tightness and durability of the roof, as well as give it an aesthetic and finished look
When creating a roof made of metal tiles, it is imperative to use additional elements that allow you to solve the following problems:
- increase the strength and tightness of the roof at the joints;
- hide the joints and give the coating an aesthetic appearance;
- protect the under-roof space from moisture, dust and debris;
- give the roof the necessary performance characteristics, thereby increasing its durability.
Construction stores offer a large selection of additional elements for metal roofing, which allow you to equip a roof of any complexity.
Additional elements for metal tile roofing are usually made of galvanized painted steel. When purchasing them, you can save money, for example, by using a product made of ordinary galvanization for the lower valley, and a polymer-coated part for the outer valley.
Those elements that are located in plain sight must have a polymer anti-corrosion coating and correspond to the type of the main roof. This way you can not only ensure the tightness of the roof, but also make the roof beautiful and attractive.
In order for a metal tile roof to serve as long as possible, all joints and joints must be covered with additional elements
Gutter holders
Gutter brackets can vary in type and size, as well as the material from which they are made. Gutter holders can be made of plastic or galvanized iron with a protective polymer coating. Usually they are chosen to match the gutters, but they can also be of a contrasting shade - it all depends on the preferences of the owners.
There are three main designs of gutter holders:
- Long - have an elongated mounting strip, mounted to the rafters or sheathing before laying the main covering.
- Short ones also have the form of a hook, the mounting base of which is combined with the rear part. Such brackets are usually installed after laying the roofing material and are attached to the front board or to the ends of the rafters.
- Universal - they are collapsible elements with a short holder and a removable strip, so they can be used at any stage of creating a roof.
The correct choice of holders eliminates unnecessary actions and costs during their installation. For example, if a roof is being repaired, it is better to use short or universal holders. When constructing a new roof structure, preference should be given to long hooks, as they provide a stronger and more reliable fixation of the gutters.
The method of attaching brackets for gutters should be selected based on the capabilities provided by the roof structure
It is better to purchase gutters and brackets for attaching them in one place and at once. The installation step for metal holders is 50–60 cm, and for plastic ones – 30–35 cm.
Gutter for water drainage
A metal roof, like any other roof, will not function properly without gutters. These elements serve to collect and drain melt and rain water from the roof surface.
Gutters vary in the material they are made from. For a roof covered with metal tiles, gutters made of:
- Metal. This is the most popular option, as they not only reliably drain water, but also have high strength, rigidity and durability. Such elements have a special coating that protects them from the negative effects of aggressive environments, so with proper use they will last 30 years or more. The disadvantage of metal products is their heavy weight.
- Plastic. They combine beautifully with both metal tiles and other types of roofing, are not afraid of corrosion and are light in weight. They also have disadvantages: they make a lot of noise and can crack when water freezes.
According to the cross-sectional shape, gutters can be:
- round;
- oval;
- square or rectangular.
If your climate zone has little rainfall, then you should not purchase wide rectangular gutters. A universal solution is considered to be round products, the diameter of which is determined taking into account the region of construction.
Most often, round gutters are used on country houses, the diameter of which depends on the region of construction.
The eaves strip is necessary to protect the front board from moisture. It is located under the edge of the metal tile and is installed on the finished sheathing immediately before installing the finishing coating. This part of the roof is usually chosen to match the color of the main roofing material, but sometimes people who prefer unexpected solutions install contrasting additional elements that sharply distinguish the building from a series of similar structures.
For the manufacture of cornice strips, steel sheets with a thickness of 0.4–0.5 mm are used. Plastisol or polyester is usually used as a coating. The standard length of the planks is 50–60 cm, their number is calculated based on the size of the roof and the amount of overlap.
The cornice strip is attached to the front board with self-tapping screws, which are screwed in in increments of 30–35 cm.
The eaves strip is attached to the front board with an inclination towards the gutters
Another additional element is the junction strip. It is necessary to ensure insulation of the roof in places where it adjoins pipes, ventilation shafts, parapets, etc. This element performs an important protective function; it creates a tight and reliable connection through which water cannot penetrate into the under-roof space.
There are two types of junction strips: upper and lower. The lower strip is mounted under the metal tile, and the upper one is mounted above it. In addition, such elements can be straight, having an obtuse, acute or right angle of conjugation.
The junction strip is installed at the exit points of chimneys, ventilation shafts and similar elements
The abutment strips are made from sheet steel; they are usually matched in color with the base coating. Fastening is done using self-tapping screws with sealing washers. For additional sealing, sealant or special seals are used.
Valley roof
The end strip protects the edges of the sheathing and the under-roof space from moisture and gusts of wind and gives the building a finished look
A metal tile roof protects the house well, but this material does not “breathe”, so it is necessary to provide high-quality ventilation of the under-roof space. To do this, ventilation outlets are installed that look like small chimneys.
Ventilation of the under-roof space can be continuous or targeted. The organization of continuous air exchange is carried out before laying the tiles. When using spot ventilation, air flows are directed to specially equipped outlets, which are installed on the roof next to its ridge.
For a roof with an area of up to 60 m2, one ventilation outlet will be sufficient; for larger roof sizes, several will be required. When the roof has a complex shape, ventilation outlets must be installed near each ridge.
The ventilation outlet must be installed at a distance of at least 0.6 m from the roof ridge
The installation location of the ventilation outlet is chosen at the discretion of the owner, but in any case it should be no further than 60 cm from the ridge. It is not recommended to install two such elements on one sheet of metal tiles.
When choosing a ventilation outlet, you need to pay attention to the following points:
- The profile of the ventilation outlet cover must correspond to the profile of the roofing material;
- the colors of all roof ventilation elements must match;
- The kit must include fasteners, a template and overlays;
- the larger the pipe diameter, the greater the throughput of the element, but also the higher its cost;
- the presence of additional functions (this may be a built-in level that simplifies the installation process, a mechanical or electric fan) affects the ease of installation of the element and its price.
Video: ventilation outlet for metal tiles
Sewage outlet for metal tiles
If the house has a sewer system, it is necessary to provide for its ventilation, for which a drain pipe is installed. It is a continuation of the riser and leads to the roof. You cannot combine the exhaust pipe with the ventilation system of the house, and it is also strictly forbidden to combine it with the chimney.
Sewage outlets installed on metal roofs are usually made of plastic and have a deflector that allows air to be removed more efficiently. There are sewer outlets with a built-in electric fan. The installation of these elements is carried out in the same way as ventilation outlets.
The sewer outlet must not be installed close to windows or balconies.
Output for antennas and electrical cables
If it is necessary to install an antenna in places where wires pass through the roof, it is necessary to ensure tightness, for which special outlets are used.
Pass-through elements are universal and can be used for both metal tiles and other coatings. They are made of elastic material, so they retain their shape and provide tightness under both mechanical and thermal influences. The antenna or cable output retains its properties at temperatures from -55 to +135 °C.
The outlet for the antenna or electrical cable has a soft base that takes the shape of the metal tile profile and ensures a tight connection
There is a large selection of sizes of pass-through elements, so they can be selected for cables of any diameter. The flange of such outlets is made of soft material; it can take the form of metal tiles, corrugated sheets or other covering.
Table: diameter of passage elements depending on their markings
Features of metal tiles as a roofing covering
Metal tiles are one of the most popular and affordable roofing materials. The full width of the standard sheet is 118 mm, the usable width is 110 mm, and the length can vary from 0.5 to 8 meters. For the manufacture of metal tiles, steel with a thickness of 0.4–0.5 mm is used, and the thicker the sheet, the longer its service life and the higher the cost.
The service life of a metal tile roof is more than 60 years, it is non-flammable, durable, reliable and beautiful. Thanks to the wide variety of colors, this material can be used in any design projects. Metal tiles do not require a large roof slope, only 14 degrees is enough, so it is used on single-pitched, gable and other types of roofs.
The metal tile sheet is treated with several layers of protective coating, which ensure durability and a presentable appearance of the material.
For the manufacture of metal tiles, galvanized or galvanized aluminum steel with a polymer coating is used; copper sheets are less commonly used. This is a lightweight covering, a square meter of which weighs between 3.8–4.8 kg, so it does not require a massive rafter system and sheathing, which saves money.
To more reliably protect the sheets, they are covered from below with a layer of varnish 7–10 microns thick, and on top with a layer of polymer 20–200 microns thick, which can be used as:
- Polyester. This is the most common and cheapest polymer, which can be glossy or matte, tolerates temperature changes well, but is afraid of mechanical damage.
- Pural. It has significantly higher strength than polyester, so it is not afraid of damage from snow or ice, withstands chemical influences well and can be easily dyed if necessary.
- PVC based plastisol. The thickest and most durable coating that has an embossed surface, so the material treated with plastisol is more reminiscent of natural tiles.
Table: comparison of characteristics of various metal tile coatings
| Coating | Polyester | Matte polyester | Plastisol | Pural |
| Surface | smooth | smooth | embossing | smooth |
| Coating thickness, microns | 25 | 35 | 200 | 50 |
| Primer thickness, microns | 5–8 | 5–8 | 5–8 | 5–8 |
| Thickness of protective varnish (back side), microns | 12–15 | 12–15 | 12–15 | 12–15 |
| Maximum operating temperature, °C | +120° | +120° | +60–80° | +120° |
| Color fastness | **** | **** | *** | **** |
| Resistance to mechanical damage | *** | *** | ***** | **** |
| Corrosion resistance | *** | **** | ***** | ***** |
| Weather resistance | *** | **** | ** | **** |
Based on the combination of properties, the best coating for metal tiles is pural.
The main disadvantage of metal tiles is their noise during rain and low thermal insulation performance. Therefore, a roof made of this material must be heat and sound insulated.
Video: what kind of metal tiles do you need
Lightning protection is a mandatory element for a metal roof. Lightning rods are connected through bends to grounding conductors using a welded or bolted connection. The presence of lightning protection allows you to reliably protect the house and all its residents from damage by discharges during a thunderstorm. If this is not done, then a lightning strike that hits the roof can create burns in it, as a result of which the roof structure can catch fire.
Lightning rods can be mesh, cable and rod types. Their choice depends on the height of the building, the presence of tall trees and buildings nearby, but the main factor is the thunderstorm intensity of the area.
The most common type of lightning protection is a lightning rod in the form of a rod, which is connected to a grounding conductor through current conductors.
Most often, a metal rod is mounted as a lightning rod, which is attached to the highest point of the roof; a conventional metallized cable is used for the current conductor. For a metal roof, you can simply attach two wires to each slope and ground them. For a one-story house, the ends of the wires are dug into the ground to a depth of 1.8–2 meters. This protection option is only suitable if there is a layer of non-combustible materials between the roofing metal sheets and wooden elements.
Special catchers can be installed on a metal roof, the thickness of which should be 4 times the thickness of the metal tile. For every 10 m2 of roof, it is recommended to install one catcher measuring 80x80 cm. However, it should be taken into account that such a design spoils the appearance of the roof.
One of the biggest disadvantages of metal tiles is its low sound insulation. During heavy rain, noise will be heard in the attic and even on the first floor of the house. To make living in such a house comfortable and safe, it is necessary to properly soundproof a metal roof.
The main causes of noise:
- improper installation of the sheathing, when boards of different thicknesses were used, which is why it was not possible to achieve a tight fit of the metal tile sheets;
- insufficient number of fastening elements, which is why it was not possible to achieve the required rigidity of the metal tile. For 1 m2 of metal tiles you need to screw in 8 screws;
- small roof angle - the smaller it is, the greater the noise.
To ensure the maximum level of sound insulation of a metal tile roof, the following measures must be taken:

To ensure sound insulation, you can use any materials with a sound absorption coefficient greater than 0.4. For example, for mineral wool it is 0.7–0.95.
Ridge for metal tiles
The ridge strip is located at the very top of the roof and protects the junction of the slopes from the penetration of water and foreign objects
To ensure maximum tightness, before installing the ridge strip, seals are installed at the junction of the slopes. They can be self-expanding, profile and universal. The ridge strip can be straight, semicircular or mortise.
It is best to purchase metal tiles and additional elements from one manufacturer. Installation of the ridge involves the use of the following elements:
- ridge strip;
- lightning rod holder;
- ventilation tape;
- sealant;
- fastening elements.
Installation of a ridge for metal tiles
To perform the above work you will need:
- fasteners with rubber washers;
- safety rope and ladder to securely secure to the roof;
- mounting belt;
- screwdriver;
- ridge strip.
It will be inconvenient to carry out these works alone, so you must invite an assistant. Installation of the ridge strip is carried out in the following sequence:
- Check the connecting line of the slopes for evenness. An error of no more than 2 cm per meter of length is allowed, otherwise it will not be possible to install the skate properly.
- Regardless of the width of the ridge strip, seals are installed at the place where it adjoins the roofing to protect the under-roof space from moisture.
Ridge strips are installed with an overlap of about 5–10 cm
How to attach a ridge to a metal tile
When fixing the ridge strip to the metal tiles, you must use self-tapping screws with a rubber head. They are installed on the crest of the wave. Self-tapping screws cannot be screwed tightly and installed very often or, conversely, rarely. If fasteners are installed frequently, the ridge strip will begin to bend in a wave. If they are placed sparsely, the skate will not fit tightly and flapping. It is necessary to choose the optimal middle at which the ridge strip will sit tightly and evenly. This is done experimentally, checking after some time the evenness and reliability of fastening the additional element to the roof surface.
Video: attaching a ridge to a metal tile
Despite the fact that the cost of metal tiles is quite affordable, the price of the additional elements used will be significant. Experts do not recommend saving on them, since only the correct use of high-quality additions will make it possible to create a durable and beautiful roof that will reliably protect your home for many years.
In order for a roof made of a modern metal profile to have a neat and finished look, it is necessary to purchase components for metal tiles in advance. These are all kinds of corners, skates and other elements. The components not only make the covering a single whole and perform a decorative function, but also as a result prevent moisture, debris and dust from getting between the profile sheets, forming strong metal roofing units. This means they prevent the destruction of the entire roof over time. Read about the types of additional elements and their purpose on the roof in the material below.
Horse
If you are interested in metal roofing elements, then it is worth knowing that the very first of them is the ridge strip. This element is designed to join two roof slopes at an angle and in the same plane. That is, the ridge forms a logical completion of the roof at its very top.
Modern profile manufacturers offer ridge strips in the following shapes:
- Radius ridge (semicircular). In most cases it is used on metal tile roofing. Can have a radius from 70 to 125 mm.
- Trapezoidal skate. It is universal and can be used on any roof.
- Figured skate. It also harmonizes perfectly with any other roofing material.
Important: for a figured and trapezoidal ridge, the offset of one wing can vary between 150-300 mm depending on the roof configuration and the slope angle of the slopes. Moreover, regardless of the shape of the skate, its length is always 2 m.
However, the ridge is not the only main element of the peak part of the roof. To completely complete the ridge assembly, you need to purchase the following components:
- T-shaped and Y-shaped adapter. The first one is necessary for connecting the ridge strips on a hip roof, and the T-shaped one is intended for perpendicular connection of the hip roof strips.
- Cap for ridge strip. This element applies only to the semicircular ridge. In this case, the plug can have a flat, conical or tent-shaped appearance. Such mesh plugs prevent birds, as well as debris or dirt, from entering the existing space under the roof.
- Sealant-backing for metal tiles. Provides a tighter fit of the metal profile to the roof and prevents it from rattling in the wind. In addition, it performs a waterproofing function.
Endova

Such an element of metal tiles is necessary if the roof has a broken configuration. Valley planks are laid in the inner (negative) corners of the roof. Such a fragment of the roof is designed to absorb the flow of precipitation from two adjacent roof slopes and drain it freely into the drainage system. The valley looks like a plank curved at an angle inwards. There are the following types of valleys:
- Inner (bottom). Designed for laying directly on the sheathing before installing the profile sheet. That is, it needs to be placed under the metal tiles. After installation of the roof it will not be visible. At the same time, it is important not to forget that when fixing the lower valley, a substrate for metal tiles should be used.
- Outer (upper) valley. It is installed on top of an already installed roof and performs a decorative function. It has the same configuration as the internal additional element for metal roofing.
- Figured valley. Acts as a top bar, but at the same time has an attractive appearance. Precipitation flows along it to a lesser extent than along the lower fragment.
Important: like the ridge, the valley strip has a standard length of 2 m.
End strip
It is often also called a wind bar. Such a fragment is attached to the gable part of the roof at the ends. As a rule, the wind strip has the form of a profile sheet bent along the length. The main function of the end strip is to protect the roofing material from possible disruption under gusts of wind. In addition, the wind strip protects the under-roof space from birds entering it and at the same time performs a decorative function. The length of the overhangs of such a plank can vary from 10 to 25 cm. At the same time, the length of the plank itself remains unchanged - 2 meters.
Tip: to visually complete the roof space, you can buy either a smooth wind strip or a more attractive embossed one.
Kapelnik
This fragment, together with the cornice strip, forms a complete cornice assembly. The drip line is mounted along the gable board of the rafter system/sheathing in order to prevent drops of water from entering the tree when rainwater drains into the drainage system. The standard dimensions of the drip are 40-50x100-110 mm with a length of 2 meters.
Cornice strip
This fragment for a metal tile roof is also indispensable in the overall roof structure. In its form, it is a kind of ebb with a bend on it. This strip additionally protects the eaves boards from excess moisture and is mounted on a drip film. As a rule, the cornice strip has the following parameters for the cornice wing - 70x100 mm or 100x150 mm. The length of the product is also 2 meters.
Junction strips
Such roofing components allow you to combine the roofing covering and elements protruding on the roof, such as chimneys, protruding turrets, etc., into a single structure. The abutment strip prevents water from getting between the metal tiles and protruding roof fragments. In addition, such an element performs a decorative function and forms a roof space that is uniform in color and shape.
Snow guards

It is worth knowing that the components for metal tiles do not end with the above. Such a fragment as a snow retainer is no less important. Its main function is to delay the sudden sliding of layers of snow along the tiles to the eaves during its seasonal icing over time. Since the crust of snow can turn into a slightly icy crust under the sun, its sudden descent from the roof with some melting can cause damage to both the profile itself and the drainage system. That is, roughly speaking, if a block of ice slides off the roof, it will not benefit the roof.
According to the form of execution, such elements for metal tiles can be:
- Pointed. They can be placed on the roof in a checkerboard pattern over the entire surface of the roof.
- Lattice. Simple lattice parts, snow guards, are mounted at the bottom of the slope.
- Tubular. They are placed in one line in the lower third of the roof slope.
Advice: you shouldn’t skimp on additional elements for metal roofing. Coating components that are not technically completed will eventually lead to the destruction of the entire coating. And these are more significant costs than purchasing components for the roof.