Owners of country cottages and summer cottages very often think about building a swimming pool on their territory. However, an open-type pool requires constant maintenance and cleaning of various debris. In addition, very often climatic conditions allow the use of this structure for a fairly short time. Therefore, the most relevant and practical is to build an indoor pool, for example, right in a greenhouse.


Peculiarities
Caring for this structure is much simpler and easier; it can be used throughout almost the entire spring, summer and half of autumn. Many owners install special heaters in their pools, this allows them to use the structure in almost any weather. It should be noted that the construction of such a structure requires large financial costs, and not everyone can afford it.
Therefore, swimming pools in polycarbonate greenhouses have become an alternative option for many.

These closed structures have many advantages.
- A polycarbonate greenhouse can be purchased ready-made and in the required sizes. Therefore, installation will not take much time.
- The design reliably protects the interior space from prying eyes.
- You can use and enjoy the pool in almost any weather.
- Thanks to the polycarbonate coating, the water will warm up much faster and more evenly.
- Such a structure always provides protection from various insects.
- In the manufacture of this structure, environmentally friendly materials are used.
- The installation of the structure can be done by hand, which can significantly reduce financial costs.
- In indoor pools, much less water evaporates.
- The cost of these structures is quite affordable.
Absolutely all family members can use the pool; the polycarbonate coating will reliably protect against various precipitation and temperature changes. Thanks to the frame treated with special means, the design will delight you for many years.


Advantages of polycarbonate
Until now, glass has been a very popular material for covering the walls and roofs of greenhouses, but it is a very fragile material. The products were heavy, and glass has high thermal conductivity.
Thanks to the latest developments, a material such as polycarbonate has appeared with excellent technical characteristics:
- light weight;
- strength and reliability;
- transmits light well;
- the sun's rays are evenly dispersed inside the structure;
- due to the good flexibility and elasticity of the material, any shape can be created;
- increased resistance to precipitation and impacts;
- the material is absolutely waterproof;
- is resistant to mold and mildew;
- the material has increased fire resistance;
- easy to clean;
- has a long service life;
- a huge variety of models made using a rich color palette.


Forms and models of construction
The choice of a greenhouse for building a swimming pool must be approached carefully. High humidity in the structure implies the use of materials that have good resistance to corrosion and moisture.
Frames made of galvanized and stainless steel, aluminum, and polymer-coated steel profiles have improved technical characteristics and are resistant to various influences. It is not recommended to purchase frames made of wood and ordinary steel. These structures are susceptible to high humidity and have a short service life.
An important role when choosing a greenhouse is played by the shape of the product. It is necessary to choose a structure that can withstand significant loads during the winter period and strong winds.


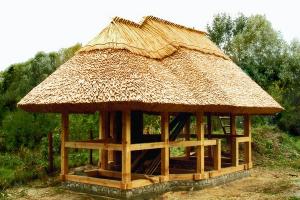
Greenhouses can take many different forms.
- Arch-shaped design. A distinctive feature of these models is their excellent aerodynamic properties. The most popular and widespread option, the shape of the product ensures unimpeded melting of the snow cover.
- For round pools Dome-shaped structures are often used. A stylish and interesting structure will decorate any garden plot. A distinctive feature of this design is its complex installation.
- Greenhouses with a pitched and gable roof. These structures are characterized by low resistance to precipitation in the form of snow and strong winds. The installation of these structures will not cause any particular difficulties; you can do it yourself.
- Asymmetrical designs. The frame of this greenhouse consists of one straight side wall and a semicircular one.
When choosing a particular design, it is necessary to take into account the parameters, all the features of the land plot and climatic conditions, the number of family members, etc.


Also, polycarbonate greenhouse designs are divided into two types.
- Low. These structures are mainly used to protect the pool from various debris. The structures are divided into two types: reclining and sliding.
- Tall. The height of the structure allows you to be inside the structure, walk, sit, and so on. In such structures you can install furniture and special heaters. The structure is equipped with doors.


Installation work
Pool
The parameters and dimensions of the pool should be selected individually. Models are divided into two types: recessed and surface-mounted. To avoid erecting high vaults over the pool, it is better to opt for in-depth models.
There are two options for installing a pool.
- The first option is to make a pool bowl with your own hands. To do this, you need to dig a pit. Its sizes are individual. Next, you need to install the formwork inside the pit, prepare a sand cushion and reinforcement. Then you need to pour the concrete. After it hardens, the surface is finished with tiles. This process of making an artificial reservoir takes a lot of time and effort.
- In this case, the pool bowl is selected and purchased at a specialized retail outlet. The modern market presents a huge range of different models of these products. They differ in size, shape and material from which they are made.


Models made of propylene are more popular. These products are distinguished by excellent technical characteristics, increased resistance to temperature changes and various mechanical and chemical influences. Products made from propylene can withstand soil movement; they are quite durable and reliable.
To install the bowl, you also need to prepare a pit. The dimensions of the pit should exceed the parameters of the bowl by about thirty centimeters.
Before lowering the bowl into the pit, you need to carefully compact the bottom and lay a layer of geotextile to avoid washing out the soil. Next, it is necessary to prepare a cushion of sand; only after all manipulations are completed, the bowl for the reservoir is lowered into the pit.


Greenhouse
You can install a polycarbonate greenhouse over the pool yourself, without involving specialists.
To do this, you need to select a greenhouse model that is suitable in shape and parameters, then all work is carried out in several stages.
- You need to pour the foundation using concrete and reinforcement. The depth of the foundation should be about fifty centimeters.
- Next, you need to assemble the structure, following the instructions exactly.
- After this, you need to carefully secure the frame to the foundation. To do this, use special bolted connections.
- Then you need to carefully secure all the arcs and stiffeners using special fasteners.
- After completing all the manipulations to secure the structure, the frame should be treated with special anti-corrosion agents and painted in the desired color.
- Upon completion of painting, you can begin covering the structure with polycarbonate, following the previously prepared drawings.
Outdoor recreation has always been particularly popular. But it happens that it is not possible to go somewhere to the sea or just run to the beach.
Still, the lack of time and reluctance to go back on foot are taking its toll. In this case, it is considered absolutely necessary to install an artificial reservoir on your private plot...
DIY polycarbonate frame pool
Outdoor recreation has always been particularly popular. But it happens that it is not possible to go somewhere to the sea or just run to the beach. Still, the lack of time and reluctance to go back on foot are taking its toll. In this case, it is considered absolutely necessary to install an artificial reservoir on your private plot, preferably a frame type. It can be exclusively summer - open. You can build a canopy over the pool, which will allow you to use it at any time of the year, under any weather conditions. In order to make your dream come true, you need to decide on the material from which the pool bowl will be created. It can be made from fiberglass, filled with concrete, or made into a polycarbonate pool with your own hands. The latter option is considered one of the best to use and convenient during the construction process.
A polycarbonate pool is very reliable, as it is resistant to bad environmental influences.
The polypropylene included in the material is resistant to chemical and biological influences of the external environment.
In this bowl, the cultivation of harmful microorganisms and the growth of algae is impossible. Therefore, a polycarbonate pool will last a long time.
Installing a small (4-5 m²) polycarbonate pool on a private plot will cost a relatively small amount: from 200 to 300 thousand rubles. Those who plan to make a polypropylene canopy over the pool bowl will have to spend even more money.

The construction of any frame pool begins with the selection of the area for it, its clearing and marking. The artificially created reservoir should not be too close to the house, so you will have to retreat 15 m from the main building on the site. Then make sure that the water surface is not covered from above by the crowns of any trees, because leaves falling into the water will clog it. Moreover, make sure that the place chosen for a polycarbonate pool is not located in a lowland, otherwise all rainfall and melt water will flow into the bowl, which will greatly spoil the object created for relaxation and aesthetic pleasure.
When you have already made the markings, you can begin to dig a pit. This must be done very carefully, especially for the walls of the pool, because the soil should be as smooth and dense as possible. Deepen the bottom 30-40 cm from the dimensions that you plan to have for the finished polycarbonate pool. If the soil in which you plan to build a pool is too heaving (includes clay and loam), then you will have to dig an even deeper pit. Indeed, during moments of snowmelt, highly rising groundwater can significantly damage, or even completely destroy, the object you have built.

Scheme of a polycarbonate frame for a swimming pool.
The pool frame must be strong enough and able to serve well for a long time. A good option would be well-dried pine lumber, pre-treated with an antiseptic that does not wash off.
To make the frame of the bowl, you will need:
- 10 bars 1.5 m each.
- Bitumen mastic.
- Edged board, the quantity of which depends on the height of the pool.
- Black, stainless steel screws.
- Screwdriver.
First, you need to treat the lower parts of the bars by about 50 cm with bitumen mastic. This is done so that this part, dug into the ground, is not exposed for a long time to either rotting or attack by wood-destroying pests. Then, these columns - bars - are dug in at the corners of the dug pit and in the spaces between them. During this work, you need to ensure that the horizontal level of the installed bars is the same. To do this, you need to stretch the fishing line between them and check the evenness using a hydraulic level.

Diagram of a polycarbonate pool bowl.
A layer of crushed stone and sand is poured into the bottom of the pit and compacted thoroughly. Then, right over this layer, you make a “skinny preparation”, which has the form of a cement-sand screed, the thickness of which is up to 100 mm. After it has dried, you can proceed to installing the rest of the pool frame. Along the perimeter of the bowl, begin to tie the posts together with edged boards, using self-tapping screws and a screwdriver. After this, when the frame is ready, you can proceed to installing the base of the pool.
It would be wise to use polycarbonate. The total area of which must be calculated based on the area of the existing frame at that time, because it is this that will need to be covered with polycarbonate. It does not allow water to pass through and is easily attached to wood using self-tapping screws. Polypropylene sheets bend easily, so you can make even a round-shaped bowl with your own hands without spending a lot of time covering the entire area of the pool. Those owners who do not trust this building material can lay awning fabric on a wooden frame, which does not allow water to pass through at all, and you can choose it in any color that pleases your soul. Thanks to this element, it will be possible to give the pool some zest, because polycarbonate is transparent. To seal the end seams between sheets of cellular polycarbonate, it is appropriate to use special adhesive tapes, which can be purchased at the same hardware store where you purchased the polycarbonate.

Swimming pool drainage diagram.
Then there is little left to do: you will just need to decorate the top of the pool, for example, using the same awning fabric, which can be easily bent to the distance at which you want to see it on the shore of your new pond. Only then can it be covered with river sand or small pebbles, which is done at the discretion of the owners of the site. There is an option to cover the edges of the pool with wood (pine). Then, by placing wooden furniture and sun loungers nearby, you will get a very stylish piece of paradise in your garden. For greater convenience, a ladder is lowered into the pool, which can be purchased in a store or made independently. It can be either metal or wood.
In parallel with digging and finishing the main pit for the pool, it is worth digging a drainage hole next to it. It should be installed slightly deeper than the main body of water. After all, water will be drained into it. To do this, build a connecting pipe, which will be inserted at one end into the lower level of the pool wall, and the other will go into the drainage tank.
In this case, a valve should be installed on it, with the help of which it is possible to regulate the drainage of water from the artificial reservoir. The bottom of the drainage pit is covered with gravel.
Step-by-step construction of a concrete pool with your own hands
Build your own pool and enjoy it all summer long - these are the thoughts that are driving you now. In addition, your kids will also be crazy about the joy that a small pond with cool water will give them on a hot day. And today we will look at how to build a concrete pool with your own hands, what are its advantages and disadvantages and for whom it would be an ideal option.
Before building anything, you need to understand the design features, its advantages and disadvantages, and similar options. Perhaps concrete is far from the most ideal option for you, and installing, for example, a frame pool would be much more rational.

Additional equipment for your comfort
Let's first look at the positive aspects of this material for the construction of artificial reservoirs.
- The most rigid pool structure is made from concrete;
- Freedom of choice. You can build a bowl of any size, depth and shape;
- Possibility of installing any additional equipment. You can install hydromassage, LED lighting, and so on;
- Concrete is the most durable material of all similar ones for the construction of tanks;
- Large selection of finishing and decoration options;
- In general, a concrete pool looks more prestigious than all others.
Now about the disadvantages of this material.
- Extended construction periods. If you build a tank in the spring, then you will only be able to enjoy cool water in it in the middle of summer;
- High price. How much exactly? We will talk about this in more detail below;
- Not the most convenient option to maintain.
- To install it yourself, you need to have construction skills and experience with tools.
As we see, even concrete bowls are not without drawbacks, in principle, like all other options. This option is suitable for those who are not going to save on the construction of an artificial reservoir and want to install the maximum number of additional devices to increase comfort and decoration.
So, if you have decided that a concrete pool is what you need, then read on.
A pool with a concrete bowl does not differ much in design from other types. It has the same systems that do the necessary work to maintain the water in the required condition.

Construction of an artificial reservoir and its systems
Concrete pool systems:
- Pump;
- Thermostatic devices;
- Filters of various types.
It is also possible to install additional devices:
- Automatic chemical dispensers;
- Contour lighting;
- Hydromassage, counter current, waterfalls, fountains;
- Slides, jumps and other attractions.
Holes for nozzles for collecting and returning water to the bowl are installed immediately when pouring concrete. Next, a circuit consisting of a pump, filter and heater is connected to them. The procedure for connecting this equipment depends on your conditions and device models. After installing the circular chain, consider that the pool is ready for use.
You can install additional equipment after completing all construction work, but it is still better to think through everything in advance and do it in one go.
Now let's look at each stage in great detail.
Let's start construction
We have divided the process of building a concrete pool with your own hands into several steps. The result is a detailed guide that will help you do everything yourself.
Any big undertaking must begin with drawing up a plan. You need to draw a bowl on paper indicating its dimensions. The drawing also needs to reflect the location of the equipment and its connection to the pool and the electrical network.

Bowl drawing
Decide on the depth of the bowl. If it is intended exclusively for adults, then 2 meters is just right. If for children, then it all depends on their age and height. When installing a diving board, the depth must be at least 2.5 meters.
Planning is a serious and responsible matter. Under no circumstances should you rush. Do not start work until you are sure that your drawing is correct and specific.
Only after creating a detailed plan for this can work begin.
The next step will be choosing a location, digging a pit and preparing a cushion for the foundation.

Pool pit
The place should initially be as level as possible. Electricity and water supply should also not cause problems for the future tank. Pay attention to these two points when choosing a location.
We clear the area of plants and large stones, and then begin digging a hole. You can do this yourself, but this approach will take a lot of time and effort. If possible, contact a team of private workers or even the services of an excavator. This will significantly speed up the process and bring you closer to finishing the job.
Pit requirements:
- The bottom of the pit is 20-30 centimeters lower than the bottom of the future pool;
- The walls of the pit with a margin of 15-20 in each direction from the walls of the concrete bowl;
- The side walls should have a slope of 6-7 degrees to the outside;
Compliance with these requirements simplifies the installation of the pool. If they are violated, you will either not be able to complete the work at all, or you will do it with big problems.
Next, we install all the pipes that will be supplied to the pool. A bottom drain and side nozzles are installed, and from them the pipes go up. It is advisable to cover the holes tightly with a rag or film to prevent dirt from getting in during construction work.

Filling the foundation with a pillow
After finally digging the hole, you need to prepare a cushion for the foundation. There is nothing complicated, you just need to pour the compounds in several layers and level them out. The first layer is 15-20 centimeters of sand. Next comes crushed stone 5-10 centimeters high.
We level each layer using a board with a level attached to it and compact it. If you are pouring cement, let it harden completely and only then proceed to further work.
The last layer is laid out with overlapping roofing felt or other waterproofing material. It will protect against external groundwater and leakage of the bowl itself.
Now you need to install formwork from boards to fill the foundation of the tank. It is recommended to make the foundation slightly wider than the perimeter of the pool walls. This will give greater stability and durability to the structure.
The next step is to install reinforcement for the foundation. Rods with ribs with a diameter of 10-14 mm are used. The larger the area and depth of the tank, the thicker the reinforcement bars should be used. The mesh dimensions should be 20 by 20 centimeters.

Foundation reinforcement
The mesh of rods is installed in two layers. The first is located at a height of 5 centimeters above the pillow, and the second layer is 5 centimeters higher than the first. Thus, it turns out that our slab will be about 14-15 centimeters thick.
To accurately position the reinforcing layers at a height of 5 centimeters, use brick or wooden blocks. Professional installers have special stands in their arsenal.
At the site of erection of the side walls, the rods are bent vertically upward. Later we will tie reinforcement for the walls to them. This design is rigid and reliable.
To fill the base, you must first prepare a solution. To do this, you can order a special machine or do it yourself in a concrete mixer. But you need to work quickly so that your solution does not have time to harden while you are preparing a new batch.
To prevent air voids from forming in the thickness of the foundation, you can use a vibration machine or an ordinary rod. The vibration installation works in accordance with the instructions, and you simply lower the stick into the solution that has not yet hardened and make circular movements. This will allow air to escape to the surface.
First of all, you need to make reinforcement of the side walls. To do this, we tie the steel bars to those that were bent vertically upward at the base reinforcement.
The installation of walls should only begin when the foundation has completely hardened. How quickly will this happen? Depends on weather conditions and the composition of the solution itself. On average, this period is 1 week.
The thickness of the walls of a concrete pool and the number of tiers of reinforcement directly depends on the volume of the pool. For a pool of 4*4 meters with a depth of up to 1.5 meters, it is permissible to use one tier. The thickness of the walls is 10-15 centimeters. If the area and depth are larger, then at least 2 tiers of reinforcement are installed, and the wall thickness is at least 20 cm.
Next, the formwork for the walls is installed. Wooden boards, plywood or chipboard sheets are used for it. All of them must be impregnated with a moisture-repellent composition. The joints of wooden sheets need to be covered with some material or sealed.

Formwork installed for pouring concrete into walls
Poured concrete will put a lot of pressure on the formwork. To avoid deformation or complete destruction of the structure, spacers are installed on both sides. Also, the formwork walls are nailed on top to small bars.
Formwork for steps and other pool shapes is also installed. Next, concrete is carefully but quickly poured into all walls at once.
After complete hardening, you can remove the formwork and begin waterproofing and lining the pool.

Applying pool waterproofing
For waterproofing, special compounds are applied by spraying or using a roller. Carefully work out the junction of the walls and the foundation, as well as uneven areas of the walls. Let the composition dry completely.
A slight change in water level may be due to normal evaporation of moisture.
For final cladding, tiles, mosaics or film are used. Which to choose? Depends on your budget, preferences and ease of use of the material.

Tank lining with mosaic
To install tiles and mosaics, use only high-quality glue that is not afraid of water. The seams also need to be treated with anti-funge compounds. This will significantly extend the life of the cladding and make it easier to maintain.
Thematic videos
Construction budget
What is the cost of a concrete pool? This question often arises among residents of private houses. Let's figure it out.
If you take all the work into your own hands, then the largest item on the list of materials will be concrete. You will also need a minimum set of equipment: a pump, a filter and a heater. And less tangible expenses will go to tiles, waterproofing, and so on.
Don't skimp on equipment. The entire circulating system should have time to pass the entire volume through itself 2-3 times a day. If this does not happen, the efficiency of cleaning and heating will approach zero.
On average, a pool with an area of 10-15 m2 will cost you 200-300 thousand rubles. Of this amount, approximately 100-150 will be spent on equipment, and the rest on construction materials. Of course, you can keep it to 150, it all depends on your requirements and desires.
We have provided an approximate average cost. Take it as a guide, and when you get serious about building your own tank, calculate everything exactly in accordance with the prices of your city.
So, today we have discussed in detail how to build a concrete pool with your own hands and how much this pleasure will cost you. You can also check out other step-by-step guides for installing artificial ponds on our website.
How to build a pool with your own hands - making a concrete pool at the dacha (detailed instructions)
To paraphrase the classic, we can say that installing a swimming pool in a house, on a personal plot or in a country house is not a luxury, it is a necessity.
The construction of private swimming pools on an individual plot has become a standard phenomenon, like the construction of RIPµSЂP°РЅРґС‹ or беседки.
The only difference is in the design and scale: a small pool in a bathhouse, a decorative pool in the yard as part of a landscape design composition, or a structure of large size and volume - indoor and outdoor swimming pools, which are located on the street, with all the accompanying fixtures and accessories.

Briefly about the main thing - how to get a swimming pool
You can get what you want in two ways:
- First, buy a ready-made pool.
But before purchasing, please consider the following:
- it costs expensive;
— it is impossible to buy a concrete pool ready-made. This means you will have to pay for the project, for materials and for labor. Also, return VAT to the state;
- Secondly, make the pool yourself.
This seems like a difficult task only at first glance. In fact, you already have everything you need: desire, opportunity and our instructions. This means that building a swimming pool should not cause any difficulties.
And physical fatigue will quickly pass when you splash around in the pool, which you made with your own hands.
Which pool is better to choose for a summer residence - types and types

Requires special knowledge for arrangement

It is cheap, convenient to carry and store, but is not very practical and has an extremely short service life.

Sold ready-made.

Purchasing such a structure (especially a large one) entails difficulties with delivery and installation, which cannot be done without special equipment (trailer, crane, excavator).
 Plus, it involves digging a pit, which is also quite problematic.

Lightweight and durable. The design principle is similar to the previous version. Causes difficulties during transportation and installation.

The best and most justified option of all of the above.
This pool is ideal for a summer house or country house, where you will use it seasonally.
 It can be made from concrete blocks, but it is better to pour a monolithic one. Despite the fact that this is the most complex and expensive design, its reliability and durability are beyond doubt.
Disadvantages of a concrete pool and how to eliminate them
- problems with the water supply system. As a rule, they appear as a result of errors during their laying and installation of pipeline systems. If the work is carried out correctly, no difficulties arise;
- Possible water leakage. This significant problem can be eliminated with the help of several layers of good waterproofing, the use of high-quality concrete and compliance with all rules for their installation;
- peeling of ceramic tiles or mosaics. Eliminated by using high-quality special-purpose glue;
- spread of fungus.
 The appearance of fungus can be easily eliminated by regular cleaning and treating the surface of the bowl with special disinfection solutions.
Regular care and implementation of the above actions is the prevention of fungus formation.
Permission to build a swimming pool
In fact, an outdoor pool in a yard or plot can be built without approval from Rostechnadzor.
According to Article 51 (clause 17) of the Town Planning Code of the Russian Federation, auxiliary use facilities do not require a documentary permit for construction. But there are some nuances here, it all depends on the parameters of the structure, if it is a small decorative or children’s pool, then no questions asked, but if it is a permanent building for swimming, i.e. sufficient depth, length and width, then it is better to draw up documents.
If the pool is not registered in the BTI, accordingly, it will not be on the certificate of ownership, and it will not be included in the technical passport. In the future it will be possible to legalize it, but it will cost more than registering it right away.
Building a concrete pool with your own hands - instructions

Installation work - construction of a concrete bowl for a swimming pool
Preparing the site
To do this, standard procedures are followed: clear the area of bushes and trees, and also cut off branches that may hang over the pool. Material from moydomik.net
Excavation work - digging a pit for a swimming pool
 Of course, digging a pit can be done without the use of special equipment. But only if you have a small and shallow pool, you have a lot of time, effort and help.
 As a rule, the cost of renting an excavator and digging services will be approximately the same, the difference is in time.
Construction of a pit for a swimming pool
- increase the dimensions of the pit. They should be larger than the size of the future bowl. This is done in order to place technical equipment there and arrange a cushion under the concrete. And also for the construction of formwork.
- presence of an angle. When digging walls, make sure that there is an angle of their deviation relative to the vertical. This method will prevent soil from falling into an already dug pit.
- the presence of drainage systems. To ensure that the water that splashes out of the pool does not turn into puddles and does not destroy the landscape design, it is necessary to provide a place for its drainage.
- First of all, it is necessary to lay all hydraulic communications.
- provide for the possibility of draining water.
 To drain, the bottom of the pool is sloped at 5-7% (2-3 cm of slope per 1 meter of bottom), which should be directed towards the drain hole.

Arrangement of the pillow
(concrete footing)
A gravel-sand cushion is needed to ensure better pouring of concrete. Usually it is a mixture of sand and crushed stone, which compacts well. Cushion height 300-350 mm.

Bottom waterproofing
The more options for possible leakage we take into account and prevent, the longer the service life of the concrete pool will be.
Roofing material is perfect for RіРёРґСЂРѕРёР·РѕР»РёСЂСѓСЋС‰РµРіРѕ материала. It needs to be laid out with an overlap of 150-200 mm, and preferably in several layers. You can also use bitumen, liquid rubber, coating (polymer-cement) compounds or a PVC membrane.
Pouring the first layer of concrete - constructing the pool base
There are two ways to prepare concrete (or rather, ways to obtain it)
- With your own hands - it takes a long time and is very difficult; the work can be made easier by a factory one or a factory one.
- Order ready-made concrete, which will be delivered by a mixer - if your budget allows, then this method will be more rational.
Composition of concrete mixture for 1 cubic meter. or 2,400 kg:
- cement – 325 kg;
- water – 170 l;
- sand – 625 kg;
- crushed stone 1,250 kg.
To calculate the quantity, cubic capacity, composition and parameters of soil, you can use calculators:
For the footing (concrete cushion under the pool bowl), you can use B-25 concrete, and for the bowl itself it is better to use hydraulic concrete, class P-4 B-25 F-200 C-4.6. If there is no hydraulic concrete, you can use cement S-500 (concrete mixture - cement and sand 2:1).
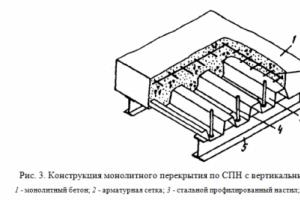
After all the work has been completed, the base of the pool will look like the one shown in the diagram.

2. A layer of sand (10-15 cm);
3. Crushed stone (10-15 cm);
4. Concrete (15-20 cm);
5. Layer of cement mortar;
6. Waterproofing layer;
7. Reinforced concrete bowl.
Advice.
You can do without pouring the first layer of concrete (pouring cement mortar). To do this, you will need to reinforce the bottom with reinforcement at a height of 50-70 mm. above the level of the sand cushion. The progress of work is shown in the photo below.

 Reinforced frame structure - 2
Pool bowl reinforcement
The bottom is reinforced with a steel rod (reinforcement) of class A3 (ribbed), with a cross-sectional diameter of 8-14 mm.
The number of floors of reinforcement is two tiers.
It will come in handy.
For an oval pool, reinforcement no thicker than 10 mm is used. This is due to the fact that reinforcement of this diameter is sold in coils. And, therefore, you can independently adjust its length. The spacing of the reinforcing tracks is 200x250 mm.
 For a rectangular pool, arbitrary installation of reinforcement with piping in increments of 200x200 cm is allowed.
You need to put something under the reinforcement, for example, a brick, so that it remains in the middle of the concrete base during the process of pouring the concrete solution.
 After installing the reinforced frame, fill the bottom of the pool with concrete solution. When pouring, try to avoid the presence of voids filled with air - this will reduce the quality of the surface.
We are waiting until the concrete dries and you can safely move on it.

The principle of reinforcement is identical to the previous one.
The number of tiers is determined by the height of the bowl.
Installation of formwork for a swimming pool
The material used for formwork is a wooden board (painted or oiled) or, more conveniently, plywood (preferably moisture-resistant or laminated). The use of plywood allows you to create bent shapes with a minimum of effort, which is important when building a pool of complex or oval shape.


In order to avoid deformation of the formwork under the pressure of the weight of the concrete solution, it is recommended to install stiffeners and spacers at a distance of 500 mm. A beam with a cross section of 50x50 is suitable for spacers.
Installing plywood formwork is more expensive, but the surface quality of the concrete bowl is almost perfect.

Note:
the sheathing for the steps is mounted separately.
Pouring the walls of the pool bowl with concrete
 We wait until the concrete hardens. In this case, it is better to cover it with something to avoid destruction from exposure to temperature or moisture. And also periodically moisten with water.

If you do not plan to use a metal ladder, but want to make the procedure of immersion in water smooth, you need to provide concrete steps.
The formwork for the steps is installed when the entire concrete bowl for the pool is ready.
It is better to use plywood for the manufacture of formwork, because... it allows you to create bent shapes and does not require additional cleaning.
Construction of a concrete pool - video on pouring a concrete bowl
Finishing and lining of the pool bowl
The stage involves a set of activities:
Sanding pool walls
 Grouting is done manually or using a special grinder.
Waterproofing is applied using special liquid solutions, between the layers of which reinforcing fabric (mesh) is laid.

 Pool waterproofing – 2
When performing this type of work, special attention should be paid to:
- seams between the bottom and walls of the structure;
- seams that appeared when pouring concrete;
- place of communications entry;
- chips, gouges and cracks.
Finishing
Before doing this, it is important to check the quality of the waterproofing. To do this, you need to fill the pool with water. Measure the water level. Then wait 10-12 days. And measure the water level again. Changes in this parameter are an alarming sign. This means that the waterproofing was done poorly and there is a leak somewhere.
The amount by which these two indicators differ can say a lot. For example, a slight discrepancy would indicate that the water could simply evaporate under the influence of heat.
The following materials are usually used for finishing:
 facing tiles;
 mosaic;
 PVC film (the cheapest option).

The choice of finishing material is influenced by factors such as:
— ease of care;
- availability;
— ease of installation;
- price;
— possibility of replacement;
- appearance.

Arrangement of the area near the pool
They make RґРѕСЂРѕР¶РєРё, flower beds, беседки, bar, R»СѓР¶Р°Р№РєРё and other joys for comfort.
Installation of metal stairs and handrails is carried out as a last resort.
Conclusion
Concrete pools - photos of construction methods
The process of organizing a basement. Option for installing a concrete floor, methods for installing basement walls (brick, blocks, monolith). Recommendations and advice…. Builders have a saying that a house can be built without a foundation, on any kind of soil. Just how long will this house last? If this… Features of modular composite pools, advantages and disadvantages...
 Concrete pool - original version


Leave your comment


The basis of this material is polymers, and it is not surprising that experts predict a great future for it. Lightweight polycarbonate contains various types of voids in its structure. Its weighted version is monolithic and is often used for structures with a high degree of responsibility. Due to its flexibility, this material is perfect for shelters with different curvatures. Among its main advantages are:
- relatively light weight;
- ease of transportation;
- ease of installation;
- durability;
- weather resistance
Despite so many positive aspects of this material, it has certain disadvantages:
- decrease in strength when the protective film is damaged;
- before installation, you need to design the future structure in detail;
- Incorrect tightening of mounting fasteners leads to cracking.
From this it is worth drawing a conclusion: if you treat it responsibly and do not damage it during installation, then during operation this material will not be picky.
Choosing polycarbonate for canopies
When purchasing polycarbonate, you need to navigate its types and types. The first thing you should pay attention to is the thickness of the sheet. It varies depending on the purpose.


Advice! If you want to build a complex structure of large dimensions, you must first make calculations for snow and wind loads. And only after that choose the required sheet thickness.
Considering that such material is presented in two types, namely monolithic and cellular, it is worth choosing it for certain types of structures. It is worth considering that the first type is much heavier than the second, and therefore the weight of the structure directly depends on this. The thickness of any type of polycarbonate sheet for canopies is used, starting from 6 mm and above. Which depends on the size of the spans.
Considering that polycarbonate pool covers not only perform a protective function, but can also become part of the pool, you should be responsible when choosing its color. Therefore, when purchasing, you can evaluate all color options and settle on the most suitable one for your situation. If you are planning frequent renovations and design changes, then you should choose transparent sheets.
It is always worth paying attention to the fact that such bright colors can radically change the color of the structures under the canopy. On the one hand, this can create an interesting atmosphere, but otherwise it will spoil the tranquility of the atmosphere of the place to relax. And if you want to completely protect a certain area from the sun’s rays, then other dark shades.
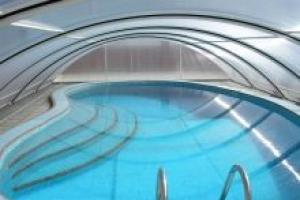
Types of polycarbonate canopies for swimming pools
Depending on the design features, pool canopies are divided into two types: stationary and sliding. The first type of structure is immobile; it takes up quite a lot of space. Such structures are multifunctional and are ready to cover not only the pool itself, but also the surrounding areas where couches or other structures can be placed. A foundation is built under this type of canopy so that it is firmly fixed and lasts for many years.
If you need a cover exclusively for the pool, which will be extended when necessary, then you will like the canopy.
Due to the plasticity of polycarbonate, canopies made from it can take many shapes. That is why you can easily create a pool area design according to your preferences. To begin with, you can determine the height of the canopy yourself. After all, it can only cover the pool itself and rise 1-1.5 meters. Or you decide to create a structure up to 2 m high, and maybe higher, in order to hide under it not only the reservoir itself, but also various communications, along with a recreation area.


Installation of a polycarbonate canopy
If you are really interested in pool covers made of such a universal material, and you want to build one on your site, then you should familiarize yourself with the stages of its construction, as well as all the nuances of operation. Polycarbonate is not picky, and yet it needs to be looked after. And if installed incorrectly, certain elements may be damaged, causing its performance to deteriorate.
Creating a canopy and installing it
Thanks to professional installation and the use of high-quality materials, your structure will be incredibly durable for many years. That is why all stages, from design to the last stage of installation, should be treated responsibly.
The best option would be to invite professionals. But, if you want to build a canopy for a polycarbonate pool with your own hands , You need to familiarize yourself with all the nuances of this process:
- The main and irreplaceable stage in the construction of a canopy is the project. This will not only help to avoid problems during installation, but also during operation of the structure. By calculating the required amount of material, you can find out how much money should be spent and where you can save. At this stage, the strength is calculated according to snow and wind loads. Such calculations should be made by a professional engineer if you do not want the structure to collapse like a house of cards during the first winter precipitation.
- When the project has already been created, you can begin construction work. The required number of sheets has been calculated, materials have been purchased. It is important to prepare the site itself; it is leveled and smoothed. Now it's time to build the foundation. Since the structure is quite light, the optimal foundation depth is 50-60 cm. After small pits have been dug, it is necessary to fill them with concrete.
- The next step is to install the support posts. The already selected pipes must be secured in the foundation. Now it's time to construct the frame. This is the most important part, because the durability of the future canopy depends on it. Having bent the arches and secured them to the racks, it is necessary to install stiffening ribs. They are carefully welded to the arches or secured with screws.
- When it is finally constructed, it is time to fasten the polycarbonate sheets. It is very important to be extremely vigilant at this stage, because if the fastening screws are not tightened correctly, this can lead to cracking. By scratching the protective layer of the sheet, you can cause the high performance properties of the material to deteriorate in the future. Therefore, carefully bend the profile and slowly make holes in it.
You need to know that the protective film is removed only after final installation. The main materials for creating such a design are:
- concrete mixture;
- bolts;
- polycarbonate sheets;
- profile pipe;
- perforator;
- welding machine;
- sealant;
- level.
It is important to install polycarbonate only with the protective side facing the sun, which will help prevent fading. It is necessary to use a sealant to isolate the joints from the penetration of rainwater and other external factors.
Caring for a polycarbonate canopy
In fact, this material is very easy to use and does not require special attention. If you followed all the rules during installation and not a single part was damaged, the structure will serve you for many years. The sealant protects fasteners from aggressive external environments.
Therefore, the only step in caring for polycarbonate structures is cleaning. The canopy must be washed with plain water. If it doesn't take up a large area, you can even hose it down. But, since water can leave stains, it is necessary to wipe the structure with a cloth or special devices in order to remove dirt.


If the structure is significantly dirty, it is worth using products designed for this. Under no circumstances should you use abrasive products, as they can damage the surface and leave scratches on it. It is also worth removing dried dirt very carefully; you should not arm yourself with sharp objects.
Pool canopies made of polycarbonate: conclusions
Thus, we can conclude that polycarbonate is an excellent shelter option for any type of terrain. It can easily replace tree, , and even metal. Moreover, such material has a very affordable price, and many can afford it.
There is an incredibly wide range of colors on sale, which will allow you to use polycarbonate not only for shelter, but also to decorate the area. Due to its plasticity, polycarbonate canopies can become an indispensable part.
Pool canopies made of polycarbonate, the photos of which perfectly illustrate their aesthetic qualities, will suit any style and building. Such a shelter is quite simple to construct, and it is not at all difficult to care for. You can create the design with your own hands. But, if you want the canopy to be resistant to all weather conditions and last for many years, you need to seek help from a specialist.
The summer season in Russia is not very long. Throughout the summer, in many regions they swim in natural bodies of water: lakes, ponds, rivers. If there are no natural bodies of water nearby, install an artificial pool from the usual means on a personal plot. However, the pool needs additional care, since dust and various plant debris can get into the water. To protect the structure from such troubles, a special pavilion is built above it.
We build with our own hands:
Pool-greenhouse
The independent process of constructing a simple greenhouse pool is not labor-intensive. Sheathed with polycarbonate or other translucent materials. The frame is made of profile pipe, which gives the building a neat and aesthetic appearance. Main purposes of the pavilion:
- The construction allows you to create a relaxation area with increased comfort near the country pool;
- Provides protection to the structure from various contaminants and does not require regular cleaning;
- Protects swimmers from the negative effects of ultraviolet radiation;
- Operation of a greenhouse pool with a polycarbonate pavilion is possible in all weather conditions;
- There are financial savings on electricity and other methods of heating the pool;
- A canopy increases the lifespan of the pool and reduces maintenance and repair costs.
REFERENCE: The canopy is constructed at various heights. The lowest one is no higher than 1.5 meters, the highest one covers only the pool itself, or the owner has the opportunity to arrange the entire internal space near the reservoir.
Materials and construction requirements
Using polycarbonate sheets, you can build a canopy over a pond with your own hands, without spending a lot of effort and time. You only need the following materials and tools:
- Polycarbonate;
- Square or rectangular profile pipe;
- Welding machine;
- Shovels and concrete mixers;
- Concrete mixture;
- Fastening elements;
- Electric jigsaw and screwdriver.
Swimming pool-greenhouse for a summer residence:
The polycarbonate pavilion has many advantages. The main ones:
- Environmentally friendly materials are used during construction;
- The pavilion, together with the materials from which it is made, is durable and lightweight, so there are no extra costs during transportation;
- The structure is resistant to adverse weather conditions;
- Thanks to polycarbonate, the amount of moisture evaporation in the greenhouse pool is reduced, and it also helps maintain an optimal humidity level;
- The water in the pool is protected from the appearance and further proliferation of pathogenic microflora;
- You can build a canopy yourself, without involving specialists, you just need to have the necessary materials and tools;
- Building materials can be purchased at an affordable price;
- Service life exceeds 10 years;
- The design is fire-resistant and has good light transmission;
- Easy maintenance of the building. You can clean polycarbonate from dirt using ordinary detergents. The frame of the structure should be painted regularly to prevent the formation of rust. The wooden frame should be periodically inspected for rot and traces of mold.
REFERENCE: The optimal thickness of polycarbonate for a canopy is more than 8 cm.
Requirements for a swimming pool in a greenhouse
The created artificial reservoir is protected in various ways:
- The shelter covers the pool on one side or several. Basically, the canopy is built as a full-fledged one, for greater reliability of the pavilion;
- The covering can be stationary or sliding (telescopic). The advantages of the latter include rapid transformation. However, the rather complex manufacturing is a disadvantage;
- The type of bowl is determined by the shape of the reservoir itself: it can be rectangular, combined and round.
A polycarbonate pavilion, built independently over a country pond, comes in different shapes:
- Asymmetrical. Appearance: semi-arch. With a vertical wall along the building plus a vault on the opposite side. The vertical walls at the end serve as a place to install the door. The shape adds volume to the pavilion and allows for a seating area;
- Canopy in the form of a dome. It is built if the pool is round in shape. During self-construction, polycarbonate is cut into segments, which gives the building an impressive and aesthetic appearance;
- Arched and pitched canopies have two longitudinal vertical walls. Building them with your own hands will not be difficult.
Features of the installation of the structure and its strengthening or to do it right?
A greenhouse pool needs a solid foundation:
- A foundation 50 cm high is poured using concrete and reinforcement, and only then the frame is built;
- Before constructing the frame, the shape of the future pavilion is determined;
- Using bolted connections, secure the frame to the foundation;
- Using special fasteners, the arches and stiffeners are fixed;
- An anti-corrosion coating is applied to the frame and then painted;
- Afterwards, the pavilion is sheathed with covering material.
Possibility of year-round operation
 The short summer does not allow the full potential of the dacha reservoir to be used. During the rainy season or with the onset of autumn, being near the pool does not bring any pleasure. In this case, it is necessary to build a pavilion over the reservoir for year-round use:
- The structure is mounted directly on the foundation;
- Before installing the frame, strengthen the base to increase the service life of the building;
- Thanks to the polycarbonate dome, the illusion of weightlessness is created. Due to the greenhouse effect inside the pavilion, you can swim in the pool in any weather. To operate the pool all year round, it is necessary to build a high, sealed pavilion. When dug into the soil, it will absorb the heat of the earth, and the structure of the roof will prevent the heat from escaping outside. In regions with harsh winters, a separate internal heating system will be needed.
If you don’t have the energy and time to build a greenhouse pool yourself, ready-made kits are purchased from specialized companies. Designs from Germany are expensive, but their advantage is high quality. Constructions from China are affordable, but far from high quality. Russian buildings occupy the “golden mean” in terms of cost and quality.