Warning: Use of undefined constant WPLANG - assumed "WPLANG" (this will throw an Error in a future version of PHP) in /var/www/krysha-expert..php on line 2580
Warning: count(): Parameter must be an array or an object that implements Countable in /var/www/krysha-expert..php on line 1802
If thirty years ago the most common roofing material was asbestos-cement slate, today there is a huge selection of different coatings on the construction market. They differ in appearance, performance characteristics, cost and installation technology. Among all materials, corrugated sheets belong to the cheapest category. The quality and durability of such coatings are appropriate; this should be remembered and not made long-term plans. In this regard, profiled sheets are not recommended for use on residential buildings, especially prestigious cottages. Most often this material is used in garages, outbuildings and various sheds.

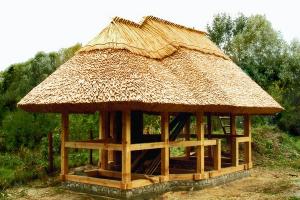
Corrugated sheet roofing is an excellent option for a gazebo
If you have a little practical experience in construction work, then installation of corrugated sheets can be done without the involvement of expensive professional specialists. We strongly do not recommend working alone; it is much better to call an assistant. Why?

Before installation of profiled sheets on the building, if necessary, preparatory work must be carried out.
| Type of preparatory work | Short description |
|---|---|
| If it is planned to build a residential attic (attic) in the house, then the roof must be insulated. Before covering the roof with corrugated sheets, steam and waterproofing should be done, and insulation should be installed in place. True, the order in which the warm cake is made may change, but in any case, wind protection must be installed before installing the corrugated sheets. |
| If these elements of engineering systems are built and installed before covering the roof, then the tightness of the roof is significantly increased and the risks of leaks are minimized. You should know that making holes in a finished roof for chimneys or ventilation is a very thankless task. These elements can fall not only under the sheathing, but also under the rafters; special technical measures must be used to maintain the integrity of the rafter system. |
| These works are much easier to do before installing the profiled sheets. In addition, in the case of a warm roof, only with this sequence can you then properly make drips to drain condensate. |


Basics of technology for installing corrugated sheets on wooden sheathing
There are several general rules, the implementation of which is strictly necessary.
Before starting work you need decide on the number of sheets, taking into account the angle of inclination of the slopes:
- angle up to 14° – overlap 200 mm;
- angle 15–30° – overlap 150–200 mm;
- angle more than 30° – overlap 100–150 mm.

If the angle of inclination is less than 12°, then the joints must be additionally sealed with bitumen mastics or other sealants.
It will surprise no one that modern suburban construction uses a wide variety of roofing materials. The roofs of houses covered with slate and iron disappeared into oblivion. They have been replaced by higher quality and more presentable materials that meet all the standards and requirements of modern housing.
Such roofing materials include profiled sheets. It may seem to an ordinary person not knowledgeable in construction that this material should not be used for roofs. Its gray appearance alone will “spoil” the entire design of the house and site. But it only seems so. Modern corrugated sheeting has excellent appearance, a wide range of colors, and excellent protective qualities thanks to the zinc and polymer layers.
Let's add here the low price and ease of installation. All together gives an excellent roofing covering. It is the last indicator - ease of installation - that attracts country developers who are trying to save on construction by doing some of the work themselves.
Installation instructions for corrugated sheets
Let's start with the fact that each roofing material can be laid at a certain angle, ensuring the quality of its operation. Anyone who has installed a roof at least once knows that the angle of installation of the roofing covering is determined by the angle of the slope of the roof itself.

So, corrugated sheeting can be laid at an angle of at least ten degrees. A smaller angle will create conditions under which the outflow of water will be difficult and it will definitely get under the material. This is especially true in cases where the corrugated sheet is laid overlapping.
The second nuance concerns the length of the roof slope. Typically, corrugated sheets are made in a standard length of twelve meters. This is a very convenient size; with this sheet you can cover the entire slope at once without joints or seams. If the roof slope is smaller, then the corrugated sheet is cut to a certain size.
Please note that you cannot cut profiled sheets with a grinder or grinding wheels!
During their operation, large thermal energy is released, which will damage the protective layers of the material. And this, in turn, will lead to further corrosion of the metal. To cut profiled sheets, use metal scissors or a special device.
Stages of installation of corrugated sheets
The construction of the roof begins with the installation of the rafter system and sheathing. Wooden slats or boards can be used as sheathing. The second option is better and more reliable. The boards are laid on the rafters every 0.5-1.0 meters and attached to them using nails or self-tapping screws.

Roof sheathing under corrugated sheets can be made of wood and metal.
Why such a large range of sizes? It all depends on what kind of profiled sheet is used for installation on the roof. For corrugated sheeting grade C35, the sheathing pitch should be 50-60 centimeters, for C44 it is already 65-75 centimeters.
If it is not possible to cover the entire slope with one sheet, then a board must be laid under the junction of the two sheets. It must be taken into account that the two sheets are laid overlapping with an overlap of 15-20 centimeters. It all depends on the angle of the roof slope.
Important! After the sheathing is ready, it is treated with an antiseptic solution.
A corrugated sheet is a metal roofing material, therefore, whether you like it or not, condensation will form under it, or rather, on its lower surface. These are moist air vapors passing through the elements of the roof of the house and coming into contact with the cold surface of the corrugated sheeting.
Moisture is the enemy of any building material and must be neutralized. How?
There are two options:
- Place vapor barrier material on the bottom and waterproofing material on top of the sheathing boards. For example, plastic film and roofing felt.
- Create a ventilated layer. To do this, you need to make a false sheathing, which is laid lengthwise on the rafters. That is, the pie will be like this: rafters, waterproofing, false sheathing, sheathing and roofing material.
Now you can lay the profiled sheets themselves. To lift them onto the roof, you need to build a simple device in the form of two joists or rafter legs, which are laid from the ground to the roof at a slight slope.
It is best to work with four people: two below, two above. From below, the corrugated sheet is placed on an inclined device and fed to the top. The upper workers pull it onto the roof and lay it at its destination.
How to attach corrugated sheets?
For fastening, special roofing screws made of galvanized steel are used. They come with rubber washers as seals.
Please note that it is not ordinary rubber that is used here, but neoprene. It retains its qualities well under the influence of temperature and moisture changes. The self-tapping screws have the following dimensions: diameter 4.8 millimeters, length from 28 to 40 millimeters.

The corrugated sheeting is fastened to the sheathing in the lower corrugation. The location of the fasteners is the edges of the sheet and its middle.
You should not use a large number of screws; three for each sheathing element will be enough. The installation of the ridge and its fastening, on the contrary, is done through the upper corrugation.
In this case, the length of the screw is determined by the wave height. And one more important point. Manufacturers of roofing screws today offer different products according to their color design. That is, their hats come in different colors. This makes it possible to precisely select the fastening element so that it matches the color of the corrugated sheet.
Adjacent profiled sheets are laid on top of each other, overlapping each other in one wave. If the thickness of the profiled sheet is small, then a hole can be made in it with a self-tapping screw. It is equipped with a drill-shaped tip.
If the thickness is large enough, then it is better to make holes with a drill. The instructions are simple: no punches that can tear the material.
Flat roof and corrugated sheeting
Flat roofs made of corrugated sheets are mainly used to cover industrial buildings and outbuildings. During installation, you will have to take into account the features of the structure, especially the low angle of inclination of the slope.
Developers cover such a roof with a single sheet, without creating joints. Otherwise, there is a high probability of water penetrating under the roofing.
If it is not possible to install the roof in one sheet, then the joints of the material will have to be well treated with silicone-based sealants. In general, a flat roof and corrugated sheeting is a rare combination. For such a roof, other materials are suitable, preferably rolls based on bitumen.
Conclusion
As you can see, it's quite simple. It is only important to strictly follow the sequence of all work, adhere to the recommendations given above, and not change the materials specified in the house design. You should never cheapen a project!
To protect the house from precipitation and the negative influence of external factors, an important component of the entire construction process is the installation of a roof. The material from which it is made must be of high quality and durable. When choosing it, it will be a good option.
Its advantage is that such material can be used to cover any structures: country houses, mansions or any outbuildings.
It is characterized by durability and is able to withstand strong physical or weather impacts.
The profiled sheet has an attractive appearance and a large selection of colors when purchasing, can take on various configurations and shapes of the roof, is less demanding in maintenance compared to other materials, and can also be attached independently without the help of specialists.
In this article we will take a closer look at how to cover a roof with corrugated sheets and let's disassemble the device.
If you are calculating fasteners, take nine pieces of nails per 1 square meter. m. of roofing. The calculation of waterproofing and vapor barrier is done on the basis that one roll contains 75 m2 of materials, 10 cm of which will overlap the corrugated sheet on the roof (according to GOST) and as a result the formula is:
N = S ÷ 65;
- N – number of rolls of waterproofing or vapor barrier
- S – roof area, m2.
Based on this, you can determine how many specific materials need to be purchased.
When calculating thermal insulation materials, the manufacturer’s instructions are specifically taken, which must indicate the average degree of required materials per 1 m2. You also need to take into account the thermal conductivity coefficient, which helps determine the thickness of the insulation layer. Now let’s move on to roofing the roof with corrugated sheets with our own hands.
Profiled sheet - do-it-yourself roof installation
How to cover a roof with corrugated sheets with your own hands? To do this you need to use the following instructions:
- Laying of corrugated sheets on the roof begins from the right side;
- In the case of covering a hip roof, the laying of profiled plates begins on both sides based on the highest point of the slope;
- Lining the roof overhangs with corrugated sheets. With help, do the installation and good fix the cornice strip with an overhang indentation of 4 cm. Then place the sealant in the middle between the profiled sheet and the strip;
- Look at the location of the slope. When it is less than 14–12 degrees, then a sealant will be needed on the longitudinal seams;
- Secure the first sheet with one self-tapping screw and then align it along the edges so that it matches the cornice;
- Next sheets overlap and fix them at the corners with self-tapping screws;
- When the first four sheets are laid out, align them using a cord and then secure;
- Having moved to the second level of laying the corrugated sheet, attach the first sheet of the second row to the first sheet of the first row.

How to cover a roof with corrugated sheets

Corrugated sheet roof installation technology
Why are sealants needed and how to use them correctly
 Sealing joints corrugated sheets on the roof are produced using seals.
Seals serve as an indispensable item when it is necessary to prevent precipitation from penetrating into the house.
Even if a small amount of liquid gets under the roof, this will lead to rotting of the wooden boards on which it rests and, as a result, the entire structure may collapse over time.
The fact is that in the absence of a seal, small crevices and gaps remain in the roof through which it can penetrate inside. In this case, even waterproofing will not be able to save the structure and the roof will need to be repaired.
In addition to liquid, dirt can get under the roof, which will also adversely affect the constructed covering for the house.
Features of the seal
- Fire resistance;
- Durability. He can be fit for ninety years and during this time his condition will not deteriorate in any way;
- They can seal areas near the ridge of wall and wind strips;
- Universal seal suitable for any part of the roof;
- He elastic and has a porous structure;
- Stable against mechanical influences and does not allow moisture and rotting of roof surfaces;
- Provides sound insulation and thermal insulation;
- Its thickness is 20 mm;
- The seal is capable withstand temperatures from – 60 to + 95 degrees;

Sealing joints of corrugated sheets on the roof
The roof needs to be sealed in this way: first, clean the area to be sealed from dirt and dust, and then stick the tape to one of the seam surfaces. At the same time, do not bend it or try to pull it out. To select the correct tape, consider its expansion volume.
How to bypass the hood on a roof made of corrugated sheets and the connection of the pipe to the roof
After the roof frame and all the necessary elements underneath have been constructed, it is worth starting work on the pipe. In this situation, you will need an abutment bar located at the bottom in the form of an angle with dimensions of 140x140 mm and bent up to 90 degrees, which must be placed in the lower part of the smoker.
To do this, put a special sheet. Place the junction bar on its surface and also on it. After the bottom abutment strip has been installed, a corrugated sheet is placed on top place the top abutment strip on it. Next, cut through the groove with a grinder and fill the hole with sealant.
Read about the installation of additional elements.
To successfully carry out all installation work when covering a building with a roof made of corrugated sheets, you need to prepare the necessary materials in advance and gradually create its foundation, starting with the construction of sheathing and waterproofing.

Bypassing the chimney with a corrugated sheet

Bypassing the chimney with a corrugated sheet
To properly finish the roof, you should calculate everything in advance using special formulas and, at the end of construction, install a seal to protect the house from moisture penetration and be sure to arrange the corrugated sheet material so that it looks aesthetically pleasing from all sides, including at the location of the smoker.
Useful video
Installation of roofing from corrugated sheets in video format:
In contact with
A material such as corrugated sheeting has long been known to everyone and is used in construction in a variety of roles - it is used to install fences, build garages and sheds, and also cover the roofs of outbuildings, small houses and even large mansions. Corrugated sheeting is produced in a variety of colors, so you can see houses covered not only with sheets of the same color, but also with a combination of shades. which looks very original.
To know how to properly cover a roof with corrugated sheeting, you need to carefully study the instructions, and then purchase high-quality roofing materials and consumables, and prepare all the necessary tools.
It is very important that you do not need to have special professional skills to cover a roof with this material. The main thing is to follow the technological sequence of work and not make mistakes that could lead to a roof leak, which will require bringing the coating to perfection.
Advantages and disadvantages of corrugated sheeting as a roofing material
Like any roofing material, corrugated sheeting has its pros and cons, which you need to know before purchasing it.
TO positive qualities This material includes the following:
- The light weight of the corrugated sheet allows you to easily lift it to a height and, if necessary, level it at the installation site.
- Optimal ratio of cost and service life of the material. With high-quality installation, the manufacturer sets a minimum service life of 12 ÷ 15 years.
- Easy installation - the material is easily overlapped and screwed with special self-tapping screws.
- The aesthetics of the covering – corrugated sheeting, thanks to the variety of colors, makes the appearance of the house neat and gives it individuality.
- The relief of most sheet models includes special capillary grooves, which are designed to effectively drain water when laying sheets of material overlapping.

Negative qualities corrugated sheets can be called:
- High thermal conductivity of the metal. Therefore, corrugated sheeting will not protect the attic from overheating or low temperatures. If this coating is chosen, a good attic floor will be required, which involves additional costs for thermal insulation material and its installation.
- In windy weather, when the wind speed is 15 m/s or higher, any metal coating emits ultrasonic vibrations, which negatively affects the human psyche. Therefore, in regions with constant windy weather, it is better to give preference to roofing coverings that do not vibrate in the wind.
- Low sound insulation. If the roof is not equipped with heat and sound insulating material, the sounds of drops or hailstones falling on the roof will be clearly audible in the house.
Choice corrugated sheeting for roofing
Corrugated sheets can be made from galvanized metal sheets that do not have a color coating. Such sheets are most often used to create temporary or permanent canopies, or to cover outbuildings. It is also often used to fence construction sites. Unpainted corrugated sheeting has a fairly low cost, but is not very suitable for covering residential buildings, as it has low performance characteristics and is not very attractive from an aesthetic point of view.
It is very popular, which has a decorative protective coating made of polymer compounds. This material is more durable and can withstand quite serious loads. Of course this is — with proper installation, which largely depends on the angle of the roof slopes.
Several types of corrugated sheeting are produced that have a protective and decorative polymer coating:
- Bearing (H) - intended for covering the roof, ceilings and canopies.
- Wall ( WITH) - used for the construction of fences, hangars, garages.
- Universal (NS) - suitable for roofing, installation of fences, construction of garages, utility facilities, etc.
To cover the roof it is better to use a load-bearing one, but as a last resort You can use any of the above types.
In addition, this material varies in height and number of waves. The height of the wave (corrugation) is indicated by a number that is placed next to the marking of the type of corrugated sheet. For example, several models are presented in table:
| Marking | Appearance of corrugated sheets | Application | Corrugation height in mm | Metal thickness in mm | Usable width in mm |
|---|---|---|---|---|---|
| C10 |  | Wall | 10 | 0,5; 0,6; 0,7 | 1100 |
| C18 |  | Wall | 18 | 0,5; 0,6; 0,7; 0,8 | 1000 |
| S21 |  | Wall | 21 | 0,5; 0,6; 0,7; 0,8 | 1000 |
 | Roofing Wall | 35 | 0,5; 0,6; 0,7; 0,8 | 1000 | |
| C44 |  | Wall | 44 | 0,5; 0,6; 0,7; 0,8; 0,9; 1,0 | 1000 |
| H60 |  | Roofing | 60 | 0,7; 0,8; 0,9; 1,0 | 845 |
A metal sheet of corrugated sheets can have one-sided or two-sided coating, but no matter what it is purchased for, it is better to choose a material that is protected on both sides.
The coating consists of numerous protective layers; the diagram below clearly shows which layers cover the outer and inner sides.

External side of roofing material:
- The basis for corrugated sheets is steel sheet.
- The steel is coated with a layer of zinc.
- Next comes the anti-corrosion coating.
- A primer layer is applied to it, which serves as a preparation for the polymer.
- Then comes the colored polymer coating.
- A protective film (polyurethane) is often applied to the color polymer coating, which will protect it from fading and peeling.
- For transportation and storage of corrugated sheeting, it can be additionally covered with a film coating on top, which is removed after installation.
The inner side of the corrugated sheet is covered in the same sequence with exactly the same materials, but on some models there is no colored polymer film on the inside, while on others the sheet is coated equally on both sides. The latter, of course, have a higher cost, but their service life is much longer.
The color range of corrugated sheets is quite varied. According to the most conservative estimates, the color range is represented by no less than 30 shades, so choosing the right one will not be difficult. The color layer can be applied to the surface using powder or using a special polymer coating technology.
If we summarize the selection criteria, we can list the following:
- To make sure that the material is of high quality and produced under professional conditions, you should ask the seller for a product certificate. If it is missing, then it is better to contact another store.
- The markings of the material are checked, indicating its purpose, thickness and wave height.
- The appearance of the material is assessed. It is necessary to pay attention to the evenness of the sheet, the absence of defects in the coloring and protective layer, the same shade of all sheets, and the uniformity of the coating. Appearance can tell a lot about the quality of corrugated sheeting - if upon inspection you find peeling of the coloring layer or burrs on the cuts, then it is better to refuse the purchase.
- Another criterion is to check the corrugated sheet for bending - a high-quality material must be elastic, and if you try to bend it, it tends to return to its previous position. In this case, no trace of bending should appear on the coating.
- Type of external decorative coating - polymer or powder. The highest quality corrugated sheet coatings are matte and regular polyester and plastisol. Coating details must also be included in the product certificate.
- Material price. We must remember that you should not choose the cheapest material - it is unlikely to be of high quality. Moreover, all corrugated sheets have a very affordable price.
When the material is purchased, it is necessary to correctly deliver it to the construction site, and also carefully, without damage, unload it and raise it to a height.
Prices for various types of corrugated sheets
Corrugated sheet
How to avoid damage during transportation and installation of material?
It is important to highlight this issue because damage to the corrugated sheeting during its delivery, unloading and installation will significantly reduce the service life of the future roof.
This material is made from steel sheet, which is given relief by cold rolling in special equipment.

Such material, laid as a roof, is able to withstand high wind and snow loads, but during its transportation, loading and unloading, the covering of the sheets may be subjected to unnecessary mechanical loads, which will lead to its damage. To prevent this from happening, certain rules for transporting, storing, carrying and lifting sheets must be followed.
- Transportation of corrugated sheets is carried out by trucks. The sheets must be stacked on a rigid base of the body or on a special metal frame, which is fixed in the body at an angle.

- After laying the roofing material in the car, it must be securely secured with slings to avoid friction of the sheets against each other when the car is moving, since this is what can lead to damage to the protective coating.
- A vehicle transporting corrugated sheets must move at a speed of no more than 80 km/h.
- It is very important to ensure that the unloading of the roof covering is carried out with the utmost care. If unloading will be done manually, it is advisable that each sheet is removed from the stack separately, transferred and placed in the place prepared for them. It is best to prepare a flooring of boards and plywood, covered with polyethylene on top.
- It is necessary to ensure that none of the sheets are bent during transportation, since it will not be possible to return it to its original state, which means that when covering, gaps will form between the sheets that will disrupt the evenness and integrity of the roof.
- To lift corrugated sheeting onto the roof without causing harm to it, you also need to do it correctly:
- to accurately lift the material, you will need logs that are installed at an angle to the roof - these will be a kind of “rails” for the convenience of lifting sheets;

— sheets rise to a height of only one piece at a time;
— the installation of corrugated sheeting on the roof itself can be done by two craftsmen, but lifting the roofing material to a height is best done by three people — this is additional insurance for the integrity of the material and the safety of the work.
Now a few words about how not to damage the corrugated sheet during installation.
The maximum risk of damage to the material occurs if a large area of the roof is covered, since during the installation and fastening process you will have to walk on the already laid roof. Therefore, it is necessary to choose the right shoes for work - they should not only be comfortable, but also have a soft elastic sole that cannot damage the protective layer and will not slip on the roof surface. You can step on the fixed roofing material only between the ribs and only in those places where the guides pass, especially if there is a large step between them.
In order for the installation to proceed accurately, without unnecessary damage to the roofing material, you need to use only high-quality tools. To work you will need:

- Screwdriver.
- Roulette.
- Scissors for cutting metal up to 0.6 mm thick.
- Marker for marks.
- Level.
- Electric drill.
- Rubber hammer.
- Jigsaw or electric scissors.
- A soft brush for sweeping away metal shavings.
 It is forbidden to cut corrugated sheets with a grinder. The optimal tool for this is electric scissors.
 Features of installing corrugated sheeting as a roof
In order for the installation of roofing material to be successful, it is necessary to take into account some features of the work.
Influence of roof slope on installation
Much of the process of covering with roofing material depends on the slope of the roof. It is very important to correctly position the boards or bars of the sheathing, as well as maintain the required amount of overlap of the corrugated sheets.

- If the slope of the slope is 5 ÷ 10 degrees, then the sheathing is made continuous or the slats are nailed at a distance of no more than 5 ÷ 7 mm from each other.
The overlap of the sheets in this case should be horizontal in two waves, and the top row on the bottom row should be at least 300 mm. Moreover with such a small slope of the slope, the gaps between the corrugated sheets are most often filled with sealant, since there is still a risk of water flowing between them, especially in windy weather.
- When the slope of the roof slope is 10 ÷ 15 degrees, the distance between the sheathing bars is 400 ÷ 450 mm, and adjacent sheets are laid overlapping on one wave. The top row should overlap the bottom by 200 ÷ 220 mm.
- If the roof slope is more than 15 degrees, the sheathing bars are secured on the rafters on distance of 550 ÷ 600 mm. The overlap of sheets laid next to each other is made in one wave, and the top row overlaps the bottom row by 170 ÷ 200 mm.
To make it convenient to mark and fasten the sheathing, cut out the required size, for example, 600 mm, which will help to install the frame under the roofing much faster.
The procedure for securing sheets
It is very important to follow the sequence of laying sheets if the coating consists of two or more horizontal rows of corrugated sheets.
- Laying of roofing material starts from the eaves. The edge sheet is set strictly according to the building level, since the correct installation of all other roof elements will depend on its evenness. In addition, the laid sheets are aligned along the lower edge of the overhang - if this method of alignment is excluded, the lower edge of the roof will be uneven.

- Upon completion of the installation of the first row, fastening the second begins on the same side of the roof from which the first was mounted. However, some craftsmen also practice a different approach - with sequential laying of the bottom and then the top sheet, or with a “ladder” laying - for example, two sheets below - one on top, that is, the top row is constantly “lagging behind” by 1 sheet.
 The best option is if the length of the sheet is sufficient for the entire roof slope
 - If it is possible to purchase sheets equal to the length of the slope, then you should give preference to this option - this will reduce installation time, and the roof will be more reliably protected from leaks, since there will simply be no horizontal overlaps of the sheets.
Rules for fastening corrugated sheets
This is done using special self-tapping screws equipped with a press washer and a rubber gasket. To make the roof look aesthetically pleasing, the screws are usually matched to the color of the base material.

- If the roof is covered with sheets that are continuous along the length of the slope, then the first sheet is temporarily fixed at the top below the roof ridge by 50 mm and at the bottom, on the overhang. The sheet should protrude beyond the edge of the overhang by 40 ÷ 50 mm. The upper distance left open will become a ventilation gap and will later be covered with a ridge element on top.
- The second sheet is laid overlapping with the first by one or two waves, depending on the slope, aligned with the overhang of the first sheet and screwed with a self-tapping screw.

- Subsequent sheets are laid and aligned along the overhang and fastened together at the crest of the wave. They are fastened from the cornice to the ridge with a screw-in step of 500 mm.

- When 3-5 sheets of corrugated sheeting are laid and they are aligned along the edge of the overhang, they are permanently secured to the sheathing. The sheets are attached to the sheathing at the bottom of the wave, immediately after the sheets overlap, and then, passing one wave, along the bottom of the second.
- If two or more horizontal rows are laid, then in the strip of their overlap they are secured with self-tapping screws along the bottom of each wave.
If corrugated sheeting with a polymer coating is installed, then after screwing in the screws, it is recommended to remove the resulting metal shavings to avoid damaging the protective coating of the roofing material. It is completely swept away from the coating using a soft brush.
It is also necessary to stipulate the requirement that under no circumstances should corrugated sheeting be secured to the sheathing with nails or rivets, since such fasteners will not hold the sheet when a high wind load occurs. The wind can easily tear off the roof covering, leaving the nails in the sheathing bars.
Installation of additional elements
In addition to corrugated sheets, the roofing structure also contains other elements that help protect the structure from the penetration of precipitation into the attic. It should be noted that the presence of even one formed or unclosed gap in the roof can seriously damage the ceiling, as well as the walls and ceiling of the house.
Additional roofing elements include ridge, valleys, lining of pipes passing through the roof, eaves boards and others.
Skate attachment
After completing the installation of the corrugated sheets, at the highest point of the roof, its edges are covered with a ridge.

The ridge is secured with the same screws, through the top of the corrugated sheeting waves, in increments of 200 ÷ 300 mm. To make the fastening reliable, when installing the sheathing, it is necessary to provide two longitudinal boards on both sides of the ridge in advance.
When installing a ridge, it cannot be pressed tightly against the highest point of the roof - there must be a ventilation gap between it and the inner surface of the ridge element.
If a semicircular type of ridge is installed, then special plugs are installed and secured on its end sides.

Since the ridge is assembled from individual elements, they are also overlapped. Simple ridges shaped like an angle should have an overlap of 120 ÷ 150 mm, and semicircular (tiled) ridges should have an overlap of 100 ÷ 120 mm, aligning them along the stiffeners.
Use it in our article.
Finishing the gable part of the roof from corrugated sheets
To eliminate the possibility that the corrugated sheeting will be torn off by the wind from the end side, the gap between the sheets and the sheathing is closed with wind angles or planks, which are placed on one side of the corrugated board, and the other on the first rafter facing the end of the building. The plank is also secured with self-tapping screws in increments of 400 ÷ 500 mm.
 Cladding of the end part of the roof. 1 — wind strip, 2 — screws
 Since the planks are also made up of individual elements, they are laid with an overlap of 70 ÷ 100 mm.
Attaching the cornice
The cornice is installed before the base roofing material is laid. It plays both a decorative role, covering the side connections of the rafter system, and a functional one, preventing splashes when water flows from the roof into the drain from falling on the wooden parts. In addition, brackets for laying the gutter are attached under the eaves or on top of it.

- Most often, drainage brackets are first secured to the sheathing with self-tapping screws at a distance of 500 ÷ 600 mm from each other. They are lowered below the sheathing by 100 ÷ 150 mm.
- Then the gutter is installed on the brackets.
- After this, the cornice strip is installed and nailed or screwed to the bottom board of the sheathing.

- The corrugated sheets are laid on top of the eaves strip, and must be aligned in such a way that water flowing from them directly falls into the fixed gutter
Installation of the valley
Installation of a valley is not required for every roof, but only where it has a complex configuration with profile breaks. If there is a junction of two planes facing downwards, then you cannot do without installing this element.

The endow consists of two parts - internal and external.
- The inner part of the valley is laid before the roofing is laid. It is attached to the junction of two roof planes and fixed to the sheathing with roofing screws in increments of 350÷500 mm. The individual parts of the long valley are laid, starting from the cornice and rising to the ridge, with an overlap of 150 ÷ 200 mm.

- After the corrugated sheets are laid (with a shift to the inner part of the valley by 80 ÷ 100 mm), a layer of porous sealant is laid between them and the inner part of the valley. This material will prevent leakage during rain. Then the corrugated sheeting through the bottom of the waves in increments of 400 ÷ 500 mm, together with the lower part of the valley, is screwed to the sheathing with self-tapping screws.
- After this, silicone sealant is applied to the edges of the corrugated sheets, and the outer part of the valley is laid on it. Just like the inner one, it is composite, so its parts are overlapped by 100 mm, starting installation from the cornice and coating the joints with sealant.

- After this, the outer part of the valley is screwed with self-tapping screws to the corrugated sheet.
Fastening snow guard
Snow guard- this is an element that will prevent snow from suddenly falling off the roof in the spring, delaying it and giving it time to melt and drain with water or evaporate.

Snow guards There are two types - these are peculiar strips in the form of corners, scrolling in a checkerboard pattern, or horizontal tubular barriers installed in special brackets.

The brackets are attached to the surface of the corrugated sheet at a distance of 900 ÷ 1000 mm. Then special tubes with threads along the edges are inserted into the holes in them, onto which, after installation, metal plugs are screwed.
Both brackets and strips snow guards are attached through corrugated sheeting to the sheathing. When fastening the planks, they are screwed through the top of the wave, so gaps are formed between the plank and the corrugated sheet, through which melt water will flow out.
Wall profile covering the joint between the wall and the corrugated sheet
If a corrugated roof is adjacent to a wall, then the joint between them must be closed to avoid leakage. For this purpose, there is a special shaped strip - a wall profile, which is mounted on the wall using anchor fasteners, and on the metal profile - with self-tapping screws screwed into the crest of the wave.

Silicone sealant can be used to seal the joint between the plank and the wall. In addition, it is advisable to make a groove in the wall to hide the upper curved edge of this profile in it. After installation, the groove can be sealed, for example, with cement mortar or tile adhesive for exterior use.
Seals for corrugated sheets
Seals are used in roofing work to close gaps at the junctions of the covering with the wall, in places of “fractures” of hipped roofs and under the ridge.

Seals usually have an adhesive layer on one side, covered with parchment, which is removed before installation and the material is glued in the right place.

Designing the passage of a pipe through corrugated sheeting
If the chimney pipe of a stove or fireplace, or a ventilation duct, passes through the corrugated sheet covering, then you will have to work on it. But before do work for external finishing of joints, it is necessary to install around chimney internal apron, which mounted before laying on the corrugated sheeting.

An apron is installed around the pipe from separate metal adjacent profiles. On the walls of the chimney, using a marker, mark a line along which a groove will be punched to bend the upper edge of the adjacent profiles into it. Then it must be thoroughly cleaned of dust and washed with water.

After this, the so-called tie - stripe metal sheet with flanges, which are mounted from the pipe to the cornice. The tie is necessary to drain water accumulating behind the pipe during rain.
After this, the lower part of the apron must be secured for sealant, on sheathing and lay a tie on the sides of the pipe, and install the upper edge in the groove, also on the sealant. When installing parts of the adjacent strip, you must ensure that they overlap each other by 150 mm.
After the internal work is completed, the corrugated sheeting is installed. When the roofing material is laid around the chimney pipe, the outer flashing strips are installed, which are secured to the pipe and to the ridges of the corrugated sheeting on the roof.
General sequence of roof covering with corrugated sheeting

So, knowing how to install all the additional elements and the corrugated sheeting itself, you can consider the sequence of work on covering the roof with this roofing material.
- The first step is to cover the rafter system. It is laid from the eaves, overlapping the slope horizontally by 100 ÷ 150 mm. The film is secured using a stapler with staples on the rafter legs.
- Counter-lattice bars are nailed to the rafters on top of the film, which will create the necessary ventilation gap between the film and the roofing material. The size of the bars should be 400 × 500 mm, that is, the ventilation gap will be 400 mm.
- The sheathing of the slopes is arranged perpendicular to the counter-lattice. Here you need to provide additional ridge boards - they are placed on both sides of the roof ridge. Also, additional boards or bars are mounted around the chimney pipe and at the joints of the roof planes to secure the valley (inward corner) or ridge element (outward corner).
- Next, wind boards are fixed to the gable sides of the roof.
- Then the brackets for the drain gutter are attached to the bottom board of the sheathing, and the gutter itself is laid.
- The cornice strip is nailed to the outer board of the sheathing.
- The next step is to secure the inner part of the valley, if it is necessary in the roof structure.
- Then you can proceed to waterproofing the chimney pipe. A tie is laid along its edges, going to the cornice - it is attached on top of the cornice strip. Next, install and sealed elements of the internal apron adjacent to the pipe.
- Having dealt with the internal additional elements that should be under the roofing material, we proceed to the installation of corrugated sheets. To pass the pipe in one or two sheets, an opening of the required size is measured and cut using electric scissors. The edges of the corrugated sheeting should cover parts of the apron attached to the sheathing and come close to the pipe. It is possible to leave a gap of 50 ÷ 70 mm.
- Next, at the junctions of the two roof sections, the outer part of the valley is fixed.
- After this, the metal elements of the ridge are fixed to the highest point of the roof.
- The last step is to attach the windproof corner.
So, as you can see, there is nothing supernatural in laying such a roof. Having studied the sequence of work and the technology for their execution, enlisted the assistance of reliable assistants, acquired the necessary material, and prepared the tools, you can safely begin covering the roof with corrugated sheets on your own.
And at the end of the publication - a useful video with the intricacies of the process of installing a roof from corrugated sheets.
Video: important nuances when laying corrugated sheets as a roof
We found out which brands are most in demand in construction, how corrugated roofing sheets differ from load-bearing and wall sheets, and also briefly touched upon the materials of protective coatings for profiled sheets.
Light weight, high strength, durability, a wide range of colors of manufactured profiled sheets made of galvanized iron - these are the main advantages of corrugated sheets that have ensured its popularity in modern construction.
Temporary fencing and fencing are made from corrugated sheeting; it is used in the construction of walls and ceilings, as well as in roofing.
Corrugated sheeting covered with a protective layer of polymer material can serve as reliable protection for the roof of your country house or bathhouse for many years. In terms of its characteristics, such a profiled sheet is practically in no way inferior and is increasingly becoming a worthy choice as a roofing material.
Let's find out how to correctly lay corrugated sheeting on a roof, what minimum slope should be chosen for a roof made of corrugated sheets, what brand of corrugated sheeting is best to choose as a covering, and also how to properly attach corrugated sheeting to the sheathing.
Which brand of corrugated sheet should I choose for the roof?
Today, the industry produces a wide range of profiled sheets, differing in profile height, configuration, metal thickness and width of the workpiece from which the corrugated sheet is made.
Corrugated sheeting of various brands can be successfully used for roofing. The main thing is that its coating is resistant to environmental influences, and its load-bearing capacity corresponds to the perceived snow and wind loads. Depending on the height of the profile and the thickness of the metal, you should select the correct lathing pitch (see this article below).
For the construction of a roof on a pitched roof, corrugated sheeting with a thickness of 0.5-0.7 mm will be sufficient. The most popular types of corrugated sheeting for roofing are C21 and MP-20R.

If possible, you should choose a profiled sheet with the most resistant coating - pural, plastoizol, PVDF. Such a roof will serve faithfully for decades without repair.
When counting the number of sheets, you can use a special program or draw roof slopes and corrugated sheets to scale.
When determining the required number of sheets, do not forget that the profiled sheets are mounted overlapping each other at the joints. For each brand of corrugated sheeting, the size of this overlap will be different; it must be taken into account, since the overlap somewhat “eats” the width of the sheet. Recommendations for overlap during installation (in one or two corrugations) - see below in this article.
In addition, you need to add a certain length of sheet to the overhang of the cornice, which, depending on the brand, can be up to 300 mm.
The length of the eaves overhang for the most popular brands of corrugated sheets is shown in the table below:
You should also take into account the amount of overlap along the length if you have sheet joints on the short side (if the length of the slope is greater than the length of the sheet, which is not so common, but it happens). In these places, the overlap, depending on the slope of the slope, will be from 300 mm (with a slope of up to 14 degrees) to 100 mm (with a slope of 30 degrees or more).

The figure shows:
- Ks - eaves overhang of corrugated sheet;
- Ng - horizontal overlap;

Also, before purchasing, you need to calculate the number of additional elements - strips and valleys that will be installed in places where the slopes break, at the end and cornices of the slopes, on the ridge and in places where the slopes meet the counter-slope.
Additional elements for installing corrugated sheets are shown in the figure below:

Minimum slope and pitch of corrugated roof sheathing
As you know, the choice of roofing material largely depends on the angle of the slope. An article on the construction of a pitched roof provided a diagram showing the preferred roofing materials depending on the angle of inclination of the slope. The diagram shows that sheet steel roofing materials should be used starting from a slope of 15-20 degrees.
Depending on the slope, the pitch of the sheathing installed under the roof made of corrugated sheets also depends. The pitch of the sheathing and the vertical overlap of the profiled sheets can be approximately taken from the table below:
Table of slopes and sheathing pitches
|
Corrugated sheet |
Roof inclination angle, degrees. |
Sheet thickness, mm |
Lathing step |
Installation features |
|
15° or more |
Continuous sheathing |
Overlap in two corrugations |
||
|
Continuous sheathing |
Overlap in two corrugations |
|||
|
15° or more |
Overlap into one corrugation |
|||
|
Continuous sheathing |
Overlap into one corrugation |
|||
|
15° or more |
||||
|
Overlap into one corrugation. |
||||
|
15° or more |
||||
|
Overlap into one corrugation. |
||||
|
15° or more |
||||
|
Overlap into one corrugation. |
||||
|
15° or more |
||||
|
not less than 8° |
For roofing of industrial facilities, 2 times stiffer than profile S-44 |
|||
|
not less than 8° |
For roofing of industrial facilities, self-supporting profile |
With an increase in the angle of the roof, the pitch of the sheathing increases. Wooden blocks of 3x10 or 5x5 cm are used as lathing for corrugated sheeting.
Construction of a pitched roof made of corrugated sheets
If you have calculated and purchased the required number of corrugated sheets, as well as additional elements, then you can proceed to the installation of the roof.
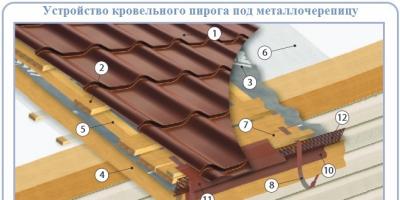
If you have a warm attic, then the composition of the roofing pie will look like this (from top to bottom):
- corrugated sheeting;
- sheathing;
- waterproofing;
- insulation;
- counter-lattice.
The installation diagram of an insulated roof made of corrugated sheets is shown in the figure below:

The construction of attic floors and rest rooms in the attic of a roof covered with corrugated sheeting is not recommended, since no layer of insulation will save you from the loud drumming of rain on the corrugated sheet. This is one of the main disadvantages of profiled sheets used as roofing.
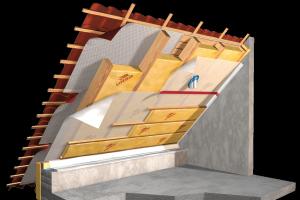
If you plan to build a cold attic, then the roofing pie will look like this:
- corrugated sheeting;
- sheathing;
- waterproofing.
In this case, the waterproofing is rolled out with a slight sag directly along the rafters, on top of which the sheathing is subsequently hammered under the corrugated sheet as shown in the figure below:

In the figure the numbers indicate:
- rafters;
- waterproofing;
- rafter strip;
- sheathing.
What the sheathing looks like on top of the waterproofing is shown in the photo below:

How to attach corrugated sheets to the roof?
The corrugated sheeting is fastened to the sheathing using special self-tapping screws for corrugated sheeting with a neoprene sealing gasket that protects against moisture penetration under the roof. Self-tapping screws are produced painted in RAL colors corresponding to the palette of profiled sheets.

The pitch of the screws should not be less than 500 mm. Self-tapping screws are screwed into the lower part of the corrugated sheet wave, and into the upper part where the ridge is installed.
Installing the end strip
From the end of the slope, the corrugated sheet is covered with an end (gable) strip, which protects the roof from moisture penetration and from wind, which can tear off the sheets with sufficiently strong gusts.
How the end strip is installed is shown in the figure below:

In places where the slope is broken and in areas where the slope adjoins the wall, a corner strip is installed, one side is attached to the wall, and the other side is attached on top of the corrugated sheet using self-tapping screws and silicone sealant.


Skate device
The ridge is formed as shown in the figure: