In order to properly equip the roof of a house, you need to go through several sequential steps, including the starting ones - to create the frame and the final ones - to design it. The latter include the installation of weirs, snow clearers and hemming of projections, which directly protect the façade of the building from destruction.
Purpose of roof lining
The procedure itself is necessary to protect the roofing elements from destruction and for the beauty of the building.
Roof lining allows you to:
- give the external appearance of the structure a completed look;
- regulate the thermal insulation level in the premises of the building;
- prevent the regular influence of natural precipitation on the condition of the external elements of the building;
- regulate the temperature in the rooms.
Experts advise filing all overhangs, regardless of their size, angle of inclination and design features of the roof.
DIY cornice finishing
Sheathing the roof of a house is not difficult at all. This procedure is quite accessible to every home owner, but requires certain knowledge and skills. First of all, it is necessary to carry out preparatory work on decorating the roof frame with your own hands.

Actions are classified into:
- preparatory;
- protective coatings for protrusions.
Preliminary actions
Starting events are long-term, consisting of a series of tasks:
- Focus on material, hemming technology, ventilation.
- Organization of rafters, walls, tools, etc.
What material to choose - how to hem the roof from below
For filing overhangs, it is better to prefer the same roofing decking. According to the quality and size of the products, the cost of hemming activities is calculated. The strength and service life of the material are also important.
Lining
The use of lumber for lining roof overhangs with clapboard is a fairly common procedure and quite in demand. This material is used to hem wooden ledges of buildings and more.
When choosing a lining it is important:
- Quality of wood products. That is, defects on the boards (cracks, knots, chips, etc.) are unacceptable. Craftsmen recommend using “Extra-lining”, which during the production process undergoes thorough screening for defects and is dried according to a unique technology.
- Humidity, which should vary between 30 and 40%. This indicator is measured using a conventional moisture meter.

Since the wood will be used outdoors, it needs to be kept outside for a month to achieve the optimal level of humidity and prevent deformation of the bars.
- The quality of lumber depends on the type of tree. It has been proven in practice that it is better to use spruce, larch, and pine as durable and economical species that are resistant to the process of decay.
- Board dimensions. The best option is lumber with a thickness of 15 mm and above, and a length that is adjustable by the overhang.
It is worth noting that, due to the need to use wooden planks with a length of 5 to 25 cm, it is better to immediately buy short products of the appropriate sizes. This way you can save a lot of money when lining the roof eaves with clapboard.
Profiled sheet
If there are special requirements for the strength characteristics of the structure, then it is better to use sheet profile material, for example, corrugated sheets of steel, or treated with zinc or polymers.

When choosing profiled sheets, you must not forget about:
- The condition of the surface, which should not be rough, without scratches, chips or dents.
- Wave height that provides the necessary ventilation. A slight difference is quite enough for this purpose. When finishing the roof overhang, large waves do not protect against the regular entry of rain, snow, and hail into the interior and contribute to the destruction of the frame.
- Color scheme. The tones of all professional sheets should not differ from each other.
- Leaf length. This parameter can reach 6 m, so choosing the required size will not be difficult. It is better to install a larger profiled sheet, equal to the length of the overhang span, and not taken from small panels.
- Ease of construction. The optimal solution is to line the roof with corrugated sheets 0.55-0.8 mm thick. If this value is greater, the sheets will be heavier, which is completely inconvenient during installation. Accordingly, the load on the frame components of the roof will increase.
It is worth noting that the corrugated sheets will have to be cut into sheets with your own hands, and this will require a special device and additional time.
OSB and plywood
This is the most affordable type of lumber from a financial point of view, and also has excellent strength characteristics. Therefore, OSB and plywood are in great demand for roofing work.
If you chose this representative of particle board lumber for lining your roof with your own hands, then it is worth noting that during its production the layers of plywood are connected with formaldehyde glue, and subsequently the harmful compounds simply evaporate.

When choosing a material, you should pay attention to:
- Type of wood. It is better to prefer products from coniferous forests, because... it is more resistant to any weather surprises. Consumers are especially pleased with its increased moisture resistance.
- Material thickness. When arranging the roof, sheets whose thickness varies from 9 to 10 mm are more in demand. Only these dimensions make the structure strong and reliable.
- Condition of the slabs, namely, the absence of chips, delaminations, shape deformations and other material defects.
- Plywood brand. Experts consider FSF to be the best option for installation in the fresh air.
Like corrugated sheeting, you will have to cut plywood yourself, which is not at all difficult.
Soffits
This is a kind of specific category of materials, including a set of products from: PVC, steel, copper and even wood. Such roof overhang lining will look attractive and will last a long time. Each plank should be in harmony with the design of the house, giving it a complete look.
Finishing roof overhangs with soffit is an extremely simple procedure, but first you need to make the right choice of the material itself.

Priority is given to:
- Dimensions that are calculated independently, according to the width of the overhang and the length of the span on one side of the roof.
- Color scheme. No recommendations are given in this regard either; the choice is yours, taking into account the large assortment of spotlight tones, design style and variety of color palette of all components of the structure.
- The type of perforation, depending on the location of the soffits. The overhangs of the gables are often hemmed with solid panels. Fully perforated elements of a set of soffits are in demand for finishing any type of projections, and partially for cornices.
Sheathing sequence
Experts in finishing roof overhangs distinguish two main processes:
- installation on rafters;
- with the preparation of a horizontal box directly under the ledge.
When choosing a technical process for filing, the reference point is made to the angle of inclination of the roof. If it is flat, then it is better to use the first option, and if it is hip or has a steep slope, then the second.
Rafters
To prepare the rafters, you need to decide on the method of cutting the wood and installing the frame for the construction of the projections.
Sequence of activities when preparing rafters:
- Provide for their length to be 30-50 cm longer than planned.
- Form a protrusion that would correspond to the specified size.
- Cut the material and process the edges of the rafters:
- vertical cut - for the purpose of filing along the rafters;
- vertical and horizontal sections - during the creation of the box.
It should be noted that if there is an unexpected increase in the width of the overhang before installation, the rafters must be lengthened using beams - “fillies”. - Achieve a straight overhang line.
Walls
Preparing the walls when finishing the roof eaves means insulating them, i.e. is a mandatory requirement of the procedure itself.
The process involves eliminating cracks and crevices that would allow water and air to pass through. The desired result will not be achieved if the insulation of the walls is done after the roof overhangs are installed.
House roof ventilation
When decorating protrusions, it is necessary to create a ventilated place under the finishing material. Thanks to this condition, it is possible to avoid the accumulation of moisture in the sheathing area and subsequent rotting of the load-bearing components of the roof structure.

Depending on the material, choose the ventilation method:
- By creating small gaps between the hemming elements.
- Uniform installation of ventilation grilles in the panels. This option is the most popular.
Using spotlights will make things much easier, because... they already have perforations for future ventilation.
Tools
To figure out how to make roof ends, you should purchase all the tools in advance:
- saw;
- grinder;
- drill;
- screwdriver;
- hammer;
- stepladder;
- level;
- fasteners: self-tapping screws, nails, screws, etc.;
- measuring device.
In addition, you should not forget about the materials for filing, as well as:
- cord;
- paint, according to the type of material;
- antiseptic solutions.
Installation on rafters
This technological process of roof upholstery is performed in the following sequence:
- Cut the material according to the protrusion parameters.
- Treat all parts with an antiseptic to improve their protective properties.
- If the technology requires painting of the sheathing elements, then this must be done before installation.
- Check the smoothness of the rafter bases.
- If necessary, level the rafters using additional boards that overlap.
- Secure them with screws or nails.
- Mount the last planks from the ends strictly along the eaves line.
- Secure with hardware according to the type of material.
- Pull the cord.
- Continue installing subsequent parts of the lining, always oriented along the line along the cord.
- Leave 5 to 10 mm distances between panels, because Due to weather surprises, the material may stretch.
Decorating a box for filing
The steps to create boxes on the roof with your own hands are carried out in strict order:
- Cut and pre-treat the material with antiseptics and paints and varnishes.
- Install and secure the board along the underside of the rafters.
- Nail the beam to the wall one centimeter higher than the front board.
- Arrange all the parts of the filing sequentially: fasten one edge to a beam mounted to the wall, the other to a board located on the side of the rafters.
- Alternate panels with ventilation grilles at equal distances or leave a gap of 2 cm or more between the parts of the filing.
- Fasten products with profile plates, screws, corners. Note! If the boards are long, at least three fastenings are necessary to avoid deformation.
- To form corners, mount the panels on both sides of the rafters or flat.
Technology for installing soffits on an overhang
And finally, let’s look at how to cover the eaves of a house with soffits. The procedure is quite simple, but at the same time, it requires theoretical knowledge to ensure reliable coverage.

All actions must be performed in a certain sequence:
- Cut the blank material to fit the width of the overhang. If this value is more than 45 cm, then additional installation of a horizontal plank in the middle is necessary.
- Mark the fixation line on the wall.
- To ensure reliability and evenness of the fasteners, you will need to mount the board on the wall along the entire length of the protrusion.
- Attach the bars to the rafters from below horizontally, because Soffit panels will be mounted to them. Remember that before installing the soffits, you need to pre-cut the rafters along the vertical and horizontal lines.
- Place the F or J profile on a board fixed to the wall.
- Connect the parts with screws.
- Insert the panel strips into the profile one by one.
- Attach the opposite side of the product to the rafter beam or add another J(F) panel. If, due to the significant width of the overhang, you have an auxiliary strip attached in the middle, then you will need another fixation of the timber with the soffits with screws.
- As soon as the installation procedure is completed, install the L-profile along the eaves lines, which will cover the ends of the rafters and panel strips.
Bottom line
Now you know how to hem the roof from below, and in what order to perform all the steps. Whatever technological process and material you choose, you must strictly follow all installation rules. The strength of the structure will depend on this, and the building and roof will become incredibly attractive.
1.
2.
3.
4.
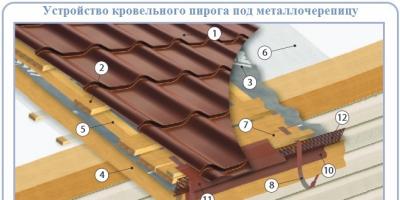
Having completed the construction of the roof structure, it is necessary to file its overhangs. Finishing the roof overhang is the final stage, as a result of which the appearance of the house is completed.
The design of the gable roof lining involves the construction of elements for ventilation of the under-roof space. Don't forget about fixing the drainage system. Various materials are used for hemming overhangs. For example, lining roof overhangs with corrugated sheets.
Hemming of roof overhangs: features
So, the following types of materials can be used to line the roof overhang:

What should be the roof overhang: sheathing and frame
Having completed the installation of the roof structure, you can begin the process of covering the overhangs.
In this case, you need to remember two design options:

Fitting the eaves overhang with soffit, details in the video:
Dimensions of corrugated roof overhangs and their installation
The algorithm of actions when working with this material is as follows:
- Using self-tapping screws, the corrugated sheeting is screwed to the frame along the wall and cornice.
- The junction of the material and the wall is determined - the front plate and the inner corner are mounted. The latter is screwed to the corrugated sheet, and the front strip is screwed to a similar board.
- An outer corner is attached to the external joints of the corrugated sheeting.
- Corrugated sheeting is fastened along the pediment - along the extreme edge of the overhang and next to the wall where it is located
The eaves overhang is the part of the roof that protrudes beyond the wall of the house, protecting it and the foundation from precipitation. But this element has a lower side, which must be closed, because through it the wind will rush into the attic, pressing on the roofing material from below, dust, insects, birds and other troubles. In addition, this part of the cornice is visible, which means it is necessary to take care of its appearance. A simple option to cover the overhang is to use profiled sheets. The eaves overhang of a roof made of corrugated sheets is a strong protection, plus full compliance with the design of the roof itself, if it is covered with the same roofing material as the overhang.
Eaves overhang of the roof of a house, lined with corrugated sheeting
The width of the overhang does not exceed 50 cm. This is a significant area considering the length of the roof slope that needs to be covered. Therefore, first of all, it is necessary to measure the width of the cornice in the horizontal plane in order to determine the length of the corrugated sheet sections used. Then measure the length of the slope to accurately determine the number of pieces required.
Typically, the standard working width of a profiled sheet is 1 m. If, for example, the length of the slope is 10 m, then you will need 10 cut pieces with a width equal to the width of the eaves overhang.
Before moving on to lining the roof eaves with corrugated sheeting, you need to build a frame under the latter. How to do it?
Assembling the frame for corrugated sheets
The overhang (eaves) of the roof are the rafters that extend beyond the wall of the house. That is, their ends will be the beginning of the assembly of the frame structure. On the end side, the rafters are covered with a wind board located in a vertical plane. It is its lower end that can be considered the place to which the outer edge of the profiled sheets can be attached.
This means that it is necessary to lay out the frame structure from her. That is, in a horizontal plane from the lower end of the wind board to the wall, you need to install a batten or any other flat material. With its help, points are determined on the wall that will create a horizontal line on the wall surface. There can be two such points on each edge of the eaves of the roof slope. Then they are connected by a line.
Along this line, a wooden batten (usually 50x50 mm) is installed, which is attached to the wall of the house with self-tapping screws and plastic dowels. The distance between fasteners is 40-60 cm. How to do it correctly:
- a hole is drilled in the slats with the required pitch;
- the frame element is applied along the drawn line;
- marks are made through holes on the wall;
- the rail is moved to the sides and holes are drilled at points in the wall;
- dowels are inserted into them;
- the rail is put in place and attached to the wall of the house with self-tapping screws.

Installation of corrugated sheeting for roof overhang along the frontal wind board
Next, the two frame elements for the cornice hemming need to be connected to each other with crossbars made from the same wooden block. In this way, structural rigidity is achieved. The distance between the crossbars is no more than 50 cm (for each profiled sheet there are at least three crossbars: two at the edges, one in the middle). They are attached to the rail installed on the wall and to the end of the wind board using ordinary wood screws 50-70 mm long.
If the wind board is not included in the roof structure, then you need to install a horizontal strip along the rafters, to which the outer edges of the corrugated sheets will be attached. It is important to install the rail so that its lower end is positioned exactly horizontally. This means that the ends of the rafters will have to be trimmed. Therefore, first the ends of the two outer rafters are set to the same level. Then a thread (twine) is stretched between them, which is set horizontally with a building level. After which the ends of all other rafter legs are aligned along this thread. Protruding parts are cut off.
Further, as in the previous version, the lower end of the batten placed on the rafters is the starting point in assembling the frame for the cornice. It is from this point that the points connected into a horizontal line are transferred to the wall of the building. The support rail is installed along the latter.

Assembling a frame from two or three longitudinal slats
The third option for constructing the frame is not to attach the rail to the wall, but to lower fillets from the rafter legs along the wall, which will be attached to the rafters with self-tapping screws. And then attach the rail to them.
We invite you to watch a video on how to assemble a frame for covering an eaves overhang.
Installation of corrugated sheets
After assembling the frame and determining the dimensions of the profiled roofing material for covering the roof eaves, you can proceed to installation work. First of all, pieces of corrugated sheeting are cut to length. Then, starting from the corner of the slope, the planks are installed and secured to the frame structure.
The same installation rules are used here as for roofing. That is, the sheets are laid overlapping in one wave and attached to the sheathing with self-tapping screws in the lower profile. The fastening step is one or two waves. Since the lining of the eaves overhang is not exposed to the negative effects of natural precipitation, you can use any metal screws (not necessarily roofing screws), preferably galvanized (silver) for fastening. The corrugated sheets are laid along the cornice frame and attached to the support rails.

The corrugated sheets must be fastened to the frame using galvanized screws.
The next stage is filing the front board or, if it is not in the overhang structure, then the gaps between the rafter legs. Here, also, corrugated sheeting is used for covering, which is cut taking into account the distance from the sheathing frame to the roofing material. The panels are laid in the same way with an overlap in one wave. Fastenings are made with galvanized self-tapping screws into the lower part of the wave.

Covering the frontal (wind) board
Please note that profiled sheets of binders laid in different planes must match the waves. That is, the lower ones should be in contact with the lower ones, the upper ones with the upper ones.

The waves of the profiled material must coincide on different planes being finished
There are gaps between the horizontal and vertical cladding of the eaves overhang, as well as between the horizontal cladding and the wall of the building, which spoil the appearance of the structure. They need to be covered with something.
- A corner is installed between the two skins, which is attached to the rafter legs, to the batten or wind board through corrugated sheets. The corner can be ordered to the required dimensions from the same material as the corrugated sheeting. Or you can do it yourself.

To close the angle between the vertical and horizontal planes of the filing, use a decorative corner
- You can install a corner between the cladding and the wall of the building, but not an external one, as in the photo above, but an internal one.
There is another option for covering the vertical plane of the eaves overhang. For this, a galvanized sheet, painted in the color of the filing, is used, which is bent into a certain shape. This option is clearly visible in the photo below. It is convenient in the sense that there is no need to carry out additional operations related to the installation of a decorative corner.

Covering the wind board with a special metal element
Side roof cornice
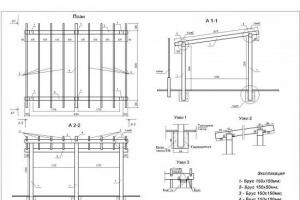
The gable part of the roof also has a small eaves overhang. Usually it does not exceed 30 cm. It can also be covered with corrugated sheeting using the same technologies. True, it is easier to work here in terms of assembling the frame, because the supporting elements to which the metal panels will subsequently be attached are themselves attached to the roof sheathing. That is, there is no need to drill anything. All parts are fastened together with wood screws.
The frame is assembled from two slats or boards, which are laid parallel to each other and along the overhang with fastening to the sheathing. No additional elements are required here anymore, because the boards are attached to the sheathing, which is often laid slats. That is, the number of attachment points is sufficient to guarantee the strength and rigidity of the frame structure.

Position “A” designates two frame elements for covering the gable overhang with corrugated sheets
Frame overhang ventilation
The attic space must be equipped with ventilation to remove moist air that penetrates from the interior of the house. To do this, a gap is left at the ridge for air to escape, and holes must be left in the eaves overhang system for fresh air to penetrate. That is, the total air flow should move from bottom to top.
If soffits are used to cover the eaves, then these are finished products in which the holes have already been made in the factory. To create ventilation for a roof whose overhang is covered with corrugated sheeting, you will have to think through a system for supplying air to the attic. The easiest option is to make holes in the corrugated sheets with a drill and a drill bit. True, the appearance of such a finish will not be the most presentable.
There is another option that uses special decorative grilles. You will have to make holes in the overhang trim for them, where they are inserted.

Ventilation grilles in the eaves
Conclusion
The eaves of the roof can be finished with different materials, but corrugated sheeting has sufficient strength and long-term operation, plus a low price compared to the same soffits. That is why the material is often used for covering cornices.
12362 0 1
Proper filing of the roof eaves - choice of 3 options and step-by-step guide
The facade of the house will never look finished and neat if the roof overhangs are not trimmed. Now there are different options for developing this sector. Based on the extensive experience of the practitioner, I have chosen the 3 most popular types of cornice cladding and then you will find out why most owners prefer them, and at the same time we will step by step analyze the installation process with our own hands.
Why hem the cornice?
The aesthetic component of the cladding is, of course, important, but in addition to it, eaves overhangs also perform an important practical function:
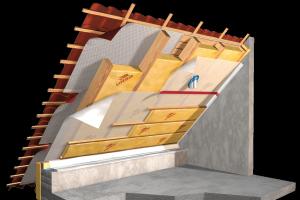
- In the vast majority of roofs, it is now customary to insulate, and if the roofing cake is not covered along the edge with a frontal strip, then it will remain defenseless against the vagaries of nature and will begin to actively deteriorate, especially for insulation;
- The frontal board, which covers the frontal strip and is also considered part of the cornice structure, is the basis for the ebb system; in most cases, the ebbs are attached directly to it, it’s easier;

- Ventilation of the under-roof space proceeds from the bottom up; accordingly, in sloping roofs, the air enters through the eaves overhang and exits in the area of the ridge. A well-designed eaves overhang plays the role of a kind of filter, preventing debris and excess moisture from entering under the roof;
- And finally, birds, insects and other living creatures often build their homes under the roof, and by covering the overhangs, you extend the life of your roof.
What is the difference between a gable overhang and a cornice overhang?
Such structures are divided into pediment and cornice. Each of these overhangs performs its own function:

- Cornice are called horizontal overhangs that originate from the lower section of the roof. Their arrangement is considered the most important, since this is where the air comes in to provide under-roof ventilation;
- Gable overhang- this is the lower inclined sector of the roofing pie, bordering the gable of the house. It does not take part in ventilation and the sheathing is needed here only for beauty and to protect the insulation from living creatures.

Pediment overhangs can only be found in those roof structures where there is an inclined cut of the roof plane, for example, gable roofs. Hip, hip and other closed rafter systems have only eaves overhangs.
Three options for finishing materials
In reality, there are many more such options; we took only the most popular ones, plus even in popular directions there are differences in models and types.
Option No. 1: wooden overhangs
Until recently, wood was the most common material. The beauty of natural wood is undeniable and the sheathing is quite easy to install. The only downside is the need for good wood impregnation. The line includes lining, as well as hemmed and edged boards.

| Illustrations | Recommendations |
 |
Lining.
The main advantage of such planks is the convenient tongue-and-groove connection. There is a tenon on one end and a groove on the other. Thus, the cornice, finished with wooden lining, will have no cracks or gaps. |
 |
Hemming board.
This board has a peculiar shape, its ends are beveled at an angle, which allows you to equip the surface without visible cracks.
|
 |
Edged board.
This is the simplest option. The edged board can be laid flat with small ventilation gaps between the planks, but this will not be very attractive. Or sew up the cornice with a herringbone pattern, as in the photo on the left, although in this option you will have to leave special slots for ventilation. |
Option No. 2: soffits or siding for eaves
Covering eaves with siding is now breaking all records of popularity. To be precise, eaves siding is usually called soffits. Such planks differ from conventional siding by the presence of ventilation meshes or grilles. Otherwise, both the material and the installation of soffits are similar to the arrangement of siding.
| Illustrations | Recommendations |
 |
Copper soffit.
If installed correctly, a copper soffit will last longer than the roof itself. Copper does not need to be painted or impregnated with anything, it is good as is. The only problem is that copper soffits are very expensive. |
 |
Aluminum.
Aluminum soffits are just as durable as copper ones. Plus, these planks are powder painted, which means the color can be matched to any façade. True, the price of aluminum soffits is not much lower than copper ones. |
 |
Cink Steel.
The price here is average, plus galvanized soffits are also painted and if they are not scratched, they will last a long time. |
 |
Plastic.
Vinyl soffits can be called the best option. They are light, not afraid of moisture and the most affordable. The main thing is not to buy cheap models, as they change color over time. |
Option No. 3: profiled sheet
Finishing with corrugated sheets is not much different from covering eaves with soffits; they are even visually similar. Moreover, the corrugated sheet is made from the same galvanized and painted metal as steel soffits. Only the dimensions of these sheets are much larger and there are no ventilation meshes on them. They will have to be arranged separately.

Overhang installation technique
Installation of overhangs is carried out after the roofing pie is completely arranged. It is desirable that the wall decoration is also finished, but this requirement is not necessary.
Types of structures
Sheathing of overhangs can be carried out in 3 options:
- Under the rafters;
- Using hanging fillies;
- Tied to the wall.
| Illustrations | Recommendations |
 |
Sheathing parallel to the roof.
Roofs with a small angle of inclination, usually up to 30º, are covered under the rafters. Fewer calculations and measurements will be required here, but it is important that all rafter legs are of the same thickness and located on the same plane. |
 |
Hanging fillies.
Box designs are more common. According to the rules, it is necessary to equip the fillies as in the diagram on the left and attach the lining to them. |
 |
Snap to the wall.
This installation is much simpler than the previous one, but according to this scheme it is impossible to sheathe the eaves of wooden houses, since during shrinkage they may warp or even collapse. |
Installation of end and front boards
- Installation should begin with trimming the rafters and under-roof sheathing strips to the level. To do this, a cord is stretched between the extreme points and everything is trimmed along it;
- The end board is nailed along the sloping edge of the roof. It will become a limiter for installing a gable overhang;
- Under the front board, the edges of the rafter legs must be cut strictly vertically, but before installing it, first a strapping or hemming board is nailed and only then the front board is attached to it;
- The dimensions of the hem board should be about 20x150 mm. The end and front boards are taken thicker, from 30 mm.

Arrangement of spotlights
It doesn’t matter what material the soffits are made of, their installation technology is the same. From the material we will need a J-chamfer, a J-profile, a finishing profile and the soffits themselves.
There are 3 schemes for arranging a cornice with soffits, we will take 1, since it is cheaper.

| Illustrations | Recommendations |
 |
J-profile.
We measure the J-profile. The outer and inner corners in a gable roof are the same; in other roof structures they need to be measured separately. |
 |
cutting.
Soffits and profiles are easier to cut with a grinder. |
After completing the construction of the roofing structure and the installation of the covering, it is time to file the roof overhangs, which are sometimes simply called the frame. The appearance of the entire building depends on the method of filing and choice of material. The box under the roof is the final touch that gives the entire structure a finished look.
The design of the box also includes elements of the ventilation system of the under-roof space. Don't forget about fixing the gutters.
To hem overhangs, you can use a variety of materials and a variety of designs.
What is a roof overhang?
An overhang is a structure protruding a certain length beyond the line of the load-bearing walls of a building, the main function of which is to protect the building and its load-bearing structures from snow, rain, and melt water flowing down the roof.
The length of the overhangs is on average 500 - 600 cm, but it can be increased if desired.
Usually, overhangs are created using the rafter system, but sometimes it is not possible to create such overhangs as a continuation of the rafters. In such cases, the so-called forced continuation of the rafter structure is used. The elements forming the elongated rafters are called “fillies”.
Since the gable of a building is also an unprotected part of the house or roof, it also needs protection from the destructive effects of rain and snow. The width of the front overhangs should be 500 mm or more, and such a structure is constructed using cornice-type boards.
The bottom of the overhangs must be sheathed to extend the service life and improve the exterior of the building.
What technologies are used and what to focus on when filing overhangs?
You should start filing when the work on installing the rafters is completely completed and you need to move on to laying the sheathing along the border of the roof covering.
When covering overhangs, several important points must be taken into account.
- Before starting work, it is necessary to saw off the ends of the rafters exactly along the same line. The parallelism of this line relative to the adjacent wall of the building must be maintained.
- In most cases, sheathing is done with boards. Its visual appeal depends on maintaining equal width in different sections of the wall.
- The ends of the rafters are sawed off vertically, while the end part is sewn up in the same way as the entire hem.
- After sawing the rafters is completed, the first sheathing board is placed along it in one straight line. In the future, it serves as a guide for completing the rest of the work.
- One important point must be taken into account: you can begin external insulation only after completing the process of filing the roof overhangs.
- If insulation is done before installing the sheathing, boards will have to be torn off to install high-quality insulation.
Selecting material for cladding overhangs
There are a lot of materials that are designed for lining roof overhangs. Despite their diversity, they are subject to the same requirements.
The material for the lining must provide reliable protection of the eaves of the roof from any precipitation, its insulation, as well as good ventilation of the under-roof space. High-quality lining material retains its original characteristics for a long time.
The most commonly used materials for lining overhangs
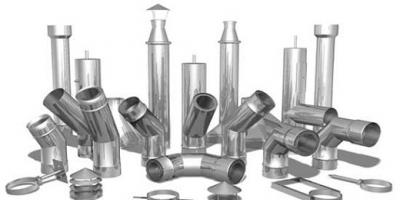
- Corrugated sheet
It consists of galvanized steel sheets coated with a polymer layer. The polymer is applied mainly for additional protection of galvanized steel, but also performs an indirect function - it provides a variety of colors.
Thanks to galvanized steel, a high level of rigidity of the sheets and resistance of their geometric parameters in relation to thermal and mechanical loads is achieved. The former includes exposure to high temperatures, and the latter – wind pressure.
When choosing corrugated sheeting for lining overhangs, ventilation is ensured due to the presence of a gap that is created by the height of the wave. Panels from corrugated sheeting can be made to the required width, which significantly reduces the time required for their installation, as well as the financial costs of lining.
- Soffits
These are plastic-based panels that are produced specifically for lining roof overhangs. The soffit is very easy to use and therefore very popular. In many ways it is similar to siding, but it also has some differences.
Firstly, the thickness of the soffit plastic is much greater; secondly, the material has a special perforation, the purpose of which is to ventilate the under-roof space. Thirdly, the soffit plastic contains special UV stabilizers, which significantly increase its resistance to ultraviolet radiation.
Soffits are very lightweight, making them easy to transport. To install the spotlights, you do not need any special equipment, which allows you to cope with the work yourself, without the help of professional builders.
Since the spotlights are resistant to adverse weather conditions and sudden temperature fluctuations, they can be used at any time of the year and in any weather conditions.
A wide selection of colors allows you to implement the most original design solutions.
Soffit panels are cut to the length of the overhangs. They are installed not along the wall, but perpendicular to it.
- Ordinary wooden lining
Since, when used as a lining, the material is used outdoors and is exposed to adverse environmental factors, when choosing it, you must be especially careful about the quality of the wood.
Attention should be paid to such qualities as the thickness of the product (it should not be too thin), the degree of humidity (the lining should not be too dry or too wet).

The finished lining strips are laid very tightly together. In order to ensure ventilation, it is necessary to cut ventilation grilles into the structure every 1.5 meters.
Planed edged boards are the most cost-effective option. Its thickness should be from 17 to 22 mm, the width is selected individually and can range from 50 to 250 mm.
The wood used is from coniferous trees: spruce, pine, larch. Before installation, the boards must be impregnated with antiseptic and waterproof (impregnation, paint, varnish) compounds.
As in the case of using lining, the moisture content of the boards should correspond to the natural humidity of the environment. If you use wood that is too dry or too wet, it will warp over time.
Overhang trim boards are placed parallel to the wall or perpendicular to it. As a rule, a gap of 10-15 mm is maintained between them so that air masses can freely penetrate into the under-roof space and ensure its uniform ventilation.
When positioned perpendicularly, the plank lining is attached on both sides; when positioned parallel, it is attached every meter. If the overhang is wide, then the fastening is made in the middle.
- PVC siding
One of the most economical and technologically advanced materials for hemming. Moisture-resistant material is used for overhangs. The kit includes strips intended for covering the edges (in the shape of the letter “P”), corners for fastening planks and joints, and ventilation grilles.
The filing is positioned perpendicular to the wall, since this is much more convenient and economical, taking into account the fact that the siding does not have a sufficient degree of rigidity and may often need to be secured. Cut strips of the required length in 2-4 places are attached to a wooden frame. The number of attachment points depends on the width of the overhangs.
- Sheet metal
Steel with a polymer coating, galvanized, copper, aluminum allows you to quickly complete the cladding. The thickness of the metal sheet should be 0.6-0.8 mm.
The length of the sheets can reach 6 m, and their width must correspond to the size of the overhang.
Holes for ventilation are cut into the sheets or perforated sections are inserted during installation.
If the sheets are steel, then the cutting areas must be treated with an anti-corrosion agent or coated with paint. Aluminum and copper do not need to be processed.
When working with metal filing, you must have special equipment for cutting the material.
- Wood boards
The advantage of this material is that it is easy to cut. The slabs are available in a waterproof version. Their installation is carried out in large planes by attaching them to wooden beams with screws.
When using wood boards, ventilation holes with grilles will need to be cut into them and covered with paint to give the overhangs an attractive appearance. The rigidity of the boards is quite high. For OSB, 6.3 mm will be enough. The material is attached to the wooden frame every 1-1.2 m.
Some features of installation of the filing and frame for it
As already mentioned, after installing the roof structure, you need to move on to covering the overhangs. There are two main methods of filing. 
With the first method, it is carried out directly along the rafters. This option is suitable for roofs with a slight slope or when there is a need to increase the height of the building.
With this method, the lower part of the rafters is located in a single plane. If this condition is not met, then a flat plane can be achieved by using additional boards: they should be overlapped on the rafters.
Then you need to align and screw the first and last strips of sheathing material, then tighten the threads to maintain the level and attach the remaining strips.
When roofing boards converge on both sides, rafter boards are installed on both sides. The usual length of overhangs is 600 mm.
The second method is more popular. All rafters should be trimmed horizontally and vertically. A board is fixed at the bottom of the rafters, and a beam is attached to the wall. It is located 1 cm above the frontal board in order to allow moisture to drain away.
If the overhang width is more than 450 mm, an additional board should be installed in the middle. When the roof slopes converge in one place, the board must be nailed from the corner of the roof to the corner of the building.
Regardless of the cladding method, the roof overhang box is installed in the same way: along the length of the wall along the gable, a board is stuffed onto the sheathing, from which the distance corresponding to the length of the overhangs is measured, after which the board is nailed parallel to the gable wall.
The result is a rigid structure independent of the wall. We must ensure that all fastenings are reliable - with screws, or better yet, with metal plates and corners.
After completing the installation of the frame, you need to start covering.
Cladding with clapboard or board
Since wind, rain, snow, cold air, etc. will penetrate into this place, the fastenings of the overhang sheathing must be very reliable.
The best choice is fastening with screws.
You must use at least two screws at each mounting point.
Along the length of the boards, they are joined in a checkerboard pattern to prevent two joints from being located next to each other. The exception is corners where sawing is done at an angle of 45 degrees (in some cases at a different angle).
The board or lining is treated on both sides with an antiseptic. The composition is applied twice: the first time before installation (both surfaces and ends are treated), and the second time after installation. In this case, it is necessary to cover all fasteners, cutting points, etc. with the composition.
To complete the work, ventilation grilles must be installed. When using linings, they are cut into the box. It's better to do this in advance.
How to install corrugated sheeting?
The filing of overhangs made of this material is carried out in the following sequence:
- Sheets of corrugated sheets are screwed along the cornice and wall to the frame, using self-tapping screws;
- At the junction points of the wall and the material, a frontal strip is mounted, as well as an internal corner. The frontal strip is screwed to the frontal board, and the inner corner is screwed to the corrugated sheet;
- The outer corner is fastened at the points of external joints of the profiled sheets;
- Profiled sheets are screwed along the pediment along the outer edge of the overhangs and along the wall;
- After this, the corners and end strip are fastened;
- To facilitate the installation process and ensure ventilation, the width of the profiled sheets should be 2 cm less than the width of the overhangs.
Fitting overhangs with soffits
One of the obvious advantages of spotlights is the ease of installation. Even beginners can do it.
Finishing overhangs using soffits consists of the following steps:
- the hemming parts are cut so that their length matches the width of the overhangs;
- wooden strips are attached to the roof overhangs;
- an F- or J-profile is screwed to the bottom of the bar, which should act as a groove;
- one edge of the soffit panel is inserted into the groove, and the other is screwed to the rafter beam;
- The side screwed to the rafter beam is covered with an L-profile (front strip).
CONCLUSIONS
- The main purpose of overhangs is to protect the building from precipitation and melt water.
- Finishing the overhangs is the final stage of roof installation.
- Sheathing overhangs can be done in two ways.
- Materials for filing must provide protection from precipitation, insulation, and ventilation of the under-roof space.
- The most common materials for cladding are corrugated sheets, siding, soffits, wooden lining, edged planed boards, metal sheets, and wood boards.
- The installation of each cladding material has its own characteristics.
Video instructions on how to properly decorate a roof overhang with soffits