Your summer cottage is your place of comfort. In order to provide this comfort, considerable strength and, of course, a suitable tool will be required. Surely, many of you are working in the garden or in your own garden. It is necessary to maintain areas of different sizes in each season. Therefore, a completely logical question arises: where should we store tools and all kinds of equipment? This shortcoming can be solved by erecting a special building designed for this purpose, namely a barn for a summer residence.
There are a huge number of ways to carry out this construction. Depending on your needs and planned economic costs, the type of terrain and soil, the barn can be assembled from different materials, and can also act as an extension to a residential building or a separate structure. Before construction, decide on the material, since sheds can be made from various materials. Possible implementation options are discussed below.
Plastic shed
A very simple option in terms of organization. Complete installation is completed in a few hours. A plastic garden shed can only be used for storing equipment and tools during a certain seasonal period (it is not suitable for storage during the cold season). Despite all the positive aspects, there are several nuances - the option is quite expensive and not durable enough.
A fairly practical option for a shed due to the fact that the material is durable and, in turn, lightweight, which allows construction to be completed within a short period of time. Inside such a shed, you can screw shelves or mount hooks designed for light weight. In addition, such a barn has an attractive aesthetic appearance, which allows it to fit into almost any country interior. When building your storage facility from WPC, take care of ventilation - proper ventilation will ensure long service life of the structure itself.
Made from wood-polymer compositeMade from blocks or bricks
Building a brick shed at your dacha with your own hands is a significant guarantee of long years of service. This is a powerful option that is not affected by weather and precipitation. Installation, provided you do it yourself, will require you to have certain skills and knowledge regarding the construction of walls and pouring the foundation. Moreover, this is an expensive option. Considering the above, carefully consider the construction option; if you lack the skills, use the services of specialists.

Brick barn

Shed made of foam blocks
A wooden shed for a summer residence is the simplest organization option and the most economical. Does not require installation of a foundation; if desired, it can be sheathed with roofing felt. An uncut board is overlapped onto the support bars, then the roof is mounted, and that’s all. This option is quite inconspicuous and is used in almost every country house.
Shed made of uncut boardsConstruction plan
Before you build a barn at your dacha with your own hands, you need to carry out several preliminary operations. To begin, draw a plan of your shed, taking into account all the surrounding buildings and plantings. The location of the shed should be practical, access to it should be as convenient as possible from almost anywhere on the site (this is necessary for cases when you need to quickly remove tools or firewood due to unexpected precipitation).
When choosing a location, try to take into account the presence of sewer pipes, cables (electrical, underground), toilet (outdoor) and build your shed as far as possible from them.
Simple shed planWhen making your plan, take into account:
- The size of the shed and its location on the site;
- Dimensions of windows and doors, their installation location;
- The place where the ventilation will be located;
- Drainage system.
Foundation for a frame shed
To make a garden shed with your own hands, the first step is to build its base - the foundation. To select the required type of foundation for a specific shed, you need to decide on the type of the latter. Considering the light weight of the frame barn structure being erected, a columnar foundation is suitable.
The foundation installation process can be divided into several sequential steps:
Columnar foundationTo carry out the lower trim, you need to stock up on wide-section bars (100x100 mm if there are 15 support pillars, and if there are 9, the thickness should be 150x150 mm), as well as boards for rough installation of the floor (approximately 40 mm thick).
Do not forget to pre-treat all wooden parts of the structure with a special antiseptic material with additives for fire resistance. Cover the pillars themselves with roofing felt (preferably a double layer glued with bitumen).
We saw the bars to give them the required length. At the end of the bar, cut off half of its thickness, which is necessary for connection with the next bar.

Sawing the beams at the ends in half to connect to the other end of the beam

Connection-beams
Then, using a drill, we make holes (the diameter of each is 20 mm) and install dowels in them for each connection.
Installation of vertical supports
To organize the racks, bars of different lengths are needed (3 m for the front wall, and 2.2 m for the back wall). First, we try on each wooden support (beam rack) in the place of its future installation. We drill a hole at the end side (0.2 – 0.22 cm). Next, the timber must be placed on the dowel and secured.
Fastening can be done using metal corners screwed with self-tapping screws.
To give greater strength, we carry out additional fixation by installing slats. All elements must be level. In addition, for strength it is also necessary to know the minimum number of vertical posts (for a barn 3x6 m, for example, their number should be six). The total number of beams in this case is exactly 13 (five pieces of different lengths for the front and rear walls and three beams for central installation).
Upper harness
We prepare 2 beams and cut off half the thickness at the ends of each, as described earlier (this fastening method is called “half a tree”). The length of the bars is 6 meters each. We take a ladder or a trestle and, having climbed up, mount the bars and fasten them using corners and screws.
Top trim - cross barsFloor installation
A fairly simple operation - boards of the required length are screwed to the joists using self-tapping screws (do not forget to make cuts in the right places).
If you are going to store more powerful equipment than standard ones, you may need a concrete floor - you can make it by first organizing a sand cushion and covering it with a layer of waterproofing. Afterwards, the reinforcement is attached and the pouring itself is carried out, followed by leveling.
Treat the concrete after hardening with a special impregnation if you want to avoid it from absorbing various liquids.
Organization of rafters
To make rafters, you need to know their length. To do this, we make the necessary measurements and calculations, taking into account the 20 cm allowance required for the future canopy. Accounting is carried out over the rear wall of the building and over its facade. The total number of rafters is 12 (thickness is 40 mm). It is recommended to make one rafter with high quality, and the rest according to its analogy. In addition to all of the above, it is necessary to make notches to securely fix the roof.
Each of the rafters is fixed in its proper place, followed by driving in a 20-centimeter nail.
Roof decking
For installation, boards of the following dimensions are required - 25x150 mm, length is six meters. We attach boards to the pre-assembled rafters using nails (the distance between them should be 15 cm). Then, between the last rafters and the bars from the top frame, we fasten the block vertically by diagonally drilling screws.
To make protection from the wind, it is enough to simply sheathe parts of the rafters that extend beyond the level. The cladding is made of wooden floors on the bottom and sides. For the last stage of the roofing, lightweight decking materials are selected; a prime example is metal tiles or corrugated sheets.
The installation procedure is as follows: we lay waterproofing on top of the sheathing (usually roofing felt). Afterwards, metal tiles are laid from the right edge moving towards the center. Ondulin should hang 5-6 cm from each edge. Fixation is done using nails driven through the tiles into the boards.
Wall cladding
To begin with, you need to sheathe the walls using OSB. Of course, don’t forget to make doors and windows in the necessary places. OSB is fastened using beams and self-tapping screws. The distance between each of the screwed screws should be about 30 cm, and the distance from the edge of the OSB sheet should be approximately 10 cm. When installing the sheathing, do not forget to leave a gap of 0.3-0.5 cm.
After completely covering the structure, we make an overlap of windproof material, and then we attach thin slats that will form the corresponding cells for laying mineral wool. Mineral wool is necessary for insulating the shed, which will allow you to operate the building at any time of the year. For extra confidence, we lay a moisture-proof layer on top of the mineral wool and cover the barn with boards. If siding is used, preliminary installation of thin slats is required to provide ventilation.
Inside, the walls are finished according to the desire and taste of the owner. This type of shed is quite durable and, if you follow the above instructions, will serve you for a very long time.
Watch a video about building a frame shed.
The foam block shed option is durable, although it may suffer unwanted economic losses. This is due to the high cost of the material, but foam blocks are durable and easy to install.
Construction of a shed from foam blocksThe construction of such a barn can be done with your own hands in several stages:
- Prepare the soil for future concrete. Remove grass, debris, cut the soil to half a meter.
- Pour the foundation (strip type), let the solution harden (carry out the pouring in sunny weather, and after it, make sure that the concrete does not dry out, to do this, pour water on it at the right time).
- Place the roofing felt on the finished foundation (for greater moisture resistance).
- Mix the solution for fixing the foam blocks (cement and sand in a ratio of 1 to 4).
- We lay foam blocks, having previously mounted the corners. During installation, we maintain the level; all horizontal and vertical constructions must be strictly perpendicular. Leave openings for windows and doors in planned locations.
- Making a roof. Almost any roofing material is suitable for this; for greater aesthetics, use a gable option for organizing the ceiling.
- The last stages are installing doors and windows, and laying the floor.
- We finish the walls outside and inside (plaster the outside, and cover the inside with plasterboard).
In order to make this construction, certain experience and knowledge is required. If they are missing, contact construction companies for help.
A do-it-yourself garden shed is the easiest way to get the minimum required level of comfort in the shortest possible time. When the first joy of acquiring a plot has passed and the question of real development of the plot becomes a question, the utility block is the first necessary building. While the residential building is just being built, it will serve as a place to store all the necessary equipment. And after construction is completed, the barn can retain its original functions, fulfilling the role pantry, and become a place for storing firewood or, for example, chicken coop.
How to choose a barn for a summer residence: considering options
Often, the construction of a barn begins the development of a site, so by this time it is necessary to already have a detailed plan diagram, which will indicate the location of all planned buildings: a residential building, a bathhouse, a gazebo, garage, barn, etc.
Advice! Since a summer cottage usually does not have a large area, it is better to combine all outbuildings to save space - build a shed that will combine the functions of a storage room, toilet and shower. This decision is especially justified at the initial stage of construction.
There are several approaches to choosing a place to build a shed, for example, near the border of the site, behind the house, in order to hide the utility block from prying eyes. In addition to the house, additional camouflage for the barn can be provided with the help of a plot. Another option is to place the shed near the house so that you don’t have to run across the entire site for every little thing. Very often, a place is allocated for a shed, which for various reasons (shade, north side, poor soil) is the worst suited for planting trees or growing garden crops.
Let's look at some of the most popular options for garden sheds.
Ready-made container utility unit
The fastest and least labor-intensive option is to purchase a ready-made shed (house) in the form of a ready-made prefabricated/dismountable utility unit. This is a monoblock structure (usually a container type), which is based on a rigid metal frame, which is sheathed on the sides with metal, and insulation is laid in the walls, and electrical wiring is already installed in it. There are many options - it can be just a small storage shed, or a multifunctional utility unit, including a toilet, shower and even a place to relax, and some models provide a removable canopy, which makes it possible to make a small veranda.
To install such a container utility unit, pouring a foundation is not required; a columnar foundation or simple concrete blocks will be quite sufficient. In a ready-made form (although it may require minimal assembly of internal communications, for example, connecting hoses to water collectors, which can be done independently), it is delivered to the site; installation will require a truck crane. Outwardly, such a barn does not look very attractive, but thanks to its reliability, durability and mobility, such a utility unit can be sold after the construction of a residential building is completed.
Preface
All about building a warm wooden shed from timber and boards. Selecting a location, developing the structure of the building, arranging the foundation, assembling the frame, insulating and sheathing the shed.
There are many different uses for a shed. And the choice of location on the site, as well as the size, design and materials from which it will be made, depend on them. Therefore, before you start building a shed for your summer cottage, you should immediately decide on its purpose. And not only in the near future, but also in the long term, so that later the auxiliary building does not have to be improved, completed, or even completely dismantled in order to build again.
Warm barn for chickens
If the shed at the dacha will be used only for storing garden tools and equipment, then when choosing a place for it, it is enough to adhere to the following criteria:
- Convenient access to the outbuilding at any time of the year.
- The soil at the construction site is unsuitable or not at all suitable for growing plants.
- Insufficient natural lighting for fruit and/or ornamental crops.
- You should not build a shed in a low area, as rain and melt water usually accumulates there. The structure will quickly become unusable, or during its construction it will be necessary to take protective measures (make a higher foundation, provide, if possible, waterproofing and drainage from it, strengthen the moisture insulation of the entire building, etc.), which will require additional effort, time and costs.
- It is not advisable to locate outbuildings in places where there is a lot of snow in winter. It may be difficult to get into it at this time of year (you will have to clear the path and the approach to the doors in order to open them), and in the spring you will have to push more snow away from the walls so that, again, they do not flood.
- If the appearance of the site from the front entrance is important and there are no intentions to decorate the barn in any way (using high-quality building materials or finishing over cheap ones or using ornamental plants), then it is better to place it behind the house or hide it behind tall plants, or in the depths of the garden, where he will be invisible.
A shed just for tools, especially in a country house with a small plot, can be built of very modest size. Most often, buildings are made 2x2.5 m.
If the barn at the dacha will be used for something else or has a completely different purpose, then this will need to be taken into account. If it contains a woodshed (a place for firewood) or a coal burner (for coal), then it is still better to build it closer to the house.
If there is a workshop in the barn, then, on the one hand, when there is noisy equipment in it, it is better to place the building away from housing, and on the other, the cost of providing the necessary communications (electricity, water supply, heating) depends on their length. We must not forget about the importance of natural light, as well as solar heat in winter. It is better to build a workshop in an open space, and not in the shade of trees or other buildings, and so that its windows are on the southern or eastern walls.
If the barn is intended for keeping pets, you must also take into account the required conditions for keeping them. For example, so that nothing bothers its guests at all.
In general, when choosing a location, you need to take into account all the nuances of using a barn. You should also rely on them when developing the structure of the building: what dimensions will be along the outer perimeter of the walls and height; how many, if any, interior spaces should be made and what will be their area; the presence of windows and additional doors (gates) and so on.
After drawing up a sketch of the future structure with basic dimensions, it is advisable to make more detailed drawings. They should indicate the dimensions of all elements of the garden shed. In this case, it is recommended to use the algorithm below for performing all the work. Based on detailed drawings, it will be possible to more or less accurately determine the amount of required building materials and draw up a preliminary cost estimate.
The optimal foundation option is columnar or pile. They belong to lightweight types of foundations, specifically intended for light buildings, such as those made of wood. Columnar is easier to make than any other. Pile foundations are suitable for all types of soil, except rocky ones. It is usually used in case of construction on difficult and heaving soils, since the installation of piles requires the use of special equipment or machinery. When there are no serious concerns that, due to the condition of the soil, a building on a columnar foundation may soon be damaged, then a pile foundation is not necessary.

Arrangement of a columnar foundation
Both types of foundation, pile and columnar, in their completed form are rows of columns along the perimeter of the building and, if necessary, inside it. Supports must be at the corners of the building and under the junction of the internal walls (partitions) and the external ones. The installation pitch of the pillars usually varies between 1.5–2.5 m and depends on the following points:
- shed size;
- what kind of logs (with what thickness and width) are planned to be installed.
The larger the cross-section of the lag, the longer the span between the supports can be. For example, to build 2x2 m, it is enough to place columns only in the corners and the logs will be 150x50 (in extreme cases 150x40) mm. If the barn is 3x3 m, then, leaving the board with the same section, you will have to install intermediate supports or use 150x70 mm logs.
If you use a board with a width of 100 mm, you will have to reduce not only the installation step of the pillars to 1–1.5 m, but also the logs themselves to 30 cm (instead of 0.5–1 m). Otherwise, the floor under your feet will sag noticeably.
After the formation of the supports (from piles or pillars), the further construction of the barn is no different. Therefore, and since the installation of a pile foundation will still require the involvement of specialists, we will consider the arrangement of a columnar foundation in more detail.
It can be made from different materials and in different ways. The most common options for making a columnar foundation:
- from pipes (metal, asbestos or plastic), which after installation are filled with concrete;
- made of bricks or small blocks;
- from reinforced concrete blocks.

Columnar foundation for a barn
For the first option, take pipes with a diameter of 15–20 cm and a length of 1.8–1.9 m. We dig 1.5 m deep wells in the places where asbestos or plastic pillars are installed. We insert pipes into them. All of them should protrude from the soil to the same height within 30–40 cm. If construction is carried out on a site that has a slope, then this must be taken into account. Pipes must be taken of different lengths - 1.8–1.9 m will go to the very top of the space for the shed, and below will be longer, in proportion to the difference in installation levels.
The top of all pillars should be at the same horizontal level.
Then you need to drive two reinforcing bars inside the pipes and at a distance of 6–8 cm from each other. This will strengthen the pillars and obtain in their upper part the elements necessary for fastening the lower frame of the barn. The reinforcement must be driven 25–30 cm deeper than the pipe installation level at the bottom of the wells and so that at the top the rods protrude the same amount above the supports. After this, we fill the pipe with concrete both from the outside and from the inside.
If the pipes are metal, we subject them to anti-corrosion treatment. We install them in almost the same way as asbestos and plastic ones. Only the wells must be made with a diameter that is several millimeters smaller than that of metal pipes. That is, the pipes will have to be driven into the holes for them. After this we pour the concrete. It is not necessary to insert fittings and studs. The timber frame building is light enough to support metal pipe posts. And to fasten the lower trim, instead of protruding reinforcement or studs, it is better to use a welded profile, for example, a corner.
The fastest way to prepare a columnar foundation of the third of the above types is to use ready-made reinforced concrete blocks, for example, FBS 600x300x200. It is necessary to dig pits under them. Their width and length should be slightly larger than those of the blocks, and their depth depends on the height of the latter. We fill the bottom of the pits with a sand and gravel cushion, and then compact it, after which its thickness should be 20–30 cm. We install blocks on the bedding. They should protrude above the soil surface by no less than 15–20 cm. The remaining gaps between the blocks and the walls of the pits are filled with soil extracted from the latter, which is then compacted tightly.
A columnar foundation is made from bricks or small blocks in much the same way as the previous type, only the supports are composite. First, we dig pits under them with a depth of at least 40 cm. We fill their bottom with a sand and gravel cushion, which we then tamp. Its thickness after this should be at least 25 cm. We lay bricks or blocks on the cushion using cement mortar.
The dimensions of the resulting pillars in diameter must be at least 2 times the width of the brick or blocks. The height of the supports should be such that they protrude above the soil surface by no less than 15–20 cm. Steel pins (reinforcement) or threaded studs should be installed in the middle of the corner and central pillars during the process of laying out their tops. They are useful for precise and reliable fastening of the lower trim and/or vertical racks made of beams. It is better to pour concrete into the remaining gap between the pillars and the walls of the pits rather than fill it with earth.
We lay waterproofing on top of the prepared foundation. It can be ordinary roofing felt. In order for it to lay down better and the waterproofing to be more reliable, it is better to lay it not directly on the foundation, but on bitumen mastic, which must be used to cover the top of the latter.
We install the bottom trim on the waterproofing. We make it from 150×150 mm timber. We connect this lumber at the corners of the future shed and at intermediate joints, if there are any, into half a tree - this is the easiest way. That is, we cut out the wood at the junction of the beams being joined to each other to the middle of their cross-section, so that one board fits tightly onto the other. If the foundation has studs or protruding reinforcement bars, then before installing them, holes must be drilled in the lumber of the same diameter as the metal products. We check the drilling locations by placing the beams at the installation site against the protruding fastener elements.

Installation of strapping and logs
Then we install the strapping lumber in place on top of the foundation. At the joints we nail the timber to each other with nails, preferably one hundred square meters, for example, 100×4 mm. For greater reliability of connections, reinforced corners can be nailed on the inside, and a mounting plate can be nailed on the outside. After this, if the foundation was without studs, that is, as a rule, made of blocks, you need to attach the strapping to it. To do this, we drill holes for a pin with a diameter of 10–14 mm through the beams into the foundation. We drive it into the prepared place and tighten it with the installation bolt. To prevent the head of the latter from protruding above the beam, a hole must first be drilled for it.
Let's move on to attaching the joists. It is best to take 150x60 mm boards for them. We turn them on edge and fasten them to the harness on the inside of the beams (and not on them) with special staples or corners of a suitable size. We nail the fastening material. Before thoroughly securing the logs, they must be aligned as accurately as possible along the upper edge of the trim beam. Otherwise, when laying the floor, you will have to suffer a lot, adjusting or redoing something, using a plane and other tools.
Before installing the bottom frame beams and joist boards, it is recommended that these lumber be treated with fire-bio protective compounds. Then the barn will last a long time.
After the lag, perhaps the most interesting part of the work is assembling the wall frame. It can be done in two ways. The first is the following order of work. The frame of each individual wall is assembled directly on the joists or on the ground next to the future building. The main thing is that the chosen site is level. The frames must be assembled sequentially one at a time. It's not worth it at the same time.

Construction of a barn frame
To assemble the wall frame, you must first place the beams of the lower and upper trim and corner posts on the ground, forming a regular rectangle from them. Then we once again level the lumber relative to each other, using a square and, if necessary, a level, ensuring that all the angles are right and the frame beams are in the same plane. After this, we drive nails of suitable sizes along all joints and/or use mounting angles and strips as fasteners. Then we install the resulting box in place of the corresponding wall on the bottom frame flush with its outer side. Then we level the frame, set a right angle between it and the base and fasten it with stops, slopes, spacers, while simultaneously nailing it to the bottom trim beam with 200x4 mm nails.
After this, we attach intermediate posts inside the box in the places of window, door and gate openings, as well as the junction with internal partitions (walls). They can be made not from timber, but from boards 100×50 or 100×40 mm, knocked together in 2 pieces. with nails, which we drive in in a checkerboard pattern in increments of 20 cm. After this, we install additional racks from the same boards in the remaining openings of the frame box. The distance between them should correspond to the width of the selected wall insulation. The optimal step is 0.6 m.
First we assemble the 2 frames of the longest walls, that is, the front and back. To ensure the subsequent arrangement of a pitched roof, they must be made of different heights. If the width of the future barn is 3 m, the front wall should be at least 0.5–0.6 m higher than the back wall. After installing these two frames on the lower frame and installing intermediate posts in them, we proceed to the end walls. Their boxes can be made from boards, and there are two assembly options. You can assemble the side frames as described above. In this case, we do not immediately install the manufactured first box, but use it as a template for the second. This way both frames will be exactly the same in size.
However, this option has one drawback - there is a high probability that the side boxes, when installed between the front and rear walls, will have to be slightly adjusted to the size of the opening with a plane or even an ax to make it faster. This usually happens if the required dimensions were not maintained and/or the lumber was too uneven.
Therefore, it is better to assemble the side wall boxes directly in the opening between the front and rear frames. First, we nail the beam or board of the bottom trim at the bottom. Then we attach lumber to it and the corner posts of the front and rear walls for the sides of the end frame. After this, we nail a beam or board of the top trim on top. Then we install intermediate racks.
The second method of assembling a shed frame is more complex and time-consuming. It has to be used when the walls are long and/or massive lumber (with a large cross-section and/or heavy wood) is used to make their frame. In this case, the assembled frame boxes are difficult or impossible to install on the lower frame and therefore they are made directly on the site of the future walls.
First, we nail the bottom trim of all 4 frames. Then we sequentially install the corner posts, align them, setting a right angle relative to the base in all planes, and then nail them to the bottom frame and fasten them with bevels so that the beam does not tilt until the frame is assembled. After this, we stretch a string (twine) between the corner posts and along it, one by one, we install and fasten the main intermediate posts (where the door windows and adjacent walls will be). If there are none, then we install one in the middle near the frame of the front and rear walls, and at the ends we do without it. Then we nail the top trim, and then all the other intermediate posts.
Using this method of assembling a shed, you can build all the walls in parallel in stages or one at a time in series. First, we completely manufacture the frame of the facade, then one of the ends of the building, and then at our discretion.
We assemble the rafter system from boards 150×40 (you can take 100×40) mm. Their length should be greater than the width of the shed so that the roof has an overhang on each side. Usually it is made 30–50 cm above the front and rear walls. That is, for a building with 3 m end walls, the length of the rafters should be 3.6–4 m.
We turn the boards on edge and lay them like this, and then nail them to the top frame of the walls with nails, which we drive obliquely, 2 on each side of the barn. After this, it is not necessary, but it will not hurt to strengthen the fastening of the rafters by installing mounting angles. This will allow the roof to withstand significant snow and wind loads.

Installation of roof sheathing
After this, you can immediately begin installing the sheathing under the roofing material, but it is recommended to take care of roof ventilation. To do this, we lay a waterproofing material (special film or ordinary roofing material) over the rafters. We secure it with 40x40 beams, which we place on top along the rafters and directly above them, and then nail them. When installed this way they are called counter bars. On top of them we nail a sheathing of 100×25 mm boards. The gap created by installing counter beams will provide ventilation for the roof covering, sheathing and waterproofing.
The installation step of the sheathing depends on the type of roofing chosen. For soft, small and fragile materials (for example, roofing felt, tiles, flat slate and the like) it is made solid. That is, the gap between the boards will be less than 1 cm. For ondulin, its manufacturer recommends a step of 40 cm. It is not worth laying sheathing boards less than every 50 cm, regardless of the type of coating.
A canopy must also be provided over the end walls. To do this, we lay the boards so that the sheathing protrudes beyond the outer rafters by 20–30 centimeters.
You can save a little on the sheathing if you make it from unedged boards. They are 1.5–2 times cheaper than edged ones. You just need to choose this lumber more carefully, because you will come across unedged boards that behave (like a propeller) and are very crooked. And one more point must be taken into account. Roofing material, such as roofing felt and the like, can be damaged by unedged boards. We will have to take care of his protection.
We lay the roofing material. Then we nail an anti-wind system around the perimeter of the roof, which will protect the roof from strong winds and from flowing water below. To do this, we nail boards of the same width from the front and back sides of the building to the ends of the rafters. Then we install the same lumber on the sides of the roof. We attach it with corners to the front and rear wind boards. After this, we sheathe the rafters from below. For this, you can use not only boards, but also moisture-resistant sheet building materials made of wood.

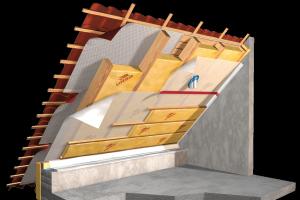
Insulation of barn walls
We make external wall cladding. You can use siding, lining, profiled or regular boards for it. Sheet materials are good and easy to install: plywood, chipboard, OSB, and so on. It is better that they are moisture resistant. Be sure to nail the boards horizontally. This will give the shed structure greater rigidity.
Again, you can save some money. If it doesn’t matter what the appearance of the shed will be, then it can be sheathed on the outside with unedged boards. Only considering that the edges of this material are uneven, it must be nailed with an overlap. You have to start from the bottom. We make an overlap of 2–3 cm, and if the lumber is too uneven, then more. You can trim it with edged boards in the same way. And the appearance is more attractive, and after the covering dries, no gaps form.
It is imperative to install hydro-wind insulation under the outer skin. This can be roofing felt or a special film. First, we lay insulation on the frame posts, temporarily fix or hold it somehow, and sequentially install the sheathing material on top.
Let's lay the floor. It can also be insulated and made with waterproofing. To do this, you need to place boards under the joists, you can use unedged ones and secure them with corners. This will be a sheathing for waterproofing and insulation. The installation step must be made up to 20 cm. Otherwise, the insulating materials will sag greatly over time and become less effective. Then inside the barn we lay hydro- and then thermal insulation on the sheathing between the joists. We install a vapor barrier directly on the joists (ordinary plastic film will do). After this we lay the floor. We use boards or sheet materials made of wood.
We install the internal wall cladding. We lay thermal insulation between the frame posts. We install a vapor barrier on top of the beams and boards of the frame. Then we install the internal cladding material - any of the above for the external one.
We cover the ceiling in almost the same way as we do the walls. We lay thermal insulation between the rafters, simultaneously nailing the internal sheathing. It will prevent the insulating material from falling out. Then we lay a vapor barrier on the sheathing boards and, at the same time, install the internal cladding material - whatever is used for the walls.
Every private household always has gardening equipment and tools that need to be stored somewhere. A lawn mower or garden sprayer with chemicals has no place in a residential building. Where to put these necessary things so that they are not affected by the environment and do not litter the yard? You can solve this problem by building a small frame shed with a pitched roof.
Advantages and disadvantages of wood frame construction
The construction of a frame outbuilding from wooden blocks has a number of advantages:
- In specialized construction stores you can purchase ready-made parts for assembling the frame structure of a shed.
- It is not difficult to build such a structure yourself, since the assembly of parts occurs according to the principle of a designer. To do this, it is not necessary to have special knowledge in construction. All elements and connections of the frame are adjusted to size, and the presence of instructions will make the construction process easier.
- A frame wooden shed will last for many years if it is properly cared for and all rules were followed during its construction.
- The construction of the structure will not take much time. Usually one week is enough to build the entire shed. This time includes: installation of the foundation, assembly of all frame elements, wall cladding, insertion of doors and windows, roofing.
- Wooden parts of the structure are easy to further process.
- When building a shed with a pitched roof, there is no need to install a rafter system.
- The frame structure of a shed can be easily dismantled and rebuilt in another location. In this case, we are talking about light buildings, without a foundation.
- The cost of purchasing materials for such a structure is much less than, for example, a brick one. Many are of the opinion that wooden structures are short-lived and unreliable. However, if you take into account the service life of these parts and the money spent on materials, then this option is much more profitable.
The disadvantages of this design are as follows:
- Wooden elements are flammable material.
- Frame parts may be subject to rotting and damage from wood-boring insects. To prevent this from happening, all wooden elements must be additionally treated with antiseptic pastes, organic solutions or oily antiseptics.
- Wood, depending on its moisture content, tends to dry out, swell, warp and crack over time.
Preparation for construction: drawings of the future barn, dimensions
Before starting the construction of a frame barn, it is necessary to take into account some points of its construction:
- A barn, no matter how carefully it is built, remains an outbuilding that does not particularly fit into the architecture of a residential building. Accordingly, it is better to build this building in the backyard.
- Entry must be free. This will become especially convenient when it is necessary to carry large items or furniture into it, in case of renovations in the house.
- It is better to place the shed on a hill (supports, piles, blocks). The distance between the base of the structure and the ground will prevent: from rotting of its wooden parts, the appearance of moisture in the room and damage to metal equipment by corrosion.
- It is necessary to carefully design the barn so that in the future there is no need to make extensions to it. It will be convenient to divide it into two rooms: in one you can set up a workshop, and in the second - the barn or chicken coop itself.
Two rooms of the barn will allow you to use them for different purposes
- The ground at the site of the future construction needs to be leveled.
- It is necessary to determine what materials will be used to cover the walls and floors. What will the interior decoration be made of and what type of roofing will be used.
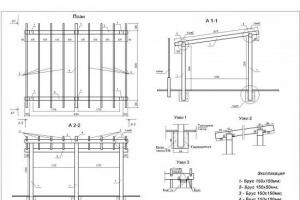
The length, width and height of the future shed are selected individually, depending on the location. For such purposes, medium-sized buildings are most suitable (see image).
Option of a frame barn with typical parameters
Another option for a frame shed
Selection of materials and calculations
High-quality planning for the purchase of all necessary materials will eliminate unforeseen waste in the future.
When constructing a shed frame, the following materials are needed:
- For the lower and upper trim you need: six bars 6 m long with a section of 100x100 mm and eight bars 3 m long with a section of 100x100 mm.
When purchasing timber and boards, you should pay attention to ensure that their moisture content does not exceed 22%.
- For flooring, boards with a cross-section of 40x150 mm are required, in an amount of (minimum) 20 pieces. OSB sheets are used as the finished floor.
- For vertical supports, beams with a cross-section of 100x100 mm are needed, in the amount of 12 pieces, each of which is 2.5 m long. Two such beams will be used as a doorway.
Wooden surfaces must be free of knots, cracks, mold and damage from wood-boring insects.
- There are two ways to slope the roof: in the first case, you need from 4 to 6 bars 50 cm long with a section of 100x100 cm, in the second case, the supports on which the slope will be placed must initially be shorter in length.
- For the sheathing you will need a board with a cross section of 22x100 mm, in the amount of 16–18 pieces.
- For a rough ceiling, you can use multilayer plywood, chipboard, fiberboard or OSB sheets.
- To fasten the beams at the corners using the “paw” method, nails are required, and “into the floor of the tree” - metal corners and strips.
The nails are selected to be longer than the thickness of the board so that they pierce it and enter the next one. This connection will be much stronger.
- When working, you will also need self-tapping screws, screws, and L-shaped metal plates to secure the timber in the corners.
- In the case of insulating the frame of a shed, you may need a thermal insulation layer (foam plastic, mineral wool or penoplex), waterproofing (foamed polyethylene foil), vapor barrier (bitumen), roofing material, polyurethane foam.
Required Tools
To build a frame shed you will need the following tools:
- Shovel (to dig holes for a columnar foundation, it is better to use a screw shovel).
- Yardstick.
- Marking cord with coated thread.
- Graphite marking pencil.
- Construction level (it is more convenient to use from 50 to 200 cm).
- Square and ruler.
- Stationery knife (for cutting insulation).
- Laser level (using this tool, a perfectly flat plane is determined).
- Chisel.
- Electric drill.
- Circular saw (with its help it is convenient to cut boards of various lengths and sizes).
- Cordless screwdriver (for attaching plywood, boards and OSB sheets to ceilings, walls and floors).
- Electric planer (necessary when calibrating boards).
- Screwdriver.
- All-metal carpenter's hammer.
- Sledgehammer (used when adjusting boards).
- Hand clamps (for clamping boards in different places).
- Wood saw (for cutting grooves).
- Construction stapler (for fastening waterproofing and vapor barrier to a wooden frame).
- Carpenter's axe.
- Construction plumb.
- Nails. For a frame shed you need from 2 thousand to 4 thousand nails. In this case, three types are used:
- GOST 4028–63 Black and zinc construction nails. Zinc ones are used for external work with wooden parts, and black ones are used for installing internal materials.
- GOST 4029–63 Zinc nails for fixing roofing felt and other sheet materials.
- DIN 1152 Galvanized nails for fastening tongue-and-groove boards, face panels and finishing surfaces.
Step-by-step instructions for building a frame shed with a pitched roof
When all the calculations have been made, the construction project is ready and the necessary materials have been purchased, you can proceed to the construction of a frame shed.
Foundation. Which one is better and how to do it
The basis for the frame is the foundation. For frame sheds and utility blocks, a strip, wooden or columnar foundation is most often used.
To protect the wooden frame of the shed from moisture, you can install a strip foundation. For this, a concrete base 40–50 cm high is made. It is important to know that this type of foundation is not suitable for sedimentary and peat soil. In these cases, screw piles are used.
For a strip foundation, it is necessary to dig a trench around the perimeter, 30–40 cm deep and 40 cm wide. The bottom of the trench is filled with sand and compacted. The result should be a sand cushion 10 cm thick. A waterproofing layer must be laid on the sand cushion, which will prevent liquid concrete from being absorbed into the sand.
After this, a wooden or metal formwork structure is made. It should rise above the ground and be equal to the height of the base. To ensure the strength of the formwork structure, it is fixed with spacers and clamps, and its upper part can be strengthened with supports. Reinforcement with a thickness of 10–12 mm is laid on the waterproofing layer, which is tied with wire.
Formwork panels fix the cement substance before hardening
When the reinforcement frame is ready, it is filled with concrete grade M200–250.
Concrete pouring should be done for the entire perimeter at once. To avoid cracks when concrete hardens, it is not recommended to pour it in rainy weather or extreme heat,
Concrete hardens for about two weeks and by this time gains about 70% strength.
Shallow strip foundation suitable for small buildings
When constructing a wooden foundation, larch logs are used, about 300 mm thick, which are treated at least 2-3 times with bitumen.
Holes are dug in the ground 150 cm deep and 30–40 cm in diameter. Sand 10 cm thick is poured into the bottom of the hole and compacted. Each log from its base is covered with a waterproofing layer of 140–145 cm. The resulting wooden pile is placed in the ground. The gaps between the waterproofing and the wall of the hole are covered with earth. To more thoroughly compact the soil around the pile, it is watered and compacted. For reliability, you can fill the hole with concrete.
The use of wooden piles can be an alternative solution for installing a foundation
Most often, a columnar foundation is used when constructing a frame barn. To do this, you need to mark it on the ground using a cord. Along the perimeter of the marking and in each corner, you should dig holes 30–40 cm deep.
Using a stretched cord, markings will be more accurate
It is better to dig a hole 70 cm or more deep, as this is below the freezing point. Sand is poured onto the bottom to form a layer of 10–15 cm, which must be compacted. For reliability, you can pour a layer of gravel 10 cm thick. After this, lay a brick, fastening it with cement mortar. For a shed, a masonry of two bricks per layer is used. If the structure is larger, the columnar foundation is made of three or more bricks.
The most commonly used type of foundation when building a frame barn
The brickwork must be treated with a bitumen waterproofing layer.
To ensure a level surface, all posts must be checked for level.
The space between the brickwork and the ground must be filled with sand or filled with a cement-sand mixture. An alternative to a columnar foundation made of brickwork are hollow concrete blocks measuring 400x200x200. The voids in the blocks are filled with cement mortar.
Video: installing the foundation
Frame of the structure
Now you can start creating the frame of the shed. On each brick pillar it is necessary to put two layers of roofing material - to protect the lower part of the wooden frame from moisture.
After this, they begin to install the lower trim. For this you need a beam with a section size of 100x100 mm. Beams and logs are assembled from 50x100 mm timber. The distance between them should not exceed 60 cm.
Beams and logs are connected with nails using the “wood floor” method
Vertical posts made of 100x100 mm timber are fixed to L-shaped metal joints or regular nails that need to be driven in obliquely. The distance between beams should be no more than 1.5 m. To ensure stability of the structure, the beams are temporarily reinforced diagonally with 40x100 mm boards.
Vertical and top beams are fixed with L-shaped connections
The construction of a frame barn is carried out not only with the help of wooden beams. Its production from a metal profile pipe is widely used.
The ease of assembly of this design attracts builders
This material option for the building frame has a number of advantages:
- The profile base is assembled without dirt or construction debris in the yard.
- Installation and dismantling of such a building will not take much time.
- If necessary, a metal profile shed can be easily moved.
- For this design, a foundation is not required. It is enough to pour gravel onto a flat area.
- Reinforcement that strengthens the frame will help to withstand the weight of snow and resist strong wind gusts.
- Thanks to a variety of colors, a shed made of profile pipes has an aesthetic appearance.
- The design with a metal frame is very practical, as it does not require treating its parts and elements with antiseptic agents. It is enough to paint it once.
If the building is subject to increased load pressure in the future, the frame is built from stronger pipes. In this case, pipes with a wall thickness of 8 mm and a cross-section of 100x100 mm are used for the lower trim and racks. For additional spacers, a profile with a section of 60x60 mm is used.
Particular attention should be paid when laying profile joists under the subfloor. The distance between them should not be more than 60 cm. The logs are secured to the lower frame by welding.
After this, they proceed to the installation of the interfloor ceiling, which is a frame structure made from a profile, as well as beams. The ceiling lining is attached to these elements from below.
The final stage of constructing a structure from a profile pipe is the assembly of the rafter system. This structural element can be either integral or a separate part of the entire structure. The main load-bearing part of the roof is a powerful channel to which the remaining elements are attached.
After all welding work is completed, finishing begins.
Construction of floors and walls (knots and jibs)
When building a foundation, you first need to make a subfloor. To do this, wooden logs are covered with OSB boards or plywood sheets with a thickness of 12 to 15 mm. Then the entire surface is covered with a waterproofing layer, on which the finishing floor is installed. It is convenient to use tongue and groove boards as this floor covering. They have grooves and ridges on the edges that are ideal for butt assembly. They are usually made from softwood. The resin contained in this wood makes it waterproof. Laying floors with tongue and groove boards is similar to installing laminate flooring.
Tight connection of boards is ensured thanks to protrusions and cutouts along the edges
After this, you can move on to installing the shed walls. To ensure that its structure is strong and lasts a long time, temporary and permanent jibs are cut into the frame.
Strengthening the racks with permanent and temporary jibs will provide additional strength in areas of increased weight load
Jibs are mandatory if the walls are not sheathed with plywood or OSB-3. The use of slab sheathing is five times stronger than the jibs (if OSB or 12 mm plywood is used). A board with a cross section of 25x100 mm or 50x100 mm is used as jib when a more stable structure is required. The length of such a board should be 30° greater than the height of the wall. Temporary jibs are used until the upper joists are installed. They help fix the specified position of walls and vertical beams.
Before installing them, the corners of the structure are aligned. In this case, it is convenient to use a bubble or laser level. The installation step of temporary jib is from 1.2 to 1.5 m. They will also help correct structural defects if you use them as a lever.
When erecting a frame structure of a barn, it is important to ensure the correct fastening of the jib and connection points:
- The installation angle of the jibs should be 45° (this is the ideal angle that provides maximum structural rigidity). In those places of construction where it is difficult to withstand it, for example, windows and doors, 60° is allowed.
- The use of hollow jibs is permissible only in small structures (sheds, outbuildings).
- They must fit tightly (without cracks or gaps) to the surfaces of the racks and the upper ceiling.
- For the jibs, it is necessary to make grooves in the vertical posts, upper and lower trim. The depth of the groove is made depending on the thickness of the jib. In a metal structure, they should go deep inside the profile of the racks.
- The joints of the beams at the corners of the frame are laid in the “wood floor” or “in the paw” method. In the first case, 50x50 mm cuts are made on both sides of the log to half its thickness. In the second case, similar cuts are made, but with a bevel. If necessary, the junction of two beams is processed with a chisel.
Such connections are fixed with nails and L-shaped connections.
Floor insulation
You can insulate the floors of a frame shed with the following materials:
- Mineral wool.
This method is very popular due to its ease of installation and relatively low price. Mineral wool is usually sold in packs of several slabs measuring 1000x600x50 mm or 1200x600x50 mm or in rolls. A waterproofing layer (glassine, roofing felt or ordinary polyethylene film) is laid on the floors of the barn, on which a wooden sheathing of boards with a section of 10x120 mm and a step width of 60 cm is placed. Mineral wool slabs are laid in the resulting compartments. All wooden elements of the sheathing, before laying the wool, must be treated with antiseptic agents to prevent rotting. For additional floor insulation, a double layer of such slabs is used. During installation, the insulation should be below the level of the sheathing. Mineral wool cannot be compacted, as it will lose its thermal insulation property. To prevent the cotton wool from getting wet, a layer of polyethylene is laid on top, secured to the staples using a stapler. Then the entire surface is covered with tongue and groove boards, OSB sheets or plywood.
- Styrofoam.
The floor is insulated with this material using joists. As in the case of mineral wool, a wooden sheathing is required, under which a waterproofing layer is laid. The width of the step between the boards is about 60 cm. The thickness of the foam boards should be at least 10 cm. This material is very convenient, as it does not deform. Foam plastic is not afraid of fungus and mold. The foam boards must be laid tightly. If any gaps remain, they can be filled with foam. After it dries, sheets of plywood or tongue and groove boards are laid on top.
- Expanded clay.
To insulate the floor of a shed with expanded clay, it is necessary to cover the lower formwork with waterproofing material, on top of which OSB boards are laid. Then a wooden sheathing made of boards with a section of 10x150 mm is installed on this surface. Expanded clay is poured into each section of this structure. Its layer should not be less than 10–15 cm, since a smaller thickness will not give the desired insulation effect. Expanded clay should be leveled so that it does not rise above the sheathing bars. Then a vapor barrier layer is laid on top of: a diffuse membrane, a water-based bitumen-polymer cold emulsion, a polyethylene or polypropylene film. After this, the OSB sheets are attached to the joists with self-tapping screws. The finishing floor is laid on top.
Materials for floor insulation in a frame barn
 This is an environmentally friendly material, the production of which does not use chemical additives. This material is easy to give the desired shape. An inexpensive and reliable way to insulate the floor.
Insulation for walls
To insulate the walls of a frame shed, mineral wool and extruded polystyrene foam (penoplex) are most often used.
- Insulation of walls with mineral wool.
Finishing walls with mineral wool is not much different from a similar method of floor insulation, but it has its own nuances. On the inside of the shed, it is covered with a vapor barrier material (foiled polyethylene), on top of which plywood or OSB sheets are fixed. Outside, wooden cladding made of boards with a cross-section of 20x40 mm can be installed on mineral wool, perpendicular to the base. These boards serve as a ventilation gap onto which the exterior trim is attached. Sometimes a layer of OSB sheets is installed in front of the waterproofing layer (exterior finishing).
- Penoplex.
To insulate walls with this material, it is necessary to select slabs with a thickness of at least 6 cm. As in the previous methods, a wooden sheathing with a pitch of 60 cm is required, under which a waterproofing layer is placed. It is more convenient to fix Penoplex boards with polyurethane glue (it is well compatible with polystyrene foam) or with metal anchors with plastic dowels. The joints of the plates are additionally fixed with polyurethane foam or metal tape. The outside wall can be insulated with an additional layer of penoplex, on which external finishing material is installed.
When the walls are fixed with anchors or dried glue, a vapor barrier material is placed on top. In this method of insulation, foamed foil polyethylene with a thickness of 3 mm is used. As a replacement, you can use polyethylene foil film. The finishing layer is fixed on top.
Materials for insulating the walls of a frame shed
 The light weight of the wool is convenient for installation. This material has a denser structure than foam plastic.
Video: all stages of construction
A frame shed on your property will always be convenient for storing equipment and old things. Having equipped its premises as a workshop, you can do carpentry and repair work, while your yard will remain clean. Insulated walls, floors and roof will provide comfortable conditions for keeping pets and birds during the cold season.
A change house, a barn, a utility block - this is the first thing that any person needs when developing a site.
It is not surprising that with the beginning of the new construction season, interest in topics devoted to the construction of “sheds” with their own hands has increased among users of our portal throughout the entire space from Moscow to the outskirts. As practice shows, it is possible to make a good change house in a dacha even without any construction experience, and the acquired knowledge can be used in the future in the construction of a large or other building.

The user admits that such a foundation is redundant for a change house. But, because There is a height difference and a slope on the site; the height of the rear pillars turned out to be 40 cm, while the front ones are almost level with the ground.

To form square pillars above the ground, formwork was made from 15x1.5 cm boards. The boards were fastened to each other using 2 self-tapping screws. on one side. This is done to make it easier to remove the collapsible formwork from the pillars. In the future, the same finished formwork Pankrat1975 plans to use it in the construction of cabins on his site.

The foundation was poured. For strength, a reinforcement frame, welded from three “tens” rods 1.2 meters long, was pre-inserted into each drilled hole.

After the concrete had hardened over the entire area of the foundation, the formwork was removed from the pillars, and the level of the top of the pillars was checked using a simple bubble and laser level. The discrepancy did not exceed 3 mm.

The time has come for the next stage - to make the harness for the change house.

Pankrat1975
While the concrete was setting, I went to the local construction market, researched prices and bought boards.
A 150x150 mm beam 6 meters long was used for the strapping, and a 100x50 beam was used for the frame posts. The user recorded all expenses in detail, which helped to keep track of funds.


The timber for the strapping was sawn into groove at the ends and secured together using reinforced corners and self-tapping screws. For greater strength, holes were drilled at the joints of the timber for wooden choppers made from mop cuttings.


Pankrat1975
The middle beams were connected in the same way as the corner beams, groove to groove, fastened to corners with self-tapping screws, crackers and choppers. I think we overdid it with the amount of fasteners. My brother joked that the utility block was olzhen turn out not to be wooden, but metal.


The strapping jumpers were made from two pieces of timber, which were also connected groove to groove and secured with long self-tapping screws. To strengthen the knot from above, having previously selected 2 mm of wood, a metal toothed plate (MSP) was nailed.

Under the timber, on each pillar, Pankrat1975 laid roofing material rolled up several times, coating each layer with diluted mastic. To protect against rotting, the timber, like all purchased boards, was “from the heart” impregnated with an antiseptic composition.

After making the harness, the floor was laid on it. A 100x50 mm board was used for this.


Then it was time to assemble the frame. Assembly began from the back wall. To prevent the wall from falling after lifting, it was temporarily secured with slab slopes.

The walls were assembled on a “platform”, fastening the racks to reinforced corners, screwed onto self-tapping screws.

To connect frame elements, it is better not to use the so-called. “black”, hardened self-tapping screws. Due to their fragility, if you slightly increase the torque on the screwdriver, the head of the screw will fly off.
Also, “black” (phosphated, oxidized) self-tapping screws do not withstand impact loads and shear work. If you use self-tapping screws when assembling the frame, then use yellow (galvanized) ones.
The “correct” frame is assembled using nails, without the use of screws and metal corners, because fasteners in the frame work for displacement/cutting (for which nails are suitable), and self-tapping screws work better for tearing.
The cuttings of the boards were used for jibs.

If rigid board material is used for cladding the frame - sheets of plywood or OSB, then jibs are not required.
Having raised four walls, the brothers began to make a roof, for which they installed rafters. A 15x2.5 cm board was used for the roof sheathing.