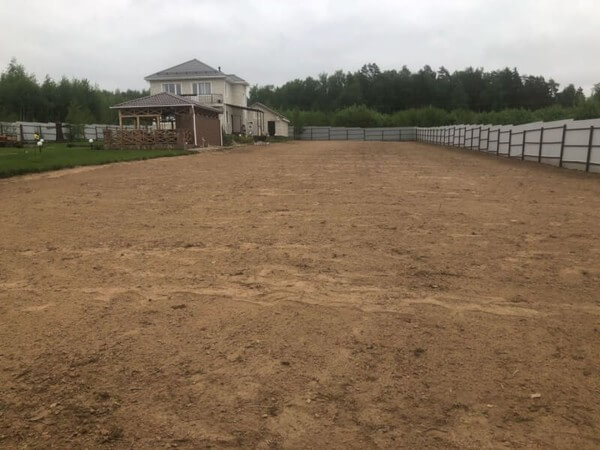
The pile-grillage foundation is most in demand among owners of suburban areas. In dense settlements, it is impossible to use heavy special equipment (hammers, pile drivers) for driving driven piles with a design length of more than 10 m or for light buildings. Renting this equipment is expensive, so short suspended bored piles with a monolithic grillage are used.
Due to the variety of construction technologies and materials used for pile-grillage foundations, there is a special terminology:
- base - a layer that absorbs vertical loads and lies below the freezing mark;
- pile - a vertical structure made in the soil or immersed in it;
- pile field - a group of piles for one structure, building;
- grillage - a monolithic or beam structure along the heads of piles (slab, lattice, frame or beam);
- low grillage – buried in the soil or located at the ground level;
- high (hanging) grillage – raised above ground level;
- bearing capacity of a pile is the sum of soil resistances on the side surfaces and under its lower end.

Based on material, bored piles are classified as follows:
- composite - reinforced concrete inside steel or polymer permanent formwork (large diameter pipe);
- rubble concrete - in the lower part of the pile stones are sunk into concrete (maximum size 15 cm, strength not lower than the design grade of concrete), the upper part (0.5 - 0.7 m) is filled with clean concrete, reinforcement is usually along the entire length (except for backfill);
- reinforced concrete - the pile is poured entirely from concrete with reinforcement along the entire length (usually not stressed);
- concrete - reinforcement only in the upper part for piping with a grillage.
The pile shaft can be manufactured in several ways, even using the same materials. For example, if a hole in the ground with a reinforcement cage placed inside is filled with concrete, the pile will be shellless.

Scheme of a pile with expansion - TISE.
If the pile reaches the bearing layer, is poured into a polymer or metal pipe, which does not carry loads and remains in the well for the entire period of operation (non-removable), acting as waterproofing, a pile with a shell is obtained.
If the temporary formwork is removed after pouring, the pile is called a temporary shell, the method is a vertically moved VPT pipe. If the formwork remains inside the well and performs load-bearing functions, the pile is called a pipe-concrete pile.
To increase the load-bearing capacity, the base of the pile can be widened with a monolithic base. The base is drilled out with a special tool, an explosion or concrete piles. In a general grillage, the head of a bored pile can have a sliding mate or a rigid embedment into a monolith.
If, during geological exploration of the site, the occurrence of a bearing layer deeper than 3 m is revealed, bored piles-racks will cost an individual developer more than a screw foundation SVF or a floating slab. In this case, suspended piles are more effective, the bearing capacity of which depends on the density and porosity of the soil. If the frictional forces on the side surfaces are not enough, other foundation options should be considered.
Unlike a strip foundation, the depth of the grillage does not depend in any way on the characteristics of the soil:
- the tape rests on the ground with its sole, there are lateral shear loads from heaving forces;
- The grillage does not rest on the ground, it is created solely for tying piles, distributing loads, and supporting wall materials (especially important for foam blocks and bricks).
After pouring the monolithic grillage, an air layer is created between the soil and its base to compensate for heaving forces. In low grillages, it is protected on the sides with sheet materials to prevent the soil from shedding and filling this space with heaving soil.
Taking into account the above, a monolithic grillage along the heads of bored piles is effective in the following cases:
- lightweight buildings - budget savings of 30 - 50% in comparison with a slab, strip foundation for log houses, half-timbered, frame, panel (SIP technology), panel cottages;
- complex terrain - slopes with a height difference of more than 1.5 m in the building area;
- high groundwater level - piles can be poured into the shell with a slight rise in water or by temporarily pumping it out of the well;
- swamp, coastal zone - excavation work for other types of foundations is impossible.
Piles are economically effective in individual construction only at a depth of 3–5 m, which is usually sufficient for lightweight structures. With normal geology on flat areas, piles reduce the construction budget of brick and concrete buildings by half. Only in this case does the foundation comply with the requirements of SP 24.1333, which regulate the design of pile foundations.
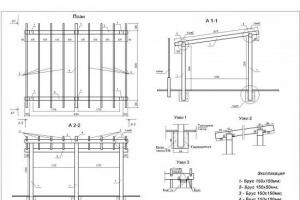
Step-by-step instructions using the example of a monolithic grillage on bored piles
To build a foundation of this type, an individual developer needs to determine the main dimensions of the elements: cross-section of the grillage (height, width), depth of the well, parameters of the reinforced belt, type of formwork. After which, the amount of building materials is calculated. For convenience, below are step-by-step instructions describing the key points.
Geological surveys, calculation of parameters
Unlike screw piles, for which it is often enough to test screw in a building spot in several places to determine the depth of the bearing layer, this will require full-fledged geological surveys. According to SP 24.1333, this will require a set of operations:
- soil testing with static loads;
- pessiometry, dynamic and static probing;
- laboratory analysis of groundwater, soils from different layers during drilling 3 m below the design level.

In addition, specialists will take into account the impact of piles on nearby buildings and the environment. The result of the research is a geological section in which the thickness of each layer of the layers of different rocks present in the building area is visible. This allows you to select from the corresponding SP tables the standard values of the bearing capacity of clay, sand, and loam to calculate the bearing capacity of the pile.
For example, for soil conditions of 2 m refractory loam, 1 m hard loam, on top of wet sand, there are several options for drilled piles:
- A – the depth of the piles is more than 3 m (passing through loam with the base resting on the sand), diameter 0.5 m;
- B – depth 3 m, diameter 0.4 m;
- B – depth 2 m, diameter 0.5 m.

For reinforcement, rods of 10–12 mm of periodic section are used. The clamps are bent from 6–8 mm of smooth reinforcement. For tying, it is better to use annealed wire. The pitch of the horizontal clamps is 30 - 60 cm, the rods should protrude 30 - 40 cm above the heads. After stripping, they are bent at right angles parallel to the axes of the walls and connected to the lower belt of the grillage.
Pouring and waterproofing

The formwork for the grillage begins to assemble from below.
Due to the large volumes of concrete work, a pile-grillage foundation is usually poured in stages. First, the mixture is placed in pile formwork and compacted with an in-depth vibrator or reinforcing bars to remove air. The grillage formwork is installed after the piles have gained at least 50% strength (3 – 5 days after pouring). The technology looks like:
- deck installation - only for a hanging grillage, holes are cut in the shield according to the size of the piles, it is put on the heads, supported by H-shaped posts along the entire length;
- installation of side panels - attached to the deck, propped up with bars or pins, the top side should be 5 - 7 cm higher than the design mark;
- reinforcement - two belts of 10-16 mm bars of periodic cross-section reinforcement, fastened with 6-8 mm clamps, bend at the corners, at the junction of the walls.

Grillage reinforcement.
Filling occurs according to standard technology with laying and vibration compaction of the mixture. The entire formwork must be filled in one go. Caring for concrete consists of protecting it from waterlogging (covering it with a film from rain), drying out (sand or sawdust on the top edge of the grillage with periodic moistening in the first three days).

This is done after stripping the grillage in several ways:
- impregnation with penetrating compounds (the service life is similar to concrete structures, no repairs are required);
- coating with bitumen mastics (resource 15 – 30 years, budget option);
- gluing with roll materials (lifespan of glass hydroisol is 30 - 50 years, the need to seal joints, use 2 - 3 layers).

Preferable impregnation waterproofing or a set of measures according to the last two options (coating + gluing).
Blind area and storm drain
For any foundation, regardless of its design, a blind area is required that has a 4–7 degree slope from the building outward. This structural element allows rain and melt water to be drained away from concrete structures under a monolithic low grillage and under a high grillage. To prevent runoff from destroying the soil adjacent to the blind area (usually the fertile layer), stormwater inlets (receive water from the roof drain) and trays that transport liquid to a separate underground reservoir are integrated into its outer perimeter.
To reduce the heaving forces under the monolithic grillage, which exert pull-out loads on the piles, at a depth of 40–70 cm. To do this, extruded XPS polystyrene foam is laid at the bottom of the trench. The width of the blind area should be 5–10 cm larger than the projections of the roof slopes, so that when the roof gutters overflow, the water does not destroy the fertile layer.
The standards SP 71.13330 of 2011 recommend a blind area width of 0.7 - 1 m for sandy, clayey soils, respectively, with a tight connection to the backfill (false base) of the pile-grillage foundation. It is made of waterproof material:
- concrete screed 5 cm thick in the thinnest areas;
- paving slabs/paving stones;
- rubber or PVC tiles;
- composite decking.
A budget option is a blind area made from dry asphalt concrete mixtures, used for repairing roadways and lining garden paths. It is compacted with a tamper, does not require heating or melting, and increases strength over time.
Following the recommendations given, even an individual developer without special education will be able to produce a pile foundation with a monolithic grillage with a minimum budget without errors. When properly calculated, the service life of underground structures is not inferior to other types of foundations, maintaining high maintainability and the possibility of increasing the usable area during operation.
Since the soils in the Moscow region are predominantly weak, sandy and water-saturated, the construction of a pile foundation with a grillage, or as it is sometimes popularly called a grillage foundation on piles, is common.
Types of grillage
The types of grillage differ in the height level from the soil surface, and the height of the ground area of the piles can be different.
- Recessed– this type of grillage is completely immersed in the ground. The top plane is below the main soil level. The most difficult type of grillage, since it is difficult to provide free space under it.
- Elevated– the concrete strip runs parallel to the ground surface. In some cases it has a slight elevation.
- High– the outer plane of the foundation rises to a significant height from the general ground level. It is a frequently used type, as it has simple installation and is not subject to earth pressure on the foundation. But it requires additional insulation and waterproofing. There is also no possibility of making a basement or underground warehouse.
Rice. Types of pile foundation grillages
The location of the piles under the grillage may vary. For greater strength, they can be arranged in continuous rows, then the grillage will look like a slab. Or, if point reinforced zones are needed, then the piles are installed in bunches. Quite often there are strip installations of piles with a strip grillage.
Types of grillage according to the material used
- Metal
It is a channel or I-beam that performs the function of tying the foundation. This type of grillage completely eliminates the deformation of walls and floors in the form of subsidence or curvature. It has an additional base for permanent formwork and concreting the subfloor on the first floor.

- Concrete
It can withstand the load of a large brick or block house, as it is the most reliable structural device. Its single piles have a common ceiling in the form of a reinforced concrete beam.

- Wood
Applicable only for light country houses. Performs the function of tying the lower crown of a wooden building. Usually installed without creating a basement area.

Pile foundation with monolithic grillage
Making such a foundation yourself is not particularly difficult if the soil does not have any serious nuances, for example, the presence of rock or large layers of sand.
First, the piles are installed according to the intended drawing. In most cases, they are necessarily reinforced and filled with concrete mixture, which is well pushed to the entire depth by mechanical vibration.

Rice. Layout of a monolithic grillage
Since the grillage is a concrete strip encircling the pile field, its cross-section is determined by calculating the constant pressure from the building. All this can be divided into several stages:
- Drawings and markings
Drawing up a drawing plan and carrying out ground markings.
Drilling wells with subsequent driving of pile shafts using special equipment.
Manufacturing of formwork structures for grillage and pile heads, if the latter have an elevation above the ground surface. When the grillage is buried, a trench is dug to pour the concrete mixture.
- Pouring concrete
Direct concreting of the pile structure and grillage using horizontal overlays.
- Freezing
Mandatory curing of the poured monolithic structure until it hardens completely. Dismantling removable formwork (if any).
Technology for constructing a pile foundation with a grillage
Before starting construction, it is necessary to carry out all calculation work on the construction of the foundation. Since installation difficulties may arise, it is better to contact professional staff. After conducting the necessary research, they will provide a full report on the necessary work and its cost.
Price pile foundation with grillage will depend on:
- number of piles;
- diameter, cross-section and total length of pile shafts;
- materials necessary for construction (cement, sand, reinforcement, etc.);
- presence or absence of special equipment.
Step sequence:
- Carrying out marking work on the site
There are two types of markings: “Egyptian triangle” and “two curves”. The first method is to drive slats into the corners on the long side of the future foundation and draw a line between them. Next, knots are tied on the rope at intervals of three, four and five meters. Knots of 3 and 4 meters are connected using a nail. Next, the rope knot is attached to the batten and stretched so that a gap of four meters is on the drawn line. Another line is drawn along a three-meter section of the rope. Then the width of the building is marked on it and the third batten is placed. The last corner is also revealed.

Rice. Foundation marking scheme
The “two curves” method is to determine the equal footage of the installed rail. Markers are placed at these points. The rope is tied at one end to the rail, and the other to the installed mark. The arc is drawn and marked. The same is done with the second mark. From the point where the arcs connect, a line is laid on which the width of the house will be determined. Then the four marks are connected with a cord, and the same marking of the internal fundamental contour is carried out. Only after this, control points for the piles are marked.

Rice. Scheme "two curves" (foundation marking)
- Drilling wells for piles
It is carried out according to calculations that should show the level of soil freezing and the passage of groundwater. The standard depth does not exceed two meters. After drilling is completed, a sand cushion is laid at the bottom of the well and asbestos pipes are installed as formwork. Piles can have not only a round shape, but also a square one. These are used if a small deepening of the foundation is necessary.
- Installation of pile supports
The installation of piles is carried out in strict compliance with the specified parameters. After installation, they are dynamically tested.
- Grillage installation
In turn, it is divided into several stages:
When the grillage is buried, a trench is dug along with the drilling of wells. A sand cushion of at least ten centimeters is placed at the bottom.
Then the formwork itself is installed using chipboards.

Rice. Grillage installation
- Two-level reinforcement
It is carried out using twelve-millimeter rods. They are connected using burnt wire. The bottom of the trench must first be covered with timber boards up to five centimeters wide. The reinforcement should not reach the same distance to the top edge of the formwork.

Rice. Two-level grillage reinforcement
- Concreting the grillage
Produced in one day with the same mixture that was used to fill the piles. The upper plane of the concrete solution must be carefully leveled using a building level. With a recessed grillage, the formwork is removed after 2-5 days, and with a high grillage - at least after a month. Moreover, the concrete must be regularly moistened with water twice a day for two weeks to avoid cracking.
All regulatory requirements regarding the dimensions of foundation elements and materials used are determined on the basis of engineering calculations, also in accordance with SNiP and are included in the construction project.
Foundation on piles with grillage - video
In this video you can watch the creation of a pile-grillage foundation step by step:
Leave a request and we will contact you:
Articles on the topic
Useful materials
JQuery(document).ready(function())( jQuery("#plgjlcomments1 a:first").tab("show"); ));
A traditional strip foundation performs its tasks perfectly when built on fairly dense and stable soils.
In more difficult conditions, other support structures are required that can create a solid foundation on problematic or completely unstable soils.
The optimal option is piles that are able to rest on deep dense layers, passing through unstable surface layers and practically not forming a structural connection with them.
This solution to the problem allows you to get a stationary and reliable foundation, saving money and, often, time.
Let's consider one of the most successful options - type.
A pile-grillage foundation is a system of vertical supports (piles) rigidly connected by a common external load-bearing belt (photo below).
The piles rest on dense layers of soil, and the grillage carries the walls of the house, evenly distributes the load and transfers it to the pile system.
This type of foundation has a lot of structural options, can withstand loads of various types and can be used in the most difficult conditions. Different types and materials of piles can be used; the grillage can be a simple support line or a powerful reinforced concrete strip.
Various combinations of these elements make it possible to create a foundation with the necessary parameters, optimally suited to the existing loads, operating conditions and hydrogeology of the site.
The presence of a grillage is typical for any type of pile foundation, so they can all be classified as part of this broad group.

Existing types
Types of pile foundations are distinguished by the type of piles.
There are:
- Rack piles. They are immersed in the ground until hard contact with dense soil layers appears. They form the strongest supporting structure and are capable of supporting buildings of any weight and number of storeys.
- Hanging piles. The load-bearing capacity of these supports depends on the frictional force on the side walls and on the strength of the soil cushion under the tip, formed during immersion. This design is convenient when dense layers of soil are too deep, but can suddenly change its parameters due to changes in groundwater levels or other processes.
The material for making piles is:
- Wood. The most ancient and traditional material, which has many disadvantages. With the advent of other, more stable and durable types, wooden piles have practically disappeared from the arsenal of builders, although they are still used in some places (in private construction, for the construction of auxiliary buildings).
- Metal. Driven piles are not specially produced; in this role, pieces of rails, channels or I-beams of suitable size are used. Screw piles are manufactured completely ready for use. The specificity of the metal does not allow for durable supports due to corrosion caused by electrochemical processes and the presence of stray currents.
- Reinforced concrete. The most common type of piles. The most durable are driven ones, manufactured using special technology using stressed reinforcement. Bored piles are cast from concrete directly on the site, which is convenient, reduces transportation costs and the overall level of use of construction equipment, but significantly increases the production time due to the need to cure the concrete to gain structural strength.
There are three main types of pile foundations:
- On driven piles. The immersion of trunks is carried out by special machines. The process does not take much time, the supports are strong and reliable. The disadvantage is the impossibility of carrying out work near the buildings in use due to soil movements that occur during immersion.
- On bored piles. This type of piles is convenient because it does not require transportation, unloading, or the use of lifting equipment. A sleeve (a type of formwork made from roofing felt or plastic pipe of suitable diameter) is lowered into a pre-prepared well, a reinforcement frame is installed and concrete is poured. All operations can be performed independently, but a fairly long period of holding the piles will be required for the concrete to harden.
- On screw piles. They are made of steel pipes with a wall thickness of at least 4 mm. The lower part has a welded or cast pointed tip and spiral cutting blades. Driving screw piles resembles the process of screwing a screw - the blades provide immersion, the sharp tip pushes apart or splits the obstacles encountered. Screw piles can be installed manually, if necessary, they are removed and reused in other places. The service life depends only on the intensity of corrosion.
NOTE!
All pile foundations cannot be created on rock or coarse rocks.

Types of grillages depending on location
Depending on the depth of immersion, there are three types of grillage design:
- Recessed. It is a complete analogue of a recessed strip base. It is immersed to a depth below the freezing level in order to eliminate heaving loads directed vertically upward. At the same time, the developed side surface of the wall experiences maximum values of lateral loads, which must be taken into account when designing. It is not used on difficult or waterlogged soils due to the lack of technological conditions for the production of concrete casting.
- Shallow. It is the most common design option for a pile-strip foundation, where the strip is immersed to a small (40-70 cm) depth. This option is much more economical than the buried one, since it does not require such a serious amount of excavation work.
- Non-buried. In this case, the grillage is installed above the ground surface, forming a gap of a certain height. This option is used on soils that do not allow extensive excavation work - waterlogged, excessively loose, prone to heaving or seasonal movements.
Some experts fundamentally distinguish between pile-tape and pile-grillage support structures due to the presence or absence of immersion of the tape into the ground. Others combine them into one group, since the general design of both is practically the same.

Use Cases
There are several options for using grillage material:
- Wood. Either a solid beam 150:200 or 200:200 mm is used, or a pack of edged boards 50:200, assembled in 3 or 4 layers. The resulting beam has high load-bearing capabilities and is easy to process and install. The cost of wood is relatively low, so a grillage of this type is the best option for houses that do not have a lot of weight (wood, aerated concrete, foam concrete).
- Metal. This type of grillage allows you to get a strong base, rigidly connected to the pile heads. The result is a durable structure, the installation time of which is minimal, and the result is very reliable. A channel, I-beam or rail is used as beams; they are attached to the tops of the piles by welding. Most often used in combination with screw piles.
- Reinforced concrete. This type of grillage is built using the conventional technology of casting a monolithic strip (floor tile). The only difference arises from the presence of an air gap between the soil and the bottom of the base. In addition, the reinforcement of the piles must be rigidly connected to the reinforced belt of the tape, forming a monolithic supporting structure. This procedure forms a powerful and rigid base that is resistant to all types of loads. The disadvantage is the long hardening time of concrete, which stops work for a month.

Its required height
The height of the grillage is directly related to the material of the walls of the house. If you plan to build a brick (concrete, cinder block) house, then the minimum height is considered to be 15-20 cm above ground level. For wooden houses, the height of the grillage should be slightly increased and be about 40-60 cm.
This will provide the necessary flexural rigidity and will allow the wood to be separated from sources of moisture below.
This refers to the snow cover, the height of which must also be taken into account. If the region has very snowy winters with high snowdrifts, it is necessary to calculate the height of the grillage to exceed their level.

Laying depth - what it depends on
The depth of placement depends on the condition of the soil on the site.
All related factors are taken into account:
- Groundwater level.
- Availability and volumes of soil water.
- Possibility of flooding in spring.
- The presence of seasonal changes in hydrogeology, an increase or decrease in the degree of filling of all aquifers.
To select the correct depth, it is often necessary to collect information from local geological and meteorological departments, consult with experienced builders, and refer to various SNiP applications.
It must be taken into account that all values indicated in various sources are minimum, i.e. It is allowed to increase the lifting height, but it is impossible to reduce the height of the gap.

Device
The grillage is a supporting structure located under all load-bearing walls, both external and internal.
It is assembled into a single strip; the beams are assembled into a single structure using conventional technologies characteristic of this material:
- Wooden beams are connected half-timbered with a jute tape sealing the joint.
- Metal beams are welded to the ends with reinforced connections with threaded elements.
- The concrete grillage is cast in the form of a monolithic element, rigidly connected to the piles by a common armored belt.
Each beam is rigidly connected to all supports located under it. The distance between them must correspond to the magnitude of the load; excess will contribute to the deflection of the beams and the deformation of all adjacent elements. Longitudinal connections of beams can only be located above the pile head; joining them in the span is prohibited.

How to calculate a monolithic base
The calculation of the pile-grillage foundation is carried out experienced and competent specialists.
This is a complex and responsible engineering task that is beyond the power of outsiders and those without special training (the work is carried out using diagrams and formulas).
If there is no opportunity to contact specialists, you can use online calculators, which give a fairly correct answer within a few seconds and completely free of charge.
If for some reason you need to calculate the supporting structure yourself, perform the following steps:
- The weight of the house is calculated along with the property, wind and snow load, and additional elements. This point is the most difficult, since it is necessary to take into account absolutely all the factors influencing the foundation from the side of the building. Some values can be found in the SNiP tables, for example, the magnitude of wind and snow loads characteristic of a given region.
- The resulting value is multiplied by the structural strength coefficient. Usually it is taken equal to 1.1, but in some cases an increased coefficient of 1.2 is used.
The value of the safety margin is relevant only for this configuration of the house.
All additional elements, decoration, furniture or extensions will increase its weight and load the foundation beyond its design value.
Therefore, it is quite acceptable to take a much higher strength coefficient in order to avoid future deformation or destruction of the foundation.
After the load is determined, the number of piles is calculated.
The total weight of the house is divided by the permissible load per unit and the result is rounded to the nearest whole number.
The permissible load on finished supports is indicated in the product passport; for bored piles it is calculated independently, using the methodology specified in SNiP or other sources.

Step-by-step DIY installation instructions
Let's consider the procedure for installing a reinforced concrete grillage located at a height of 30 cm above ground level (one of the most difficult options).
Procedure:
Preparation
The site is cleaned and leveled (if necessary). Remove all foreign objects, plants and other obstacles.
Pegs are used to mark the area. For driven piles, it consists of installing one peg on the axis of the supports; for bored piles, the lines of the outer and inner perimeter are marked. They also require preliminary drilling of wells, which is carried out based on the results of test drilling.
It determines the depth of dense layers of soil and is carried out in any case, as it makes it possible to determine the length of the trunks.
Installation of piles
Piling is driven using special machines.
It is necessary to draw up a driving plan so that the finished piles do not cut off the installation points of the next supports.
Usually installation is carried out in a spiral or snake, sequentially moving from one point to another.
For bored piles, wells are lined (immersing a pipe made of rolled up roofing felt or a piece of plastic pipe of the required diameter). Then an armored belt is assembled and lowered into the well, the dimensions of which must be selected so that it easily fits into the hole.
The length of the reinforcement must exceed the length of the well, so that it can subsequently be rigidly connected to the reinforced belt of the grillage. Then the well is filled with concrete and kept for the required time (28 days).

Construction of formwork
To build formwork, it is not necessary to wait for the concrete to harden in the wells. If driven piles are used, they usually wait about a week for the shaft to “suck” (a construction term for restoring the soil and sealing it tightly to the side walls).
Formwork is a kind of long wooden tray, the internal dimensions of which repeat the shape of the future grillage.
The assembly is made from edged boards, trying to prevent the formation of cracks and gaps.
The height of the formwork should slightly exceed the height of the grillage. To provide rigidity to the lower section, a series of supports are installed on the ground to prevent deflection of the bottom of the formwork. The inner part is covered with polyethylene, which prevents water or material from escaping from the formwork.

Creation of an armored belt
The reinforcement frame is created using conventional technology- working rods with the help of smooth auxiliary reinforcement are installed in the desired position according to the design diagram and general rules.
An important point is the rigid connection of the pile reinforcement and the reinforced belt of the tape, for which it is best to use welding. The remaining elements are connected by knitting with soft wire.

Pouring concrete
Concrete is poured after the concrete has completely hardened in the piles.
This is important, since the weight of the reinforced concrete grillage is very large and can deform uncured concrete.
The pouring must be done as quickly as possible, without interruptions, in order to obtain an absolutely monolithic support with a high degree of rigidity. The concrete is leveled and covered with burlap or polyethylene, and periodically watered with water for the first 10 days.
After 10 days the formwork is removed, after which the tape is kept until it hardens completely, which occurs 28 days after pouring.

Floors on the ground
Floors on the ground are used to create a grillage structure immersed in the ground. If there is an air gap, creating a ground floor becomes too difficult, ineffective and impractical.
The inner part of the tape is covered with a layer of sand cushion. Then a layer of geotextile is laid on it and crushed stone is poured, onto which a layer of crushed stone is poured through an additional layer of geotextile.
The entire backfill is compacted sequentially, achieving the best possible result. Then a layer of screed is poured on which the heat insulator is laid.
A screed is again poured on top of it, inside which a heated floor system is installed.
This screed can be covered with a finishing coating.. The floor cake is quite multi-layered, but it provides high-quality heating and prevents heat loss due to contact with the ground.

Waterproofing technology
The grillage is waterproofed using one of the most common materials:
- Hot bitumen.
- Bitumen mastic.
- Pasting with roofing felt.
- Application of impregnating compounds.
The simplest and fastest option is to use bitumen mastic, which performs its tasks perfectly and is sold in ready-to-use form. Apply by roller or brush, usually in one or two coats.

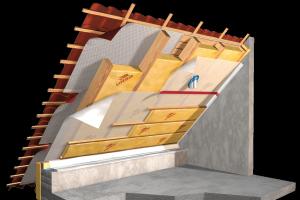
Insulation scheme
Waterproof materials are used for insulation:
- Liquid polyurethane foam.
- Extruded polystyrene foam (penoplex).
- Styrofoam.
- Expanded clay.
- Foam glass, etc.
The most convenient and effective option is considered to be penoplex, which is glued in a dense layer to the entire surface of the grillage, both internal and external.
Somewhat worse but it is much cheaper to use polystyrene foam, which is also resistant to moisture and is an excellent heat insulator, but has the ability to crumble and is excessively brittle.

Useful video
In this section you can see how to make a pile-grillage base (reinforced foundation) with your own hands, as well as how the grillage is reinforced:
Conclusion
Pile-grillage foundations are one of the most successful and reliable types of foundation.
They are able to perform their functions in the most difficult conditions, respond well to changes, and allow construction on the most problematic soils.
In most cases, the construction of such foundations is cheaper than the construction of a traditional belt.
These advantages make pile-grillage foundations preferable among most users whose plots are located in lowlands, in flooded areas.
The possibility of self-construction only increases the appreciation of this technology among builders, allowing the work to be completed at a convenient time and fully comply with the technology.
In contact with
The foundation on bored piles, with a widening at the base - a “heel” and hanging above the ground, is popular among FORUMHOUSE participants. The availability of technology and the possibility of independently manufacturing this type of base are reflected.
However, as with any construction, certain features must be taken into account when constructing one. In this regard, the practical experience and “tricks” of the users of our portal, which they use when building such a foundation, are interesting.

Vzik User FORUMHOUSE
I already have a house made of aerated concrete, a bathhouse, a gazebo, a garage and a brick fence on this type of foundation. I can say that with proper calculations and adherence to construction technology, no problems arise with this foundation.

Although our users have accumulated extensive experience in constructing a pile-grillage with a widening at the base of the pile, it cannot be considered a universal solution suitable for any type of soil and structures.
The choice of design is, first of all, based on data from a geological study of the site. Based on the results obtained, the bearing capacity of the soil, soil composition, groundwater level, the presence of subsidence foundations, etc. are determined. After this, taking into account the weight of the building and the collection of loads that the foundation (in this case, the “heels” of the piles) must redistribute to the ground, the most appropriate and cost-effective type of foundation is selected.

Based on practical experience, we can say that a pile-grillage foundation with an expansion at the base of the pile is most in demand on highly heaving soils, in areas with large differences in elevation. Under these conditions, the use of another type of foundation may not be economically viable due to the large volume of earthen and concrete work.

It should also be remembered that the calculation of a pile-grillage foundation is not as simple as it might seem at first glance. In case of gross violation of technology construction, without knowledge of soil type, groundwater level, etc. such a foundation can turn into a “time bomb” under the house. Moreover, to the final cost of a pile-grillage foundation, it is necessary to add measures for its insulation, installation of a blind area, drainage of surface and groundwater, and installation of an intake.

The fence is installed around the perimeter of the basement and closes the underground space under the house so that the wind does not blow around there.
This approach will allow you to understand whether it is profitable or not to arrange this type of foundation. A pile-grillage foundation is a “ribbon” (grillage) torn from the ground, to which piles are added. Hence (based on calculations) it may turn out that in some cases it is more economically profitable to build a classic shallow insulated strip foundation.

The main features of a pile-grillage foundation, with a widening at the base of the pile, include:
- The pile is laid below the freezing depth (depending on the region).
- At the bottom of the pile, a widening is made - “heel” with a certain ratio to the diameter of the pile and the calculated load-bearing capacity. Thus, the pile is reliably “anchored” in the ground.
- Grillage should not touch or lie on the ground.

The above measures help minimize the forces of frost heaving.

Vzik User FOUMHOUSE
I am installing gates. Due to my professional activity, I often see problems that arise with the support pillars of the entrance group. Due to the influence of frost heaving forces, poles “walk”, gate leaves warp, gates jam, etc. Of course, you can pour a monolithic concrete strip under the entire perimeter of the fence, but this is also not a panacea. I have seen many “torn” ones, and in terms of money this option turns out to be the most expensive.
Based on my knowledge and experience gained during the construction of the house, Vzik I decided that the TISE foundation would also be suitable for the fence. As four years of experience in operating a heavy brick fence showed, the forum member was right. Despite the frosts and winters with little snow, during which the ground freezes deeply, the fence remains level and standing. There were no movements of the foundation, no distortions of the entrance group - swing gates and wickets - during operation. The more interesting is the design and method of erecting this foundation.

To build a fence Vzik started back in 2012, doing it simultaneously with the construction of the garage.
On its site, the soil consists of the following layers:
- “fertility” - about 20-30 cm;
- sand 0.5 m.
The forum member advises not to drill a pile pit manually, but to rent a motorized drill with an auger with a diameter of 25 cm.


Vzik
While I was still drilling holes for the foundation of a house, I realized that doing it manually is a thankless task. Compare: on the first day, two people were able to make one hole “on clay” with a diameter of 25 cm, a depth of 1.8 m and a lower widening of 60 cm. In 10 days, only 30 piles were completely mastered, and 50 were needed! We decided to continue drilling with a motorized drill.
After renting a motorized drill, things started to get more fun. In just 2 hours, 20 preparatory holes with a depth of 1.5 m were drilled. After that, they were deepened to 1.8 m and widened at the bottom with a Tises drill.

Therefore, when it came to making holes for the foundation for the fence, the choice was obvious - to drill everything only with a motor drill. In one day, 50 holes were drilled to a depth of 1.5 meters, after which they were deepened with a hand drill to 2 meters and a lower expansion was made.

Advice: it is better to do the “heels” immediately before pouring the concrete, otherwise they may crumble ahead of time.
When manufacturing this type of foundation, we adhere to the following technology:
- Because the speed of preparing expansions drilled manually is low; there is no need to order a mixer with factory-made concrete. The pile is filled with self-mixed concrete. You can do 5 piles per day. This saves money and makes you less tired.
- For a pile with a diameter of 25 cm, we knit the frame from 4 reinforcing bars with a diameter of 10-12 mm. A welded metal mesh with a cell of 15x15 cm is used as a connecting element. Such a square fits well into the drilled hole. Releases of 2 cm on each side set the direction for the reinforcement cage and provide a protective layer of concrete.
- The reinforcement frame can be knitted not with knitting wire, but with plastic ties. Although this method is somewhat more expensive than using wire, it saves time and greatly simplifies the process of knitting the frame. The strength of the screeds is sufficient for the reinforcement cage to withstand pouring concrete mixture and further vibration. After the concrete hardens, the screeds no longer bear any force load.

Vzik
At my construction site, I tied all the reinforcement frames (under a house, a fence, etc.) with ties; I didn’t use wire at all. Of course, if you tie with wire, it is a little more reliable, but practice has shown that a plastic tie can cope with the task.

By the way, when using ties instead of wire, we get another bonus that concerns the pouring of piles with widening at the bottom. What is the essence of the idea that the user with the nickname used Destructor, clearly visible in the following photos.

We bend the “legs” (at the bottom of the frame) of each of the four reinforcing bars at an angle of 90 degrees. The curved ends look inside the frame. We knit the frame using plastic ties. Next we proceed as follows:
- Pour some concrete into the heel.
- We lower the frame into the drilled hole.
- We turn the reinforcing bars “legs” bent at an angle with the ends outward.
- As a result, the ends of the “opened” reinforcing bars enter the “heel”, ensuring a reliable connection of the widening with the “body” of the pile after the concrete hardens.


Destructor User FOUMHOUSE
When the “legs” are opened, the reinforcement slides well in the plastic screed. If you tie everything together with wire, it takes more time, and it will be difficult to turn the reinforcing rod.
In order for concrete to be poured into the hole “without a hitch”, we do it this way: we insert a special device into the drilled hole - an adjustable “neck” made from rolled tin and wooden blocks (you can come up with your own version of the device).

Advice: it is better to have several such devices in order to pour several piles at once. You shouldn’t take them off right away, because... the concrete has not yet hardened. Let the “neck” stand for about an hour, but you also don’t need to leave it for a long time, otherwise they will be caught by the concrete, and then you won’t be able to remove the “neck”. After removing the “neck”, you can put a plastic bag on the head of the pile. This is necessary so that the moisture does not evaporate and the normal process of concrete hardening occurs.

A sleeve rolled from roofing felt is inserted into the “neck” and the pit. Then we lower the reinforcement cage and pour the concrete, not forgetting to vibrate it properly, using a vibrator, and not the “bayonet” method. We make the concrete mixture as “hard” as possible, i.e. with the minimum amount of water required to mix it.
Concrete should not be liquid, i.e. spread, as beginners often do, thinking that it’s easier to lay it this way. To improve the workability of the “hard” mixture, we do not hesitate to use plasticizers.

Using a vibrator with a long mace, you can easily vibrate and thoroughly compact even hard concrete.
One more point that needs to be paid attention to. To make piles, it is often recommended to use sewer or asbestos pipes of the required diameter as formwork. According to users of our portal, the most budget-friendly and easiest way to fill a pile is to use a roofing felt “shirt” for this. Moreover, it can be used even if it is necessary to fill high piles that will protrude above the ground by 0.5-1 meter or more.


Oldvist User FOUMHOUSE
I poured the piles in roofing felt. The height above the ground was 50 cm. The diameter of the piles was 20 cm. Ruberoid was wrapped with tape only in two places where the pile protruded above the ground. To make a cylinder from a piece of roofing felt, I wound it around a sewer pipe of suitable diameter. Then he lowered them into the well and took out the pipe. I filled the pile with self-mixed concrete. Everything vibrated properly, nothing broke or came apart.
If you need to fill a pile more than 1 meter above the ground, you can proceed as follows: make two roofing felt “shirts”. First, pour concrete into the first one so that it does not reach the top edge of 10 cm. We insert the second “shirt” inside the first one, adjusting the required level, lowering or raising the roofing material cylinder. Then we pour the concrete further.

BraniganZ User FOUMHOUSE
I poured a pile 1.1 meters high from the ground like this, nothing fell.

An interesting method for making a roofing felt “shirt”, proposed by a forum member with the nickname face_ltd.
The construction of a pile-grillage foundation is common in areas with mobile clay and sandy foundations. This type of load-bearing structure is used mainly for high-rise buildings for residential, commercial and industrial purposes, but cases of use are more prevalent in private housing construction.
Construction of a pile-grillage foundation
As the name implies, the foundation consists of piles tied with a grillage.
Piles can be of two different types:
- Bored;
- Reinforced concrete;
- Wooden;
- Steel.
Piles are divided into subtypes according to their cross-sectional shape: square and round.
Their main task is to transfer and distribute the load from the building to the base along its entire length.
Depending on the type, support pillars are inserted into the ground in different ways:
- Screw ones are screwed in manually or using a special installation;
- Bored ones are collected directly in the ground;
- Reinforced concrete ones are hammered with a piledriver.
Screw ones can be screwed even near existing buildings without the risk of breaking part of the structure.
A monolithic or prefabricated (suspended) grillage plays the role of a load-bearing beam on which walls and ceilings are mounted. It redistributes the load from structures above the ground, transferring it to the piles. It can be reinforced concrete or wood, depending on the material of the supports and walls. The design of the grillage implies its location above the ground; it is not placed on the ground.
When is it advisable to use a pile-grillage foundation?
Installation of piles and strapping beams is a labor-intensive and financially expensive process. In what cases will material and resource losses be well spent:
- At high groundwater levels;
- With loose and weak foundations of sand, clay and loam;
- For the construction of wooden and foam concrete houses.
For lightweight houses with frame-panel walls, a grillage made of channel or wooden beams is suitable. For heavier structures you will need monolithic or precast concrete.
A pile-grillage foundation for a house made of aerated concrete is simply a godsend: it will withstand the load of even a 2-story house and will save your budget compared to choosing a foundation of a different structure.
Advantages of a pile-grillage foundation
This or that type of foundation is adopted on the basis of structural calculations, where the maximum load on the foundation and the size of all elements making up the structure are determined. But still, engineers often face the question of which design to adopt, based on the results of the study. Why do they prefer a pile-grillage foundation:
- The high load-bearing capacity of the supports allows them to be used for buildings and structures of any size. They reliably and rigidly enter loose soil, reaching its hard layers. When the ground vibrates due to seismic activity or seasonal changes in temperature and humidity, the soil moves but the pile remains motionless. This prevents the destruction of the building and violation of the integrity of its supporting frame. Because of this feature, this type of foundation is widely used in areas where earthquakes occur frequently.
- Lightweight steel piles are suitable for the construction of small houses and utility buildings.
- Different lengths of support pillars allow you to create a level base for the construction of buildings on hilly and mountainous areas; it is enough to choose the right length and distribute it over an uneven area. This technique is used to create multi-level houses.
- Low cost of material and work relative to strip foundations.
- Piles are not afraid of groundwater: in deep layers where support occurs, they are often absent. This indicator is not accepted for foundation calculations.
- The level of soil freezing in the region or locality is also neglected, since the lower layers of the soil section are not subject to temperature fluctuations, and the grillage does not come into contact with the ground. Determining the level of winter freezing is pointless.
- The absence of contact between the grillage and the ground ensures dry walls and reduces the risk of rodents entering the house.
- Short installation time and ease of installation;
- Maintainability of the elements making up the foundation;
- The foundation does not require preparatory soil work, the site does not need to be leveled, which reduces the cost of its arrangement.
- You can make the installation of a supporting structure even cheaper by replacing the labor of hired workers with your own. After studying some instructions, each developer can easily arrange the piles and assemble the grillage on his own.
An impressive list of advantages of the design encourages its choice. In order not to make hasty conclusions, it is worth familiarizing yourself with the other side of the coin.
Disadvantages of a pile-grillage foundation
What you need to pay attention to:
- It is not easy to collect loads without knowing the calculation rules. An approximate calculation will most likely lead to an overexpenditure of material and funds, and a lack of pillars can lead to the destruction of an unfinished house or its uneven subsidence.
- The inability of piles to accommodate heavy buildings is a significant disadvantage. To increase the load-bearing capacity, their diameter is increased, but this creates the need for serious installation technology with the attendant costs.
- Difficulty in designing a basement, which is extremely rare with pile foundations. At the same time, there is a need to cover the gap between the soil and the grillage to protect against cooling, blowing and freezing.
- On loose soils, uneven settlement of piles is possible with subsequent deformation of the grillage. To avoid this, sand cushions are placed under the base of the pillars to compensate for movement.
- If the reinforcement is installed incorrectly, it may become exposed and subsequently rust, which weakens the entire base. But this is rather an exception to the rule. The same applies to a steel pipe: if its material is of poor quality, it will begin to corrode in the near future.
Independent calculation of the number of supports for a house
Engineering calculations are an expensive pleasure. If you have neither money nor time, and the pile-grillage foundation suits you in all respects, you can decide on the distance of the pillars yourself.
- Draw a house plan to scale, observing all proportions.
- Place dots in the corners of the perimeter, where the walls intersect.
- Piles are placed under load-bearing walls every 2-3 meters, but no more. If the distance between adjacent pillars even slightly exceeds the norm, feel free to place another point between them.
- Count the quantity.
To determine the diameter yourself, use the table.
| Base diameter, mm | 100 | 150 | 200 | 250 | 300 | 400 | 500 | ||
| Base area, cm2 | 78,5 | 177 | 314 | 491 | 707 | 1256 | 1963 | ||
| Design soil resistance, MPa | Pile bearing capacity | ||||||||
| Coarse sands with any humidity | Average | 3,5 | 275 | 618 | 1099 | 1717 | 2473 | 4396 | 6869 |
| Dense | 4,5 | 353 | 795 | 1413 | 2208 | 3179 | 5652 | 8831 | |
| Sands of medium coarseness with any humidity | Average | 2,5 | 196 | 442 | 785 | 1227 | 1766 | 3140 | 4906 |
| Dense | 3,5 | 275 | 618 | 1099 | 1717 | 2473 | 4396 | 6869 | |
| Low-moisture fine sands | Average | 2 | 157 | 353 | 628 | 981 | 1413 | 2512 | 3925 |
| Dense | 3 | 236 | 530 | 942 | 1472 | 2120 | 3768 | 5888 | |
| Dusty sands saturated with moisture | Average | 2,5 | 196 | 442 | 785 | 1227 | 1766 | 3140 | 4906 |
| Dense | 3,5 | 275 | 618 | 1099 | 1717 | 2473 | 4396 | 6869 | |
| Hard clays | Average | 3 | 236 | 530 | 942 | 1472 | 2120 | 3768 | 5888 |
| Dense | 6 | 471 | 1060 | 1884 | 2944 | 4239 | 7536 | 11775 | |
| Plastic clays | Average | 1 | 79 | 177 | 314 | 491 | 707 | 1256 | 1963 |
| Dense | 3 | 236 | 530 | 942 | 1472 | 2120 | 3768 | 5888 | |
| Coarse soil (crushed stone, pebbles, gravel) | Average | 5 | 393 | 1570 | 2453 | 3533 | 6280 | 3768 | 9813 |
| Dense | 6 | 471 | 1060 | 1884 | 2944 | 4239 | 7536 | 11775 | |
The calculation presents values for the most commonly used bored piles for private construction. Collect all the loads from the structures and distribute them approximately equally across the pillars of one bush (bearing capacity). For central supports, the resulting loads are divided by 4, for corner supports - by 2.
The driving depth is determined based on calculations. Average:
- Bored - 10-30 meters;
- Reinforced concrete - from 3 and 4 meters;
- Screw from 2 meters.
Depending on the conditions:
- In seismically hazardous areas, supports are buried at least 4 m;
- When resting on wet foundations - at least 8 m;
- According to SNiP.