Here is a design for a bunker for 4-8 people. Well, approximate data on the equipment.
To protect against the action of a shock wave, durable metal protective and hermetic doors are installed at the entrances. The entrance structure is designed for a load exceeding 1.5-2 times the standard for floors. This is not accidental, since the entrances are the most vulnerable place in a protective structure: a shock wave penetrating through stairwells, corridors and other routes due to repeated reflection and compaction can sharply increase excess pressure. The life of those being sheltered depends on their ability to withstand external influences.
At the entrance to the shelter, expansion chambers should be provided to reduce the impact of the blast wave on the protective-sealed doors. The entrance to the expansion chamber from the premises within the sealing loop must be equipped with two hermetic shutters - closed under the influence of a shock wave. The width of the vestibule-gateway, the width and length of the vestibule and vestibule for swing doors should be 0.6 m greater than the width of the door leaf. Structural and planning solutions for entrances, elevated and built into the first floors of shelters, must provide the necessary protection from penetrating radiation and exclude the possibility of direct radiation entering the protected premises. The simplest method is to provide 90° turns or screens at the entrances opposite the doorways with overlaps between the screens and shelters. Protective thicknesses of screens and ceilings are taken based on radiation exposure.
For shelters, a device should be provided at one of the entrances of the airlock vestibule. A single-chamber airlock is installed for shelters. In the outer and inner walls of the airlock vestibule, protective and hermetic doors should be provided that correspond to the calculated impacts and protection class of the shelter. Security-hermetic doors must open outward during the evacuation of those being sheltered.
All entrances to shelters, except those equipped with airlock vestibules, must be equipped with vestibules. Doors in vestibules should be provided: in the outer wall - protective-hermetic, corresponding to the calculated impacts, shelter protection class and type of entrance, in the inner wall - hermetic. The doors must open as the sheltered persons are being evacuated.
Entrances to built-in shelters should be located closer to the corners of buildings and in walls located parallel to the direction of prevailing winds (in the direction of winter winds).
An emergency exit tunnel combined with the entrance to the shelter may be provided to accommodate a single-chamber airlock vestibule. In free-standing shelters, it is allowed to design one of the entrances, located outside the area of possible rubble, as an emergency exit. Emergency exits should be located, as a rule, above the groundwater level. The excess of the groundwater level relative to the floor of the emergency exit is allowed to be no more than 0.2 m, and in an emergency exit combined with the entrance - no more than 1.0 m.
In conditions of high groundwater levels, it is possible to design an emergency exit through the coating in the form of a protected shaft without an approach tunnel. When combining the mine emergency exit with the entrance, a staircase descent should be provided. The exit from the shelter to the tunnel must be equipped with protective-hermetic and hermetic shutters, installed respectively on the outer and inner sides of the wall. Removal of emergency exit depending on the height and type of buildings is taken according to table. 4 SNiP II-11-77
The dimensions of openings and passages to the premises must meet the requirements of SNiP II-11-77 and other regulatory documents. The number of entrances should be at least two, while the second entrance should be an emergency (evacuation) exit in the form of a tunnel with an internal size of at least 1.2x2 m and a doorway measuring 0.8x1.8 m.
Entrances and emergency exits must be protected from precipitation and surface water. Structures protecting entrances must be made of lightweight, non-combustible materials.
________________________________________
Let's look a little at the technical content of life support systems.
For shelter:
1. Inputs and outputs:
DZG I-IV - 1 pc.
DG - 1 pc. (with DES -3 pcs.)
LZG I-IV - 1 pc.
LG - 1 pc.
UZS 8/25 - 2 pcs. (used if the door or hatch does not correspond to the class)
2. Protection of engineering heads:
MZS - 2 pcs. (with DES -3 pcs.)
3. Filtration:
FVK 1/2 - 1 set.
4. Power units:
DES - 1 pc. (power depends on the number of consumers)
1. Inputs and outputs:
DG/SU - 2-4 pcs.
2. Filtration:
Special filter-ventilation equipment includes:
filter-ventilation unit;
air intake and protective device;
means of sealing entrances and exits, consisting of hermetic doors and sealing material for partitions and curtains.
Air purification in shelters from chemical agents, RP and BS is carried out using absorbent filters of filter-ventilation units, which are supplied to the troops by the NBC protection service, and installed by the units of the engineering troops equipping the shelters. In addition to absorbent filters, other protective devices of the units purify the air from large particles of ordinary or radioactive dust.
The main parts of the FVA 50/25 and FVA 100/50 filter and ventilation units are:
filter-absorber FP-50/25 or FPU-200, which serves to purify the air supplied to shelters from OM, BA and RV;
electric manual fan MGV or VAP-1, which is designed for intake and movement of outside air through a ventilation protective device, air duct and absorber filter, supplying purified air into the structure and creating pressurization in it;
ventilation protective device VZU-50 or VZU-100, which serves to protect against the penetration of excess pressure into a structure at the shock wave front through an air intake device, as well as to clean the air entering the structure from large particles of radioactive or other dust. It protects the air intake device from atmospheric precipitation entering it;
air intake device (air duct), which is used to supply outside air to the absorber filter;
set of mounting parts and tools.
In addition, the filter-ventilation unit kit includes sealing and waterproofing means: lightweight sliding hermetic doors, waterproof paper and rubberized fabric panels.
The FVA 100/50 unit also includes an air flow indicator URV-2.
A sheet of rubberized fabric is used to make a curtain that separates the covered part of the entrance from the outside atmosphere in front of the protective hermetic door to form a second vestibule in buildings that have one vestibule.
The procedure for installing filter-ventilation units, the sequence of checking the correct installation and serviceability of the units:
when installing ventilation protective devices, the cover of VZU-100 or VZU-50 should not protrude above the level of the shelter cover;
a drainage ditch is torn off from the pit with the VSU;
The nipple rings of the filter-absorbers must be turned counterclockwise and against the stop to ensure the tightness of the connections of the component parts of the unit;
free space is provided for rotating the fan handle;
the air flow indicator URV-2 is installed horizontally so that the arrow coincides with the scale zero;
to ground the fan electric motor, one end of the grounding wire is clamped with a bolt securing the electric motor to the fan, and the other end, if the unit is mounted in a metal structure, is connected to the frame of the structure, in a structure made of non-metallic elements - to a metal rod or pin driven into the ground between the frame elements ;
panels of hermetic doors must move freely along the segments, providing the ability to open (close);
after closing there should be no gap between them;
Before entering a structure with one vestibule, a curtain will be installed.
Units FVA-100/50 and FVA-50/25 must supply the building with 100 and 50 m3/h of purified outdoor air, respectively.
The protective properties of the aggregates are tested using chloropicrin.
To do this, a rag moistened with 5 - 7 ml of chloropicrin is brought to the air intake device of a working filter-ventilation unit. The absence of the irritating odor of chloropicrin in the inhabited area, determined organoleptically by the personnel located inside the object, indicates the reliable protective properties of the unit.
The tightness of the structure is checked by measuring the deviation value of the valve flaps for air flow in the upper segments of the hermetic doors (with the protective hermetic door or hatch open). At the nominal air supply of the units, the valve flaps should deviate from their bodies by a distance of 1 -1.5 cm. For smaller deviations of the valve flaps, measures should be taken to increase the tightness of the structure.
The procedure for starting filter-ventilation units for operation from an electric drive:
insert the plug of the electric motor cable into the socket;
smoothly, without jerking, turn the fan manual drive handle at least three to four turns;
press the electric motor start relay button for no more than 3 s. Pressing the start relay button for a longer time may result in burnout of the motor winding.
3. Power units:
UPS - 1 set. (provision for at least 2 days)
1. Good explosion-proof doors are not cheap, domestic ones cost about 100 thousand rubles, but passing a blast wave through a shelter is suicidal. It will knock out all internal non-sealed doors, destroying both people and equipment. The best option in the case of a power supply is to simply concrete the entrance; in any case, after exposure to a shock wave it will be impossible to use it. You can, of course, reproduce the design of the subway passage, but this is an additional unmasking - 2 exits.
2. San. the node is located this way due to the position of the sewer chamber, the drain comes from the sanitary unit, kitchen, vestibule and steam generator. This is a communication issue. It is worth considering the issue of using diesel exhaust gases and wastewater for heating and water heating (possibly a heat pump, but the price tag is high).
3.The FVU must be located near the emergency exit, and there must be easy access to the emergency exit from living quarters. Regarding the used air, this is not a very good idea, read the book “Steel Coffins” (author Herbert Werner), it describes well what happened on board when the snorkel was clogged - the diesel engines instantly burned all the oxygen. This can also happen in a shelter when ventilation fails.
4. A single-tier system is more promising due to the ability to disguise the construction of a bunker, for example, as the construction of a swimming pool. Drainage as such is not needed, and at a depth of 7 meters it is useless. External waterproofing - pasted in 2-4 layers, hydrophobic concrete M400 (used for the construction of swimming pools), internal waterproofing painted in 2 layers on metal (if using containers). Next is 50-100 mm of insulation, vapor barrier and interior finishing.
Home, according to the saying, is a fortress, but there are misfortunes from which it is better to hide not in this fortress, but somewhere further away or, more precisely, deeper - for example, in your own family bunker. Especially for those who are afraid of natural disasters and generally take the issue of their own safety seriously, the RIA Real Estate website decided to prepare material on how to build a shelter on their own in a suburban area.
No bureaucracy required
First of all, experts note that to build a small shelter on your own site, you do not need to draw up special documents. However, this only works if there are no centralized communications running under the site, which could be damaged during the construction of the bunker. It is advisable to find out this before starting construction.
We measure the groundwater level
To prevent the construction of an underground bunker from turning into a pool of water, you need to know the depth of the groundwater. This, according to the chief architect, project manager of the company "Main Bureau of Architectural Solutions" Nikolai Matveev, can, in principle, be done on your own: just pay attention to the water level in nearby wells or pay attention to reservoirs or rivers that are nearby. The difference between the surface of the water, for example, in a well, and the surface level of the land plot will be an approximate indicator of the depth of groundwater.
You can also seek advice from neighbors who have their own water wells on their property, since when drilling them, the depth of groundwater is determined more accurately.
Of course, you need to build a bunker at least 50 centimeters above the groundwater level. For example, if groundwater in a site flows at a depth of 4 meters, then the depth of the pit should be no more than 3.5 meters, says Matveev. But the expert emphasizes that the ideal depth of a bunker is 4 meters, so in the case of closer groundwater, it is unlikely that it will be possible to build a good shelter, otherwise it will be uncomfortable, and therefore non-functional.
Location
It is important to choose the right place to build a bunker. Some homeowners prefer to install a bunker directly under the house, almost in the basement. But experts do not agree with this location. It is better to set up such a shelter at some distance from the house, since in the event of, for example, a strong hurricane or earthquake, the main building may be destroyed and its debris will block the exit from the bunker, notes Sergei Kudryavtsev, managing partner of PRIDEX.
Locating a shelter under a house is only possible if there are separate exits from it within a radius of 15 meters from the house structure, Matveev adds. In addition, communication systems must be autonomous and not connected in any way to home systems, he emphasizes.
Moreover, according to the expert, it is better to veil the entrance to the shelter. “For example, it can be placed on the side of a wooden outdoor toilet or tool shed. Typically, such structures are located in the garden among plants and trees, which makes penetration into the bunker most invisible to surrounding eyes,” says Matveev.
Taking measurements
Before you start building a bunker, you need to calculate its area. Considering that a shelter bunker in case of a hurricane or earthquake is not designed for long-term stay of people, you can limit yourself to 3 square meters per person, which will provide quite adequate conditions in case of danger. For an average family, the area of such a room will be 9-12 “squares,” says Kudryavtsev.
Short term bunker
If a bunker is being built exclusively for short-term stays, in case of natural disasters, then the most rational solution is to use a septic tank made of impact-resistant plastic dug into the ground, says Kudryavtsev. Such a solution will be quite sufficient to wait out a hurricane, but on the other hand, it is a durable structure that will not require significant funds to maintain it in proper condition, the expert argues.
Moreover, such a design does not require any complex engineering solutions, be it ventilation or heating. For a small shelter, natural ventilation is enough: essentially, these are two pipes leading to the surface, Kudryavtsev assures. Specialized air purification systems are also not needed for such a shelter. You can limit yourself to a standard dust-proof ventilation filter, which you can make yourself from gauze or fiberglass, notes the agency’s interlocutor.
Electricity supply, he said, may include connecting the facility to central networks and creating a reserve of batteries and accumulators for emergencies.
According to Kudryavtsev, it makes no sense to implement a serious heating system: the ground rarely freezes to a depth of more than 1 meter, while the shelter concept itself does not provide for long-term stay. “I think that in this case it makes sense to limit ourselves to a supply of warm clothes, thermal underwear and other hiking accessories,” the expert says.
“On average, a high-quality septic tank with a capacity of 18 cubic meters will cost about 300 thousand rubles. Whereas land work does not require special preparation, and it is quite possible to carry it out independently. If hired force is used, the cost of such work is unlikely to exceed 50 thousand rubles,” says PRIDEX Managing Partner.
Long stay bunker
For those homeowners who are serious about security issues and want to build a bunker in which they can hide for a long time not only from bad weather, but also from a chemical attack, Matveev advises building a bunker with an area of 12 square meters with a separate technical room of 2-3 square meters, where the energy generator and dry closet will be located.
The construction of a shelter begins with a pit, and when digging it, you need to take into account the thickness of the walls and the height of the foundation of the future bunker and, accordingly, make “allowances” for them. So, for example, the thickness of brick walls will be 25 centimeters, and the thickness of the foundation slab will be 23 centimeters. During the construction period, the walls of the pit must be reinforced with logs and boards in order to avoid collapse of the soil or soil.
Before pouring the foundation slab, it is necessary to prepare the foundation by leveling and strengthening the bottom of the pit with 20-30 centimeters of crushed stone or sand, Matveev instructs. To enhance the strength of the foundation, it is better to reinforce the foundation floor with reinforcement and binding wire. After pouring concrete, it is advisable to wait 10-15 days for it to harden and become durable, the expert emphasizes.
After the foundation has completely dried, you can begin building the walls. Matveev recommends using white solid brick with reinforcement of the masonry every 3 rows with metal mesh or wire. The thickness of the masonry can be half a brick. The height of the masonry must be at least 2.2 meters.
The next stage is the construction of the roof. The architect proposes to make the roof covering from a metal I-beam, covering it on top with boards 4 centimeters thick and sheets of metal 2 centimeters thick. For waterproofing the roof, according to Matveev, 2 layers of dense polyethylene are suitable. After this, the bunker is filled with earth. The entrance to the bunker is equipped with a tightly closing hermetic hatch door and a wooden ladder for descent. You can make a pressure door yourself by laying, for example, strips of insulation from a rubber tube. In addition to the main entrance, the bunker structure must also have an emergency exit in case the main manhole is blocked, the expert notes.
To waterproof the shelter from the inside, before finishing it is necessary to coat the walls and floor with waterproofing.
At the end, internal half-brick partitions are erected to create an engine room with a separate door.
The estimated cost of such a bunker, built with your own hands, will range from 75 to 130 thousand rubles, Matveev notes.
Engineering and household equipment
In order to survive in a bunker from 12 hours to several days, it is necessary to provide a source of autonomous power supply and an external ventilation duct with air filters to prevent toxic substances and dust from entering there. However, it is also possible to equip the bunker with an internal purification air conditioning system with air regeneration, but this will cost much more than conventional “external” ventilation, Matveev notes. The cost of such a system starts from 100 thousand rubles. However, this will be the only significant cost line for the construction of a shelter.
According to the architect, a generator running on gasoline or diesel fuel is suitable as an autonomous energy source system. Accordingly, the bunker should always have a canister with a supply of fuel for it, say, 10 liters.
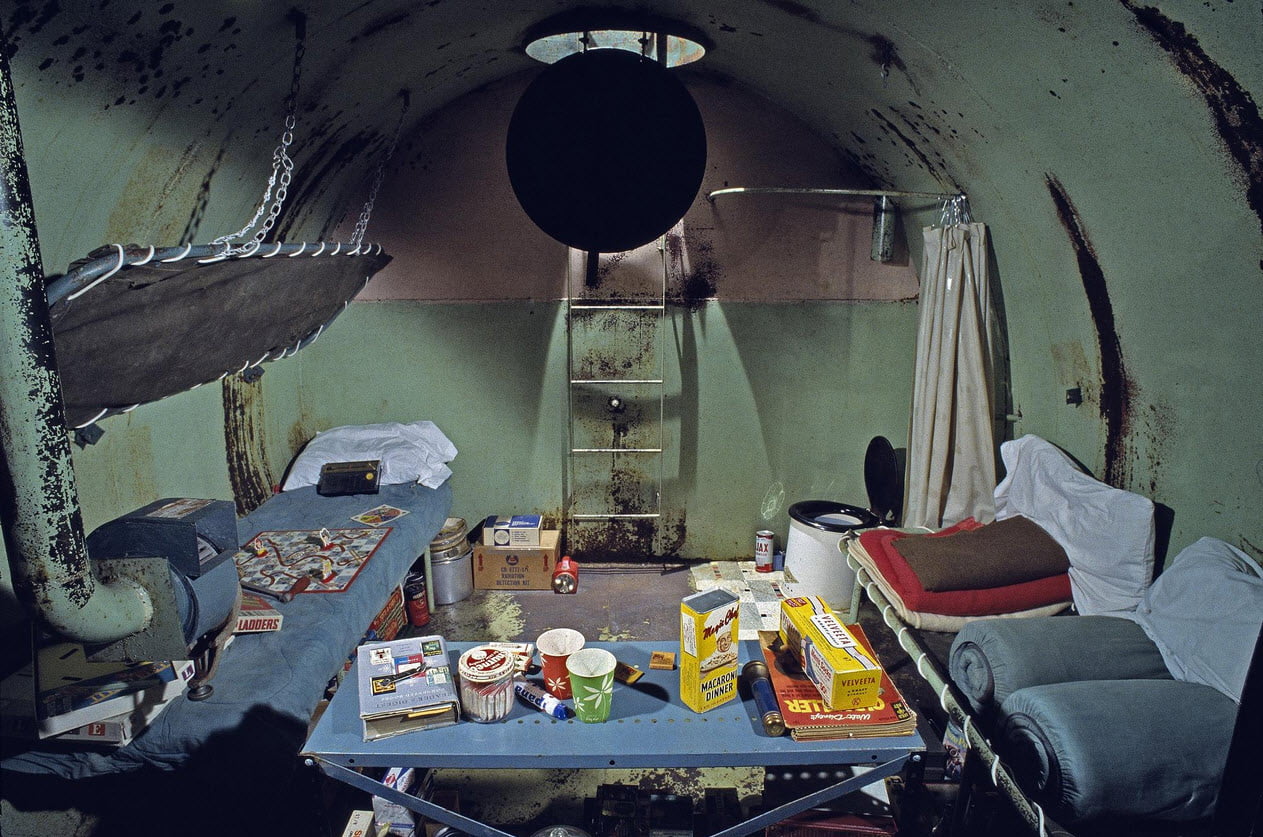
To save space, the sleeping places in the bunker are arranged in the form of bunk beds.
Strategic reserve
The main strategic reserve in the bunker, according to Matveev, is water; it needs to be stored as much as possible - 200-300 liters. Food should be canned, and it’s also a good idea to stock up on various cereals - they are nutritious and have a long shelf life.
The first aid kit should include septic tanks, bandages, cotton wool, adhesive plasters, a thermometer, scissors, a rubber heating pad and gauze masks. Each family, in principle, can determine the set of medications independently, focusing on the health status of each member of the household, but it is better to include in the list heart medications, painkillers and drugs to normalize intestinal function.
Finally, in addition to warehouses with food and medicine, the bunker should have everything necessary to conduct “reconnaissance” forays to the surface. Such items include gas masks, protective clothing and a flashlight, Matveev adds.
For many people, a plot of land near their home is a real gift. Everyone manages their part of the land free from development in their own way, but in general there is a lot of useful advice. Using this land to the maximum, you can get not only fresh cucumbers and tomatoes from the garden, but also maximum protection from any disasters, including the so-called “end of the world.” It is worth thinking about building a bunker on your site. Even if the end of the world does not come, and a nuclear war will pass the world, you can still protect yourself from natural disasters. Perhaps this room will not be needed at all, but, nevertheless, its presence is better than its absence. Even in calm, peaceful times, when there is no hurricane, earthquake or flood, the bunker can bring many other benefits. So it can be used as a wine cellar, which, by the way, will make you happy if you urgently need to hide in a bunker.Unfortunately, there are few specialists in bunker construction. And if such exist, then the cost of such “extraordinary” construction will be too fantastic. This is not a reason to cancel your plans and plant gladioli and carrots on the plot of land allocated for the bunker. It is quite possible and even realistic to build this room underground on your own. And despite the fact that the financial costs will still be very large, the savings on self-construction will still be noticeable. At the same time, do not forget that costs will be required. In order for the bunker to function properly and be equipped with everything necessary, these costs will still be quite significant. Therefore, before starting construction work, you should first of all draw up an estimate. Calculate how much material you will need and its corresponding cost, and also take into account the cost of all the necessary equipment. This estimate should also include prices for material to strengthen the walls, safe doors (should be a priority), as well as prices for independent communication and ventilation systems.

A bunker, as previously mentioned, is an ideal place not only for natural disasters, but also, with the right design, a bunker can protect against radiation. Before you begin to take further steps, you need to decide where exactly the bunker will be built - in the basement of the house or the old cellar will be rebuilt. It is best to consider the option of building a shelter in the area adjacent to the house. Such a room will be much safer than “built-in” bunkers. Although this will require much more money for construction.
Even with a moment of doubt, it is worth thinking about the fact that sooner or later such a room may still be needed. Even if not for you personally, but for your future generation.
Now let's move on to the main part. How to build a bunker with your own hands? So, what should you do first before you start building the bunker itself?
1. Select a piece of land to build a shelter that is not surrounded by other buildings, any kind of premises, trees or warehouses. Around the area of land under which the shelter will be located there should not be anything that, if it falls, could block the exit from the bunker or, even more so, cover its roof.
2. It is necessary to take into account the fact that the entrance to the bunker should be located as close (as possible) to your home. This is necessary so that in the event of an emergency you can get inside the premises as soon as possible.
3. Make sure that you have a lot of material on hand that will need to be used in the future to strengthen the walls of the room.
4. It is strictly contraindicated to build a bunker near gas pipes, as well as water supply systems and wells.

The main thing you need to know about the bunker is that safety in this room is determined by the depth of the room into the ground. At the same time, the level of the building under the ground should not be too low. It is worth considering the fact that the shelter, namely the floor of the room, must be higher than the upper groundwater level. To ensure that the room is completely safe in the event of a release of radioactive substances and is not subject to the impact of a blast wave, it would be most optimal to make a foundation 40 - 50 centimeters deep using M-200 concrete. Half a meter of soil will be enough on top. In this case, there is no need to build special walls to protect against radioactive radiation. It will be redundant! The main thing that is necessary for a room to be safe to stay in during radiation exposure is properly installed filtration. American builders who specialize in bunker construction argue that for even greater safety from radiation emissions in the shelter, it is necessary to build corridors in the form of vestibules with turns at an angle of exactly 90 degrees. Perhaps it is worth listening to the recommendations of real experts in this matter.
Bunker option No. 1
For the first time, if you wish, you can build the simplest and more or less reliable bunker. Such a shelter can safely be called the most economical option, since in addition to physical strength, it will require a minimum of investment. To do this, you need to select a piece of land and prepare a hole on it of appropriate size for the future shelter. The area of the room may vary depending on your capabilities and preferences. But the larger the room, the more amenities you can place in it in case you need to stay here for a long time.

Preparing a pit for shelter construction
The bottom of such a room can be strengthened with stones or wooden boards. If your choice is boards, then they must first be coated with special woodworking products. This will prevent the tree from rotting, as well as its damage by various inhabitants of the earth. Wooden boards must be thoroughly dried in advance. Stone floors require less preliminary preparation. In addition, stone is a much stronger and more reliable material than wood.
It is better to strengthen the walls with durable wooden boards, which were also pre-treated with special protective agents. Or, an alternative to boards can be rounded logs. They are more reliable, much stronger, and will help to significantly better strengthen the walls from possible destruction. Despite the fact that all these recommendations sound quite simple, there are also more complex problems that need to be solved in the future. We are talking about building a bunker roof. Here you need to think through everything carefully and it is advisable (if you are not a builder yourself) to consult with experienced builders. Since not only the reliability of the room, but also your safe stay in it in the future will depend on the strength of the roof. If the roof was not built securely enough, then even the slightest earthquake or hurricane may cause it to collapse. This is of absolutely no use to you, which means you need to build the roof with the idea that it should be as strong as possible. Accordingly, you should not spare money when choosing a roofing material.
In general, an inexpensive bunker option is ready. But before you start decorating the interior (if desired), you first need to take a few more important steps to complete the construction of the shelter. The main works include the ventilation shaft, the entrance to the shelter, sewerage and water supply (we take into account our financial capabilities).
Making an entrance to the room is quite simple. To do this, you need to dig a tunnel to the building of the room. The tunnel should be short enough so that a minimum of time has to be spent, if necessary, in order to get directly into the main building. The size of the trench must also correspond to the maximum volume of a person who will have to crawl into the shelter. After the trench is ready, it must be strengthened to prevent a possible collapse of the earth. To do this, a pipe is laid. Choose a durable pipe that is not subject to deformation or kinks. It should be wide enough so that you can get into the room without unnecessary problems. The entrance to the trench must also be secured by installing a strong and secure door. The ideal door for this is a sealed door.

Undercut for the entrance to the shelter and hermetic hatch
For a more comfortable stay in the bunker, especially if you have to stay here for a long time, it is better to make the toilet separate from the common room. To do this, an additional hole is dug next to the main room, the same height as the bunker itself. Choose the width and length of the pit at your discretion. Again, the floor is made of stones or boards, but space is left for the “toilet”. Here you can dig a deeper hole. The roof of the toilet is done in the same way. These two rooms are connected to each other by another trench, into which it is necessary to install a pipe of sufficient width. Of course, the toilet must be built before the bunker roof is built. Otherwise, the wide and heavy pipe cannot be placed in the passage to the toilet. It is difficult to supply electricity to such a toilet and, in addition, requires additional expenses, which are unnecessary anyway. Therefore, you can get by with a supply of candles.
Water, especially potable water in the bunker is the #1 necessity. An economical option is the most common barrel without a bottom, but without rust or contamination. The barrel is buried in the ground in a specially designated place in the shelter. It is necessary to bury it so that groundwater subsequently gets into it. Since such water will not enter the barrel in its pure form, it is necessary to take care of means of water filtration. If you are concerned about the possibility of the absence of groundwater or its presence, but in very small quantities, then you can do differently. Stock up on large bottles of purified water. If you have a special water tank, then you can place it in the bunker. In this case, you need to consider how in the future you can pour a sufficient amount of water into this tank. At the same time, even when making such a decision about water, it is worth making a drainage for groundwater just in case.
As for room ventilation, it is also necessary in the first place. Without a sufficient amount of fresh air flow, a long stay in the bunker will not be possible. To do this, purchase a special filter. And best of all, two (one as a spare) filters. You can find them at any construction market. There are many options, but here, the more money you pay, the better the air filter will be. A special hole is made in the ceiling of the building, which will be used as a ventilation shaft. A pipe is installed with such a diameter that a filter can be easily attached to it. Thanks to this device, air will flow into the room, and if it gets dirty, the filter will protect you.
For a more comfortable and longer stay in the shelter, it is better to purchase an electricity generator. It's useful, but overall not essential for a bunker.
This bunker option is the simplest option that you can build yourself at minimal cost. If you want maximum safety, comfort and convenience, then you will need much more financial expenses.
Bunker option No. 2
The second version of the bunker is more advanced. At the same time, it will require much more time and effort to build it, and you will also have to spend at least twice as much money on it than for the previous version of the shelter.

Construction of a bunker with reinforced walls and roof
A hole is dug at least two meters deep. The floor of the room is made of reinforced concrete. All the building materials necessary for this can be purchased at construction stores. Before pouring the reinforced concrete mixture onto the floor, a base of sand is prepared. The layer of sand should be approximately 30 - 50 cm. Only after laying the base, the floor is poured from the prepared mixture of building materials. The ideal floor would be one that uses a ready-made or self-welded strong frame made of reinforcement, on top of which concrete is poured. This is the most durable type of flooring. Also, for greater strength and reliability of the room, you can install piles made of reinforced concrete.

First of all, a waterproofing layer is also created on the walls from a mound of sand with a layer of approximately 30 - 40 cm. Then the frame is installed using iron reinforcement and formwork. After which the walls are filled with concrete solution. A lighter, but no less reliable option is a brick wall.
The roof is made in the same way as in the first version of the shelter construction.
The entrance to the bunker can also be made even more secure. To do this, a reinforced concrete shed is built on the surface, which must be lined with foam blocks on top. A recess is made into the shelter on the floor of the barn, which also needs to be reinforced with concrete mortar. The hatch from the barn to the bunker must be airtight and durable. Also, the passage to the bunker from the barn can be made from sewer rings. They are durable and can withstand maximum pressure and loads.

It is also worth taking care of the arrangement of ventilation shafts. It is advisable to have two or three of them. If this is a difficult task for you, then you can seek help or simply advice from specialists in this field. Since ventilation shafts can play the role of not only an emergency entrance and exit, but also provide you with fresh air.

As with the construction of a simple version of a bunker, it is necessary to build a separate room for the toilet, reinforced with reinforced concrete walls and with a concrete floor. Again, you can use sewer hatches to access the toilet.

It is necessary to make a “well” from a barrel. It is done in the same way as in the first version of bunker construction.
Bunker arrangement.
The second version of the bunker is subject to greater finishing options. But even a simple bunker can be made as comfortable as possible. Interior finishing work is not so necessary and does not in any way relate to safety. But you can make a kind of semblance of a house.
To make your long stay in the bunker not boring, you can stock up on books, magazines and board games. But the main thing is food and drink. It's best to always have canned food and bottled drinking water on hand. You can organize a bunker as a living space at your own discretion and taking into account your financial capabilities. You can put all the necessary furniture here. You can also decorate the room if you want uniqueness and originality, as well as maximum convenience.
In general, we have dealt with those points of construction work that need to be completed in order for you to have your own bunker on your site. But at the same time, there are several nuances and details that are still worth considering in more detail.
Bunker sewerage
The depth of the autonomous sewage system to be installed should be 5 - 6 meters below the depth of the main building itself. Actually, in addition to the sewerage system itself, it is also necessary to install the equipment that is necessary for the drainage and disposal of wastewater.

If desired and possible, you can also purchase several bio-toilets. They are convenient, practical and you may need them over time.

Shelter power supply
If you have the opportunity to purchase solar panels and an electricity generator, then you can provide your shelter with the most necessary electrical appliances, including an electric stove. Thanks to a generator or solar panels, you can also turn on heating equipment if necessary. True, such equipment should be as energy efficient as possible. Today on the market such heating systems are quite easy to find and buy at a very reasonable price.
Even if you are not an experienced builder, nevertheless, by following these simple tips, you can build even the simplest, but nevertheless reliable bunker. Good luck building a safe shelter!
(2
ratings, average: 3,00
out of 5)
Recent events in different countries indicate that the peaceful situation in the country can change in a matter of hours. Many of us do not think about what weapons the enemy army might use. Accidents at nuclear power plants and other man-made disasters are a direct threat to the lives and future health of people.
To give yourself and your loved ones the opportunity to survive unsafe events, you can build a bomb shelter or bunker with your own hands. This is especially true for land owners.

Preliminary activities
It is not advisable to hire specialists for the construction of this facility - it is expensive, and it is very difficult to find such specialists. It is worth considering that the construction of this structure will require significant material costs for full operation. Before starting construction, you need to determine the type of structure, its purpose, area and necessary equipment.
Then make an estimate. It is advisable to establish whether centralized utilities are located underground at the site of the proposed bunker construction. Permits are not required to build a bomb shelter or bunker on your own site.

Before starting excavation work, it is advisable to determine at what depth the groundwater flows. You can do this yourself. Pay attention to nearby bodies of water and the water level in your neighbors' wells. Your bunker should be at least half a meter above the groundwater level. The optimal depth for building a bunker is at least four meters. If the waters in your area lie closer to the surface, then the construction of an underground shelter in this area is not advisable.
Basic requirements for bunkers and underground shelters
A bunker is necessary to protect people from the destructive effects of the elements, nuclear explosions, and artillery shelling. What are the requirements for a bunker:
- the shelter must provide reliable protection from adverse impacts;
- the facility must be equipped with several exits;
- be resistant to increasing amounts of moisture in the soil;
- provide conditions for the full functioning of people during the period of placement in the shelter;
- comply with the necessary sanitary and hygienic standards.
The characteristics of a shelter depend on many factors:
- level of protection from external influences;
- location relative to a residential building;
- spaciousness;
- duration of stay in shelter;
- speed of construction of the structure;
- the presence of a ventilation system and its power.
In the case of a structure for short-term use, it reduces costs and facilitates the construction process.
Let's start construction work
Foundation and floor
After completing the preparatory work, you can begin marking the area for the future underground shelter. A pit of the required size is dug along the marked boundaries. It is advisable to make it larger than the planned dimensions of the bunker for the convenience of working with the walls by treating them with waterproofing materials. Afterwards we prepare the basis of the future structure:
- it is necessary to level the bottom;
- backfill with clay, fine gravel, and sand on top;
- if desired, lay a vapor barrier film;
- Fill the floor with cement mortar using reinforcing metal mesh.
When pouring, it is necessary to leave cavities for future utilities and highways. The reinforcement frame used to fill the floor must be tied to the overall structure. After pouring, the screed should dry for two weeks.

Walls
For the construction of walls, it is optimal to use concrete or expanded clay blocks, but the best option would be monolithic concrete walls. To increase the strength of the structure, it is recommended to fill the walls and internal partitions of the shelter with concrete mortar. When building an underground shelter, concrete must be of the highest quality with the addition of moisture-repellent additives. The height of the walls must be at least 2.2 m. The outer side of the walls must be treated with moisture-resistant impregnations, resins or slabs.


Roof
After erecting walls and partitions, take care of the installation of utility lines. Route electrical cables to the structure. After that, proceed to the roof. For a bunker, the strength characteristics of the roof are checked by hitting a projectile. It is optimal to start work by laying the metal I-beam on which the roof frame is built. Next, lay a sheet of metal 40mm thick. Next, you need to lay a vapor barrier.
The next layer can be made of concrete screeds followed by pouring concrete mortar. For entry, leave a hole necessary for unimpeded entry into the bunker if necessary. A hatch or door is selected to ensure maximum tightness. To descend, build a reliable ladder.


Before starting interior decoration, it is necessary to carry out moisture-proofing treatment indoors. To do this, use waterproofing or liquid glass. Afterwards, if necessary, partitions are erected to zone the space.
Engineering Communication
To extend the period of stay in a shelter, it is necessary to take care of an uninterruptible power supply and ensure high-quality ventilation of the room using air filtration systems. To save space, sleeping places are arranged in the form of beds in two tiers. If it is possible to install a sewer system, this will solve many sanitary and hygienic problems. If water supply and sewer pipes are located nearby, it is worthwhile to provide for the supply of mains to the shelter.
Strategic reserve
To ensure life in extreme conditions, it is necessary to leave a reserve in the shelter:
- drinking water, at least 300 liters, technical water, at least 100;
- shelf-stable canned foods, cereals and spices in sealed packaging;
- The first aid kit should contain dressings, antiseptics, antibacterial agents, a thermometer, water disinfectants, adhesive plaster, scissors, a tourniquet, gauze bandages, and a set of medications as needed;
- protective clothing, shoes;
- lanterns;
- gas mask, respirator;
- means of communication with the outside world.
The bunker is covered with soil from above, masked around the entire perimeter of the roof, leaving a hatch on the surface for entry.
Building a bunker on your own is quite difficult. A bunker is not just a concrete box covered with several tens of meters of earth, as the uninitiated believe. The most difficult thing when building a bunker is ensuring a human survival system.
Shelter construction: main problems
The first feature when building a shelter is the creation of a strong frame. Most often, a rectangular shape is used, the walls of which are reinforced with reinforcement, and the space between them is filled with reinforced concrete with Kevlar or Teflon fibers. The top of the bunker is covered with a “roof” - a monolithic reinforced slab with reinforcement. If you need to build a bunker in a seismic zone, then a capsule design can be used as a frame - the protective shelter takes the shape of a pill, it does not have right angles - they are all rounded.
The second distinguishing feature of shelter construction is the installation of an air filtration system. Without air, a person will not last long. It is not so difficult to build a filtration system in a bunker: the standard army filtration and air purification system, which combines several filters, is most often used as a basis - the so-called classic version of this solution is the so-called. "device - 300". Removing the air intake is more difficult - here it must be taken into account that in the event of natural disasters, bombing, flooding, the air intake can be blocked / flooded / damaged, therefore it is necessary to build a shelter in accordance with existing standards: the air intake is a reinforced concrete shaft with a wall thickness of at least 400 mm, equipped with special protective devices designed to suppress a powerful shock wave. When building a shelter or bunker, it is sometimes advisable to remove the air intake along with your home's chimney - this will attract less attention from neighbors.
The third point that is taken into account when building a bunker or shelter is a strategic supply of water. If you need to build a bunker designed to shelter one or two people, then it is advisable to place several containers with a total volume of at least 150 liters of water. If the task is to build a shelter for three to four people, then the water supply should be at least 300 liters of water. In addition, when building a shelter, it is advisable to stock up on water filtration means - this can be useful in peacetime. However, the optimal solution when constructing a shelter is to install an artesian well with output directly inside the shelter.
The fourth point when building a shelter is ensuring the safety of the entrance. The construction of any shelter implies the presence of several exits. There should be at least two of them - the main one, leading from the house to the protective structure and an additional one, located outside the radius of the main building. Each of the exits must be equipped with a vestibule gateway, which also acts as an expansion chamber capable of absorbing a powerful shock wave. Security doors through which the shelter is entered must open outward
There are many more nuances when building a bunker. We create modern solutions in the field of construction of private bunkers and shelters. By turning to professionals, you can be sure that all developed technical solutions will comply with approved SNIPs and standards. With us you don't have to think about how to build a bunker.