A comfortable microclimate in a bathhouse depends on how correctly the chimney is installed. After all, a pipe for a bathhouse is not only a means of removing carbon monoxide, but also fire safety and the health of people in the room.
The device itself can be installed with your own hands; there is nothing complicated in the process. The main thing is to prepare properly: choose the right material and follow all installation recommendations.
Choosing material for the chimney
The stove pipe in the steam room can be made of various materials, but it is most advisable to opt for stainless steel products. Important characteristics that allowed stainless steel chimneys to become widespread:
- High temperature resistance;
- The structural elements are lightweight, which simplifies DIY installation;
- Resistance to condensation;
- Resistance to aggressive environments (various acids that make up carbon monoxide);
- Good traction thanks to the perfectly round cross-section;
- No accumulation of soot on the internal walls of the chimney;
- Easy to operate;
- Affordable price.

Installation of asbestos-cement pipes is undesirable, since they do not meet fire safety standards for a bathhouse. When exposed to high temperatures, they can collapse and thereby cause a fire in the room. The result is dubious savings with health risks.
A ceramic chimney is a reliable and durable design that can withstand temperatures up to 600 degrees, but it is not suitable for a bathhouse. This is due to the excessive weight of the device, which only a capital building can withstand.
Stainless steel is the best choice of material for a sauna smoke exhaust. Reliability, durability, ease of installation with your own hands - these are its main trump cards.
Performing device isolation
It’s very easy to install with your own hands – you just need to connect the elements in series from bottom to top. Manufacturers of modular stainless steel systems provide a bell at the end of all component parts. It is also necessary to ensure that all elements that go outside have high-quality thermal insulation. The easiest way is to select ready-made modular “sandwich” elements for installation on the street, as well as in places where the roof or wall passes through.
You can make insulation yourself. To do this, the chimney must be wrapped with a layer of basalt wool, and an external contour made of any metal must be installed on top; the cheapest option is galvanization. Essentially, you need to make a homemade sandwich.

Properly performed thermal insulation is necessary for the following purposes:
- Reducing the temperature of the outer pipe;
- Reduced risk of condensation;
- Acceleration of the pipe heating process;
- Increased traction.
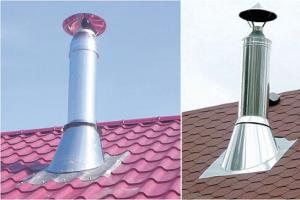
Organization of passage through the roof
The most critical stage of installation is the passage through the roof. After all, cutting a hole in the roof of the steam room can disrupt the hydro- and thermal insulation of the roofing pie, resulting in leaks and destruction of the rafters of the building. Following these recommendations will help you make the right passage through the roof:
- The hole on the roof must be designed in such a way that the distance between its walls and the pipe is about 10-13 cm.
- Make a wooden box on the roof in the place where you plan to install the chimney.
- Fill the entire space that separates the chimney from the inner duct with non-combustible material. In this case, stone wool is suitable.
- Press the waterproofing layer with sheathing bars.
For proper waterproofing, small cracks in the roof can be sealed with silicone-based sealant. Larger cracks can be sealed by installing a special element - a passage, which is located at the point of exit through the roof.

The roof passage is an apron-cap, which consists of a steel base and a rubber tip.
The passage is put on the pipe and securely fixed to the roof. Too much effort when shrinking the apron onto the pipe is not required; it can break the tightness of the connection and cause a roof leak.
Today it is not difficult to buy a chimney for a bathhouse, but before going to the store it would be useful to know what they are. Their types, materials from which chimneys are made and which one is right for you. Or maybe it’s worth making a chimney in the bathhouse with your own hands? We will try to answer which chimney is better for a bathhouse and what is the structure of a chimney in a bathhouse in this article.
Conventionally, the passage of the chimney from the steam room to the street can be divided into three options:

Chimney in the bathhouse ceiling
Chimney for a bathhouse made of stainless steel
Stainless steel chimneys are sold in stores in two versions: double-walled sandwich chimneys (insulated) and single-walled (not insulated). 
Single-wall, non-insulated pipes are used mainly for lining brick chimneys and for the first section of the chimney (you can use it to assess the wear of the entire chimney). They look like and are assembled according to the pipe-socket principle, where the upper pipe is inserted into the socket of the lower pipe. These chimneys are made of high quality mirror stainless steel or galvanized steel.
The insulation thickness on insulated chimneys ranges from 30 to 100 mm. As a rule, basalt wool, which has high fire-fighting properties, is used as insulation.
The thickness of the stainless steel is from 0.5 to 1 mm, the design is light and does not require large amounts of effort, powerful fasteners or a foundation.
The socket system is a sealed connection. A large selection of shaped products and fasteners makes assembling a chimney a simple and, most importantly, quick task, even for a person who has never done this.
The passage of wooden floors, roofs and walls in such chimneys is carried out using special elements that isolate the chimney from the wood and prevent fire.
Also, such chimneys are easy to clean and have an aesthetic appearance. 
Chimney diameter from 80 to 300 mm. The absence of corrosion, as well as the ability to order (in many cities) individual production, makes a stainless steel chimney for a bathhouse the leader in this market.
Video of stainless steel chimney assembly
Ceramic chimney for a bath

The ceramic chimney package includes:
- Ceramic pipes and fittings
- Adhesive for ceramic pipes
- Insulation
- Outdoor units
The pipes are made from refractory ceramics of a special composition; they do not absorb moisture and are resistant to aggressive environments and temperature changes. The thickness of most manufacturers is around 15 mm for pipe diameters from 140 to 200 mm. The length of each pipe is from 330 to 500 mm. 
The ceramic chimney is built free-standing on a special ceramic base “condensate collector”. Next comes a 660 mm long inspection tee with a large window for cleaning and inspecting the chimney. Then a tee is installed to connect the stove; they come at 45 and 90 degrees.
Glue for ceramic chimney pipes, the so-called “acid mass for gluing pipes,” comes in 1.5 kg plastic buckets and is applied using a glue gun. The glue creates a sealed monolithic joint with a coefficient of thermal expansion equal to the expansion of the ceramic pipes themselves.
High-density (110 kg/m3), molded insulation designed specifically for ceramic chimneys and their diameters. Segments with a locking connection fit tightly to the chimney. 
External high quality concrete blocks 400 by 400 mm, connected with block glue.
And the design is completed by the “top kit”, which consists of a concrete slab and a metal cone.
Ceramic chimneys for a bathhouse are very reliable in terms of fire safety, and if your bathhouse is located in the basement of the house, and the chimney will pass through the upper floors and a cluttered attic, then this is your option. Concrete blocks can be plastered and painted to match the color of the walls, which will visually hide the presence of the chimney in the room.
Video of ceramic chimney assembly
Chimney price
The price of a chimney is no less, and often much more expensive than the stove itself. 
Let's compare prices for stainless steel chimneys and ceramic chimneys with the following conditions:
- Chimney height 7 meters
- Internal chimney diameter 160 mm
- Chimney elements
- Base with condensate drain
- Audit
- Tee for 90 degree connection
- Chimney
- Cone on the chimney head
Stainless steel chimney from 40 t.r. up to 60 tr. The chimney weight will be from 40 to 70 kg.
Ceramic chimney from 45 t.r. up to 120 tr. The chimney weight will be from 500 to 700 kg.
Do-it-yourself chimney for a bathhouse
If you are going to build or assemble a chimney with your own hands, here are some tips and life hacks:

Results for choosing a chimney for a bath
- If you have a small, one-story, free-standing bathhouse with an iron stove, then take a sandwich chimney made of stainless steel.
- If you have a large two-story bathhouse or a bathhouse in the basement of the house, buy a ceramic chimney or build a brick chimney lined with steel pipes.
- A brick chimney is only justified if you have a brick stove or fireplace.
Video on choosing a chimney
Previously, sauna stoves did not have a chimney. Then the ancestors of modern people washed themselves in black. Today there is no longer any need to inhale and there is no soot - all this is true, because modern baths are created according to new design laws. Mostly people build steam rooms on their own. You should also build a stove and build a chimney for the bathhouse. But we must remember that this is a very responsible matter that requires a serious approach. You can accidentally make one small mistake, and the steam room will not work as intended. Therefore, it is very important to work without haste and extremely carefully.
Types of smoke exhaust structures
The chimney for a steam room can be external or internal. In our country, you can often find internal options. Among their advantages is the absence of violation of the architectural style, as well as saving heat in the room.
All the heat remains inside the steam room. Internal systems are good because they have better traction. They are also easier to care for. The internal structure also does not require insulation.
The external systems are more like American traditional chimneys. They were previously used by Americans on their ranches. They have a rather interesting appearance. If you decide to build an external solution, then there is no need to make a hole in the roof and ceiling, which definitely has advantages. The wall for the chimney inside must be no less than 12 cm thick, and for the outer wall the thickness must be at least 38 cm.
Popular schemes for installing sauna chimneys
How is the smoke exit structure arranged? Any element is a structure made of pipes, flanges, and fasteners. The main requirement for this building is the ability to operate at high temperatures without any changes in the properties and emissions of combustion products.
To prevent the chimney for a bathhouse from losing large amounts of heat, it is located as close as possible to the inner wall.

In this case, you will get the most effective traction. And if there are reasons why this configuration is impossible, then a thicker wall is created.

Thickness parameters depend on temperature. For example, if the temperature is lower than 20°, then it is necessary to make thick walls, from 38 cm. If there are severe Russian frosts in the region, then the thickness should be about 58-65 cm.
When there is more than one stove in a steam room or bathhouse, then each of them must be equipped with its own chimney. Otherwise, the thrust will lose strength. Smoke exhaust system specialists recommend the following. In cases where it is impossible to build several systems for stoves, a cutting system must be installed at a height of approximately 75 cm. It is also important to ensure that the inner surface of the future chimney is as smooth as possible. If there are any roughness inside, soot will accumulate on the walls. This may increase the risk of fire.
The simplest chimney
This element will be based on a stainless steel pipe. In addition to this, you need to prepare one elbow with a diameter of 20x120 cm from galvanized steel, two elbows of 16x120 cm each, three of stainless steel of 16x10 cm each. You will also need a tee with a diameter of 16 cm and a plug for it. You also need a fungus that is the right size. The diameter of the chimney for the bathhouse in this particular case will be 16 cm.
The prepared pipes should be connected to each other using self-tapping screws.

It is necessary to make a hole in the ceiling slab, the diameter of which will be 16 cm. Next, from the roof surface it is necessary to remove the soft roof and thermal insulation 15 cm from the hole made.
The section of pipe that will be outside is wrapped with basalt wool. The layer should be approximately 16 cm. You should also additionally wrap the cotton wool with asbestos cord. Then a pipe with a diameter of 20 cm is connected, which is fixed and thoroughly coated with bitumen mastic. An asbestos cord is placed in the gap between the two pipes. This is necessary for protection from rain.
This is how you can independently design and install stainless chimneys for a bathhouse. This is a very affordable solution.
Features for different types of ovens
Modern equipment for baths is equipped with brick smoke removal systems.

Pipes made of ordinary or stainless steel are also used. Each material has advantages and disadvantages, and there are also certain nuances in installation.
for saunas for metal stoves
After the installation of the stove is completed, you can immediately begin installing the chimney. The first step is to attach several expansion supports to the pipe. It’s good if these are pipes made of asbestos or “Sandwich”. The latter can withstand significantly higher temperatures, unlike other analogues. However, such a pipe should not be exposed to direct flame. That is why a steel pipe is installed first, and then, after the first bend, a sandwich or asbestos-cement structure is installed.
Now all that remains is to organize the protection of the upper part from the rain. A plug may be suitable for this. Another one is mounted on the pipe below, which will then facilitate the process of draining condensate and cleaning.
If the oven is brick
This chimney for a bathhouse is easy to build with your own hands. When the row of masonry covers the stove, the construction of the chimney system begins.
So, on the 21st row of brickwork it is necessary to form two channels. They will then be merged. Next, on the right you should block the space above the core. The gap between the core and the masonry will be 2-3 cm. Any voids are filled with mineral wool insulation. With the 22nd row of masonry, the opening will already be closed, and after that you can begin to lay and shift the channels to the middle. To prevent this ceiling from cracking in the future, it is advisable to lay another row of masonry above the stove core.
For those who have managed to build a brick oven, making a chimney will not be difficult. The main thing is that no cracks arise. Also, the standard for the cross-section of the pipe should not be exceeded. Otherwise, the gases will cool quickly.
How to make a chimney for a bath through the ceiling
Often built from pine. This wood sometimes overheats. The process of smoke passage must be created with maximum attention. The wall must be fenced with any non-combustible materials. You can strip steel sheets; mineral wool or brickwork will also work.
Another effective method of protection is a special ceiling-passage assembly.

To do this, holes are cut in the ceiling where this very box will be installed. After this operation, a pipe is pulled through the assembly. It, in turn, must be insulated on each side.
At the next stage, the pipe is erected above the roof. Its height must be at least 1.5 m. When it passes through the roof covering, it is necessary to apply a sealing cover. Using this operation, you can hermetically connect the chimney pipes.
In order to get good traction and long service life, you need to clean the pipe from accumulated soot and debris once every six months. And then the bathhouse will delight its owner for a very long time.
Bath pipes
The chimney plays a very important role in creating a comfortable microclimate. The choice of pipe material for it is also important. The pipe is not only a smoke exhaust system, but also safety in case of fire, as well as health. Let's find out which chimneys are best for a bathhouse.
The pipe in the steam room can be made from a variety of materials. However, it is best to use stainless steel for this. This material has a lot of important characteristics, such as resistance to high temperatures, light weight, ease of use, good traction, and resistance to aggressive environments. The best chimney for a bathhouse is made of stainless steel.
Asbestos cement pipes are not very desirable. They poorly comply with fire safety standards.

When exposed to high temperatures, a product made of this material may collapse and a fire may occur, which is very dangerous in a steam room with wooden walls. This is a rather dubious saving.
Ceramics are reliable and durable. Such chimneys can withstand high temperatures up to 600 degrees. But these pipes are also poorly suited for a bathhouse. It's all due to the heavy weight. They are definitely not suitable for wooden structures.
Sandwich
This is a modern option. Chimneys for wood-burning saunas are assembled from it.

This product consists of two pipes. Non-flammable insulation is provided between them. Modern materials are used as it, such as basalt or ceramic wool, vermiculite. The smaller pipe serves as a chimney outlet. The big one is the outer casing. Its task is to keep the insulation dry. The casing can be made of galvanized or stainless steel.
These are the types that exist, and anyone can make such a design with their own hands.
One of the key elements of a modern bathhouse is the stove installed in it. And it is very important that the maximum possible removal of the resulting combustion products is ensured, and for this, the design of a high-quality chimney must be thought out and created in advance.
Doing an exhaust pipe to a bathhouse with your own hands is quite simple; it is important to be able to handle the tool and understand the meaning of the work being performed.
Arranging a pipe in a bathhouse
When deciding how to make a pipe for a bathhouse correctly, and, of course, reliably, you need to clarify many points. Among them are those related to types, designs, size requirements, and installation and operation features. This is necessary for its flawless operation.
Types of chimneys for baths

The chimney for a bathhouse can be external or internal, and each type has its own advantages and disadvantages. The characteristic feature of an external chimney is that it has the lowest fire hazard and is easier to attach and install. The disadvantages include its location on the street, resulting in high heat loss.
For an internal chimney there is no concept of heat loss; the heat remains inside, but installing it is much more difficult. A more serious disadvantage is the increased fire hazard.
It must be said that modern materials make it possible to reduce the existing disadvantages of external and internal chimneys to a minimum. But among the recommendations on how to make a pipe in a bathhouse, the prevailing opinion is that it is best to arrange an internal chimney.
Features that a chimney in a bathhouse has
When installing a chimney in a bathhouse, the main design features, which are determined by the materials and elements used, must be taken into account.
These features include:
- high temperatures;
- environmental and sanitary standards;
- and, of course, the building of the bathhouse itself is taken into account, which in most cases is completely wooden.
To successfully carry out installation work, the following basic principles cannot be neglected:
- The material should be ferrous or galvanized metal, ceramics or brick. Asbestos cement and aluminum are not suitable.

- When choosing insulation, the first place should be such characteristics as environmental safety and non-flammability of the material. Expanded clay and stone wool are excellent.
- Thermal insulating and reflective surfaces must be covered with metal foil materials. It is worth remembering that aluminum foil thermal insulation is very similar to a coating made of shiny lavsan, the melting point of which is less than 300 degrees.

- In the process of arranging the chimney, you need to make sure that there is no contact with the wooden elements of the bathhouse. This is one of the requirements of fire safety rules.
- Fire safety can be ensured by using sandwich pipes that are installed in the ceilings. Expanded clay or basalt wool is used as a filler.

- When the bathhouse pipe is routed through the roof, contact with the roofing materials must also be prevented. This requires the use of a special metal casing.
- To seal the seams and joints between the protective box, which is installed in the roof or ceiling, and the pipe, it is advisable to use special aluminum tape or foil.
Shape and height of the chimney for a bath
The most practical shape of a chimney for a bathhouse is cylindrical. should not be less than the diameter of the hole that the stove or boiler has. More is possible, less is not possible.
When selecting the diameter, it is necessary to proceed from the fact that the cross-sectional area should be from 8 square centimeters for each kilowatt of power. When doing your own calculations, you should use the formula for the area of a circle.
The height of the pipe in the bathhouse is determined taking into account the height of the building, what type of roof it is, and the size of the adjacent buildings. When creating a project, the height of the pipe above the roof must be taken into account.
According to sanitary standards and regulations, the pipe on the roof of the bathhouse should be of the following height:
- 50 cm above the ridge, if it is located closer than 1.5 m to the ridge;
- at the same level as the ridge or slightly higher if the distance is from 1.5 m to 3 m;
- if the distance is more than 3 m, then the same reference point is on a line drawn from the ridge downwards, at an angle of 10 degrees to the horizon;
- for a flat roof the height must be at least one meter;
- if the height is 1.5 m or more, then it must be additionally secured with guy wires.

Installing a pipe in a bathhouse
Before installing a chimney in a bathhouse, you should purchase or make all the structural elements yourself. It is worth noting that independent pipe production is only possible with special tools and manufacturing experience.
Therefore, it is easier and better to purchase chimney parts in a store and then assemble them together, and the price of such a solution will be the most reasonable.
The assembly instructions are not complicated and are within the capabilities of a person who knows how to handle the tool.
- Pipe installation begins with preparing the holes for the chimney. When building a bathhouse from scratch, these passages are made in advance. If the chimney is internal, then the holes are made in the roof and ceiling, if external, then in the wall, not far from the stove or boiler.

Attention: When leading a pipe through a wall or roof, protective metal sheets must be prepared in advance to protect the part from exposure to very high temperatures.
- Particular attention should be paid to what the pipe insulation in the bathhouse is. It includes a special interfloor adapter, and in addition - a sandwich pipe, which is larger than the main chimney.
- For the internal pipe in the ceilings, a special box is made, which serves as an adapter.

- To protect the roof, a special metal apron is installed.
- First, the main single-layer pipe is installed, which goes directly into the firebox, secured to the wall and to the outlet of the firebox.
Attention: If pipes with a larger diameter than the outlet are used, an adapter must be installed first.
- A gate is installed, after which there is again a single-layer pipe that enters the adapter in the ceiling. If the ceiling hole is not located above the stove, an elbow is used.
Attention: The number of elbows should not be more than three, and the total horizontal section should not have a length of more than one linear meter.
- After installing the pipe into the adapter, it is filled with thermal insulation.
- The next element is a sandwich pipe. It is installed inside the previous one.
- The final section of the pipe is inserted from above, through the roof and metal apron.
- Finally, a protective fungus is installed.

Pipe with heat exchanger - benefits and savings

The best option is a heat exchanger for a bath on a pipe. This design is called a samovar and is mounted directly on the chimney pipe. The water is heated by heat flowing through the chimney. The temperature of the escaping smoke can reach several hundred degrees.
A heat exchanger for a pipe in a bathhouse is useful when a bathhouse is needed some time after heating. The water will remain hot for a long time and it is possible to use a fairly large tank due to the large heating area. The water is heated quickly and evenly, according to the principles of a conventional samovar.
Cleaning the pipe in the bath

If the chimney becomes clogged, the draft deteriorates and smoke appears inside the bathhouse. A question arises regarding how to clean a pipe in a bathhouse. This can be done using a special tool, or the stove can be heated with a certain type of wood.
Mechanical cleaning involves the use of a special scraper and a stiff brush with a link handle. The work is done from the outside, from the roof, through the top of the chimney.

Considering that a lot of soot gets inside the firebox, it is necessary to protect the room from it. One option is to cover the firebox with a thick cloth.
The second method is to heat the stove with aspen wood, and the pipe cleans itself. It is recommended to do this at least once a year.

Attention: Do not use any chemicals when cleaning the chimney. This method causes great harm to the environment.
Conclusion
It is necessary to install a bath pipe carefully, not missing even small details, and if this process is being done for the first time, it is worth inviting an experienced craftsman to control and assist in the installation work. It is very important to comply with safety regulations and expert recommendations.
The video in this article contains some more details regarding the discussed topic.
You need to take the choice of a pipe for a bath very seriously, choose good material and make sure of the quality of this device. If you treat this carelessly, you can expose the structure to a fire hazard, and there will be problems with cleaning this product. Even the microclimate in the bathhouse depends on the correct choice of pipe.
Choosing a pipe for a bath: ceramic or steel?
Today, a huge assortment of this product can completely confuse every person. Most often, steel pipes are chosen for baths, as they can withstand high temperatures. This is an important property during construction.
But for a ceramic bath it is inferior in popularity. Due to the fact that it is heavy, although it is better in durability. There are also so-called asbestos-cement pipes. This material has few positive reviews. An asbestos cement pipe may burst and then a fire will occur.
If we talk about insulation, then folgoizol is often chosen, since it does not emit harmful substances when heated.

To make the pipe heat up less, you need to make a so-called “sandwich”. It is done like this:
- a steel pipe is taken;
- basalt is placed on top of it;
- then a second external stainless steel contour is placed.
A structure arranged in this way will not heat up much. The fact is that basalt can withstand very high temperatures, there is also no risk of fire, and when heated it does not emit harmful odors. This type of pipe is also called “warm” because it does not cool down very quickly. This device is the most effective for a bath. Also, the outer pipe practically does not heat up - and therefore the risk of fire is very small. And what is important, such a product improves the operation of the stove, even the draft will be better, since there are no obstacles.
How to protect a building from fire?

If you suspect that the pipe is still heating up, then you need to check the temperature of the surrounding material. You can spray water on the apron or touch the boards. If your soul is still restless, then just in case you can wrap it in asbestos. This must be done in such a way that there is always a small air gap. It is also necessary to protect the outer edge of the bath pipe from moisture by hiding it under a metal fungus.
Pipe cleaning
There are many different ways to clean it - from brushes to chemicals. But a problem arises if the stove is branded and the pipe is overlapped. A brush cannot solve the problem here. You can clean the specified pipe as follows:

- you need to pour a couple of liters of boiled water into the pipe;
- then heat the stove for quite a long time.
After this, the soot will immediately begin to come out, but you should not be afraid of the odors - they will disappear due to the high temperature.
So, the material for the pipe should be chosen that is less fire hazardous, durable and light in weight. Steel suits these requirements perfectly. All its advantages have been described above. It is better to carry out insulation with foil insulation and for better results build a “sandwich”. And for reinsurance you can use asbestos.