Most owners of their own homes choose plastic windows for installation, not only because of their excellent performance, but also because of the ease of installation. This process is simple due to the fact that the design provides for very easy-to-install fasteners and additional parts that are included in the window package. Many are interested in how professional installers install windows. With the most minimal tool skills, any homeowner is able to install such windows.
Of course, as with the installation of any structural element, when installing PVC windows, you will need to observe a number of features and certain actions. It is advisable to perform this kind of work with an assistant, even if they do not have any building skills, some difficulties may arise when leveling the window if you do this work alone. The correct execution of all the nuances of installation will help you to accurately complete the work and save on the labor of employees.
Performing measurements and calculations

Before purchasing windows, you should measure the openings - based on these data, you will make an order to the workshop. When taking measurements, it is necessary to take into account whether they are a quarter or not. For buildings made of foam concrete, openings with a quarter are characteristic, which greatly reduces heat loss. For an opening without a quarter, when ordering fiberglass windows, the length will be 5 cm less than the same parameter for the opening. 3 cm is subtracted from the value determined as the width of the opening. Gaps of 1.5 cm should be provided along the contour - they are necessary in order to carry out foaming. At the bottom, an additional 3.5 cm should be left for mounting the window sill. According to GOST, it is supposed to leave 2 cm around the perimeter.
To make the correct measurements for an opening with a quarter, measurements must be taken at the narrowest point. When ordering windows, 3 cm must be added to the measured width, the length does not change the value.

More often, PVC window structures are not arranged in the middle of the opening, but retreating in depth from the outer plane by approximately 1/3. But if you are going to install the design yourself, the window can be slightly shifted at your discretion. To order ebbs and window sills, these parameters must be taken into account. Add 5 cm to the width indicators that are calculated for the intended location of the windows.
When determining the width of the future window sill, the battery must be taken into account - it should be about half closed by the window sill. Add another 2 cm - the window sill will need to be brought under the base of the window frame. It is necessary to leave a margin along the length - at least 8 cm. But it will be much better if you add 15 cm - this allows you to cut the window sill more beautifully.
In the kit, plastic side plugs are usually attached to the ebbs and window sills. You should not refuse them, although some masters do just that.
Back to index
Window frame mounting methods

The technology for installing PVC windows does not depend on how many internal chambers are in the metal-plastic profile, or on the number of chambers in double-glazed windows. When developing an installation plan, you will need to take into account the following points: the material from which the walls of the housing are made, and the dimensions of the window plastic structure. Depending on this, the method of fastening and the devices that will be used are determined.
Plastic window frames can be fixed in the opening using the following elements:
- using dowels, mounting anchors, which must be introduced into the walls through special through holes that are made in the profile in advance;
- another option is special toothed plates pressed into the profile, which are not inserted into the wall, but placed “by surprise” and fixed with screws.
The most reliable of them is considered the 1st option. It is more often used in cases where it is necessary to install window systems with considerable dimensions and weight. Window frames with through fastening quite well resist various shock loads that can occur, for example, when operating PVC systems with sashes that open in different positions. Anchors passing through the plastic frames through, allow you to more accurately adjust the structure during installation both vertically and horizontally.

Those who wish to find out the method of correct installation of PVC windows, which are small in size, with blank double-glazed windows, may be interested in fixing the structure using anchor plates. Fasteners will not spoil the appearance of the window - they are closed by slopes.
To install anchor plates in the openings of walls made of brick or concrete, it will be necessary to make recesses. If they are not done, it will be necessary to apply an extra leveling layer before installing the internal slopes.
Sometimes installers try to combine these 2 methods. The anchors are deepened into the walls through the bottom profile, that is, the base of the window structure and the sides of the frame, and the upper part is fixed with plates. If the installation of PVC windows is carried out in a bathhouse built of wood, anchor plates should not be installed - they loosen during operation. In some cases, galvanized self-tapping screws are used instead of anchors.
Back to index
The nuances of installing plastic windows in wooden buildings

The installation process will be significantly influenced by the type of material from which the housing is built. For example, for walls made of hollow or solid bricks, foam concrete, the differences will be only in the depth at which the anchors are installed. But openings in walls made of logs or beams will require a special approach. Here it will be necessary to take into account the installation method and choose the right time for this.
Plastic windows can be installed in walls made of wooden building materials only a year after the construction of the house. It is even better to wait 2 years - during this time the shrinkage process will enter the stage in which subsequent operation will be longer and more reliable. For buildings made of glued beams, the shrinkage period lasts the fastest.
Installation of a window should not be carried out immediately into the opening, as is sometimes done in villages.
A plastic window should only be inserted into a wooden box, which will protect the window structure from skewing. The window block itself must be free from any damage, defects, rot are unacceptable. Before starting work, it should be treated with an antiseptic composition.

After the PVC windows are installed in place, the shrinkage of the log house does not end. True, it will not continue so intensively. In order for it not to cause a crushing defeat to plastic structures, it is recommended to leave a gap of 3-7 cm between the upper edge of the frame and the window frame. After the window is put in place, the gap is filled with jute insulation and closed on both sides with platbands.
There are no exact recommendations in the building codes on what materials ebbs and window sills should be installed in wooden houses. As a rule, standard ebbs are installed, which are ordered in one set with the window design. Window sills are both wooden and made of polymers. The bottom profile can be supported on a wooden window sill, i.e. it can be installed before the window is installed.
For those who are going to install windows with their own hands, but do not have much experience in this matter, the following information may be useful. Since wood passes moisture vapor well, the technical qualities of the mounting foam used when installing the window are seriously reduced. So that the foam blown around the perimeter of the structure is not exposed to moisture and does not get wet, along the line on which it is applied, foil polyethylene tape should be applied to the window block. This nuance is not specified in the regulations, but experienced installers highly recommend not to neglect such equipment when installing a window.
Back to index
Standard installation methods for plastic windows

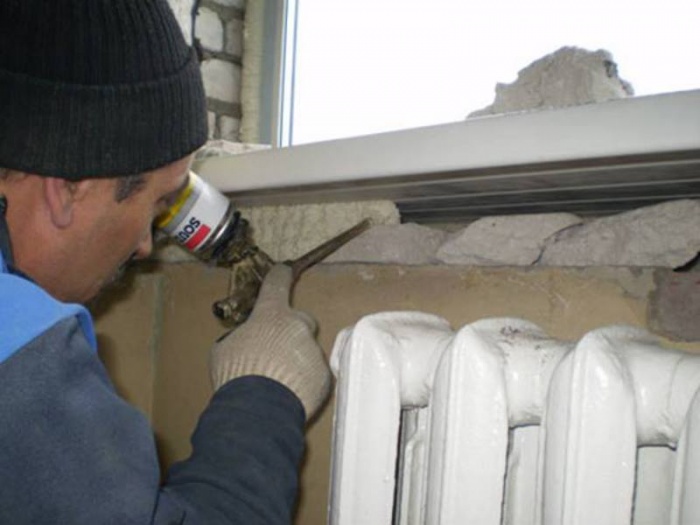
The technology for installing plastic window structures includes such a moment as the use of mounting foam. In addition to providing insulation, it will give additional rigidity to the connection of the opening with the frame. Thus, a layer of polyurethane foam, obtained as a result of its polymerization, simultaneously protects the opening and fixes the structure. So that under the influence of adverse external influences the foam layer would not lose its technical properties, it is better to surround it with additional insulation.
Regarding when exactly to insert PVC windows, the decision is made by the owners of the home. You can also find such an opinion that it is better to install it not in summer, but in winter - in this case, all installation flaws will appear immediately and can be corrected very quickly. When choosing mounting foam for work, pay attention to the information on the composition - it should indicate at what temperature you can work with this product. The foam will only cure at the temperature specified in its performance data, so you should not use foam intended for use in extreme cold conditions for summer work, and vice versa.
How to carry out foaming can be found in the instructions that the manufacturer applies to specific products. Usually foaming starts from the bottom, gradually moving up. The movements must be circular. In order to use less expensive material, it is better to blow out the foam in several steps, counting segments of about 25-30 cm.
To shift the dew point, it is better to perform foaming with different densities. In practice, it looks like this: they try to compact the outer layer of foam less than the layer facing inward. Foam should be poured around the perimeter of the window frame as evenly as possible, without gaps and voids.
Back to index
How to prepare a window opening for work?

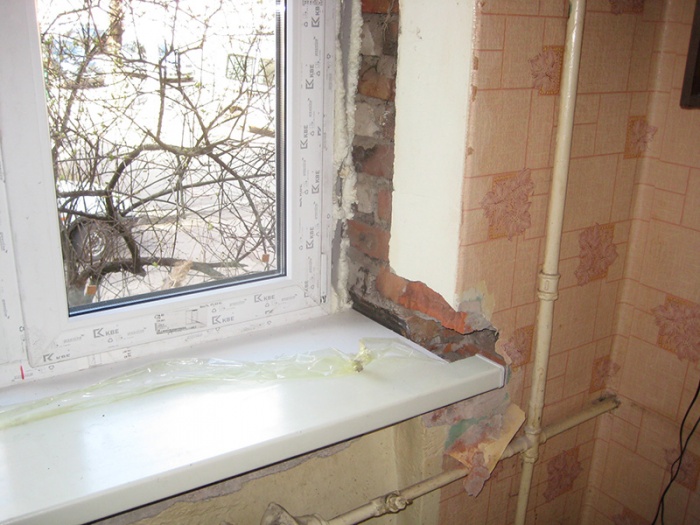
To install PVC windows, preparatory work will be required before work. Before installation, any contamination should be completely removed from the window opening: dust, construction debris, particles of old paint. When doing work on their own, craftsmen should be aware that when installing a new plastic structure in a used wooden window box, it is better to completely plan off the top layer. It is not reliable enough, it is better to remove it completely so as not to disturb the adhesion of the foam to the surface.
If the gap between the opening and the window frame does not exceed 4 cm, they are filled only with foam. With a larger width of the gaps, it is better to fill them partially with other, cheaper materials. It can be pieces of timber, drywall, polystyrene, brick fragments and other construction waste.
Plastic windows are increasingly being installed by owners of country houses, as they have many advantages over wooden products. Also, they are reasonably priced. But before you install, you need to carefully prepare for such work. To do everything yourself, you need to know the features of performing all operations.
All plastic products are equipped with parts for installation, so with proper preparation, you can install the window without outside help. It is necessary to perform all actions very carefully so as not to damage the structure. In order to fix the windows in the opening more accurately, it is worth working with an assistant. In some cases, before carrying out work, it is necessary to strengthen the opening.
Materials required for work
Before starting the installation, you need to prepare the following materials:
- wedges inserted for the correct location of windows;
- mounting foam;
- sealant;
- hydrovapor barrier material necessary to protect the joints from moisture;
- anchor bolts.
Wedges are used during the installation process for a more precise installation of the plastic profile. Without these materials, it is much more difficult to follow. Mounting foam is an insulating material that fills the space between the wall and the frame. When choosing a foam, it must be borne in mind that it must correspond to the temperature at which the work will be carried out. If you purchase a material intended for use in the summer, its use in winter may lead to the creation of a poor-quality insulating layer.

Also during the work you will need a self-expanding sealing tape. This material is glued around the perimeter of the window from the outside, after which it expands. Sealant is used to fill the space between the slopes and the window sill.
How to determine the correct position of the plastic window
Before carrying out installation work, it is important to correctly determine the position of the frame in relation to the wall thickness. The plastic window should go inside about a third from the street side. This rule is not mandatory, but when shifting the window in any direction relative to the specified distance, it should be borne in mind that the length of the ebbs and window sills must correspond to the project.
It is important to consider the size of the radiator and its position. The window sill should not overlap it by more than ½ of the width. If you completely shut off the radiator, this can adversely affect the temperature in the room in winter, as well as the condition of the window. If installed incorrectly, plastic windows usually begin to fog up.
The length of the window sill should be approximately 15 cm longer than the window opening. Thanks to this, it is possible to process the edges of the window sill during the finishing of the slopes. Side plugs are included with the window sill, which should also be fixed after installing the window.
Methods for fixing plastic windows
The choice of a particular fixing method depends on parameters such as the size of the window opening and the material of the walls. This should also be taken into account when choosing fasteners for a plastic structure.
Fixing plastic windows can be done in several ways:
- With dowels or anchor bolts. They are fixed in pre-created holes in the wall.
- Serrated plates that are outside the window profile. They are mounted on a spacer and fixed with self-tapping screws.
The first described method is considered more reliable. That is why with the help of dowels, plastic structures that are large in size are fixed. The fastener passing through the window block is more reliable and able to withstand impacts.
If you decide to install a plastic window that is small in size, they can be fixed using anchor plates. These fasteners can be hidden by slopes and finishing materials. But before carrying out the work, small recesses should be prepared for them. This will avoid plane alignment problems.
It is worth noting that when installing plastic windows, professionals combine these methods. In this case, anchor bolts are used to secure the base of the profile and its vertical parts. The upper part is fixed with plates.
Basic rules for installing plastic windows
To properly install windows, you should follow a few basic rules:
- Installation of plastic double-glazed windows should be carried out using polyurethane foam. This material allows you to give the structure additional rigidity. It also acts as a fixative and heat insulator.
- To protect the space between the window and the wall, it is necessary to fix a waterproofing material on the outside, and a vapor barrier on the inside.
- Windows can be installed at any time of the year. Many professionals recommend that work be carried out in the winter, as this will allow you to immediately see if mistakes have been made.
- Before purchasing foam, you must carefully study the features of the composition. These materials differ in several ways. One of them is the solidification temperature. The instructions on the bottle indicate the most favorable conditions for using the foam. If they are ignored, the material may begin to break down during the operation of the building.
- During the foaming of the gaps between the plastic windows and the walls, it is necessary to fill in small portions. This allows you to use less foam.
- If the opening crumbles, it is necessary to clean the surface of old materials and reinforce it.
By following the rules described, you can install windows with your own hands without making the mistakes that people who do not have experience in such work make. The technology for installing plastic windows in a brick house is quite simple, but it is important to carefully follow each step so as not to make a mistake.
How is the preparation of the opening
Before performing work on the installation of windows, it is necessary to thoroughly clean the opening from dirt and dust. It is important to remove all paint and building material residues. Before installation, it is also important to compare the dimensions of the opening and the plastic frame. If the gap is more than 4 cm, it is necessary to use not only foam. This is due to the fact that when using it, it will not be possible to create an even and high-quality seam. In addition, a lot of foam will go away.

Before installation, it is necessary to remove the sashes from the frame. To do this, just pull the pin out of the loops. If it is necessary to remove the double-glazed window from the frame, the glazing beads holding the glass are removed. These steps must be performed very carefully so as not to scratch the glass.
After removing the sash and double-glazed windows, place them on a soft pad and lean against the wall so that they are in a stable position. Double-glazed windows are not laid flat, as this can lead to scratches on the glass surface.
After that, the protective film is removed and markings are applied to the places where the fasteners will be located. The distance between them should be about 40 cm. It is important to consider that the indents from the corners should be more than 15 cm.
Installation process
After carrying out the described actions, spacers should be inserted into the window opening in the brick wall to create the necessary gap. The alignment of the frame should be done using the building level. It is also important to control the side clearances.
In the openings of brick houses, it is necessary to mark the installation sites of anchors. After that, holes are created in the walls. If fixing is done with anchor plates, it is necessary to bend them in such a way that they lie well on the wall.
The next step is to install the frame. It is important to check the horizontal and vertical structure of the structure before. How will it be finalized? After that, the bolts are finally tightened until the cap protrudes above the surface by no more than 1 mm.
After all the described work, the installation of sashes and double-glazed windows is carried out, as well as the functionality of the entire structure is checked. If you installed the products with your own hands for the first time, you should carefully inspect the opening and make sure that no mistakes were made during the work.
Slope installation
Before installing external slopes, it is necessary to measure the width and length of the opening. Cutting plastic slopes is done using a circular saw.
Important! It is necessary to fix the slopes only on clean and leveled surfaces.
At the first stage, the upper horizontal part is fixed. It needs to be drowned as deep as possible, and the space filled with mounting foam. Worth remembering. That it should not be released too much, since when hardened, the material can change the shape of plastic products.

After that, the installation of vertical slopes takes place. During these works, it is important to check the verticality of the elements. In the same way, the installation of the lower slope occurs. It is important to ensure that all elements are properly docked, and there are no gaps between them. The corners between the plastic slopes are closed with a special detail.
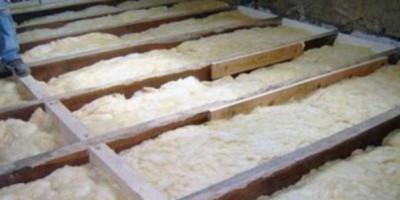
The installation of internal slopes should be carried out only after careful preparation of the surface. If the opening crumbles, it is better to clean it up to the main wall and only after that carry out further work. After that, the opening is leveled and filled with insulation. If necessary, strengthen the window opening.
Nowadays, the trend of replacing old wooden windows with plastic ones is becoming more common. Such windows have a number of advantages that significantly distinguish them from their competitors. As a rule, installation of windows is carried out with the help of specialists who will cope with the task in a matter of hours. However, fast doesn't always mean good. Sometimes in a hurry, masters forget about various little things that they have to finish on their own in the future. To avoid such a "professional" installation, you can install plastic windows yourself. The main thing is to paint a clear action plan and follow all its points.
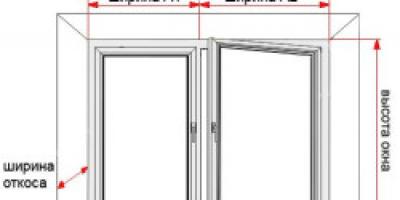
window measurements
The first step is to measure the width and height of the window opening. Width is the distance between the inner parts of the wall - the slopes. Height - the distance between the upper slope and the window sill. Based on the obtained dimensions, you can calculate the size of the window. From the resulting width, you need to subtract 3 cm (1.5 cm of the gap on each side). From the height you need to subtract 5 cm (1.5 cm of the gap from above and 3.5 cm to install the window sill).
The size of the window sill and the outer ebb is calculated taking into account a gap of 5-10 cm. During installation, both the window sill and the ebb are "recessed" into the window opening. The width of the window sill should be such that it does not overlap the heating radiator by more than 1/3. Slope measurements are carried out immediately after the windows are installed, since it is quite difficult to determine their size in advance.
Material selection

The selection of plastic windows is carried out immediately according to several criteria. First, you need to decide on the principle of fastening the frame. It is of two types:
- through the frame in the packing plane;
- using pre-mounted support reinforcement.
The first installation option is considered more reliable, but at the same time more difficult. The principle is to unpack the window. The glass is removed from the frame. Then the frame is inserted into the opening and attached to the wall with anchors. Double-glazed windows are reinserted into the finished frame. This method allows you to strengthen the window structure, however, during installation, the risk of damaging the glass increases.
The second way is to install windows without first unpacking them. In this case, metal plates are pre-attached to the window frame, with the help of which the window is mounted in the opening. This method is quite simple, but the reliability is much lower compared to the first option.
Another criterion when choosing plastic windows is the quality of the material. First, pay attention to the reinforcing profile, which serves as the basis of any window. It must be made exclusively from galvanized steel. If the window is made using another metal, then in the future it will become covered with rust and red streaks will appear on the window.
No less important is the choice of the double-glazed window itself. For unheated premises, you can choose a single-chamber package, for an apartment, house or office, it is better to give the room to two- or three-chamber models. The glass itself can be either plain or infrared-coated. IR glass, by the way, will be an excellent solution for windows that face east. Infrared rays are able to reflect heat, so even on the hottest summer days the room will be comfortable.
Preparatory work before installation

Before starting the installation of a new window, you need to dismantle the old one. This is done in stages. First, the glass is removed from the window frame, having previously prying off the glazing beads that hold it with a chisel. If this is not done during installation, the glass may break and injure you. Next, you need to cut the frame. This can be done both with the help of a conventional saw, and with the use of a grinder. However, it is worth remembering that the grinder can only be used if there is a diamond disc or a concrete disc. To avoid injury, it is strictly forbidden to use discs for wood and metal. Having cut the frame into pieces, you can begin to dismantle it, armed with a puncher, crowbar or nail puller.
The next step is to remove the old window sill and low tide. If they are wooden, then the same principle is used for dismantling as for the frame. The window sill or ebb must be sawn into several parts and pulled out one by one. With a concrete window sill, things are somewhat more complicated. You can remove it only by first breaking it into pieces with a jackhammer.
Having got rid of the old window, you can proceed to the finishing preparatory work. The window opening must be thoroughly cleaned of construction dust and debris formed during the dismantling process. This can be done with a conventional vacuum cleaner. It is also worth removing the remnants of the old insulation and foam.
After all the work carried out, the surface of the window opening must be treated with a primer. Further, in the lower part of the future window, the so-called stand profile is installed, to which the double-glazed window itself will be attached in the future. The profile is fixed with mounting foam.
window installation

If the method with unpacking the double-glazed window was chosen to install the plastic window, then the process will proceed as follows. The first step is to remove the glass from the window frame. To do this, carefully, one by one, all the glazing beads are removed, thanks to which the glass is held. Then the glass under a slight slope is smoothly removed from the frame. After unpacking the double-glazed window, it is better to immediately remove the glass to another room so as not to damage it during the installation of the frame.
To begin with, the window frame must be installed on pre-prepared wooden wedges. This is necessary so that the frame initially takes the desired position and does not move during installation.
Armed with a drill, holes are made in the frame for the anchor (three holes on each side). Having drilled all the holes, it is worth making sure that the frame has not shifted. To do this, you can use a plumb line and a laser level. It is better not to use a traditional bubble level, as it does not give the most accurate measurements.
After making sure that all indicators are normal, you can attach the window with anchors. To do this, using a puncher at the level of the holes already in the frame, you need to make a similar hole in the wall, at least 6 cm deep. Next, the anchors are fastened, starting from the bottom row. After each fixed anchor, the evenness of the window is rechecked.
At the stage of mounting the window frame, the ebb is also installed. It is attached to the stand profile, which was pre-installed under the frame. The edges of the tide need to be “drowned” a little into the wall, having previously made holes in it. At the end of the installation, all existing joints and cracks from the outer part of the window are sealed with sealant.
Having done all the above manipulations, glass can be inserted into the frame.
Installing a plastic window without unpacking is carried out according to a similar principle. The difference of this process is only that the package in this case is not disassembled, but mounted completely. The fastening of the window structure is carried out without the use of anchors, but with the help of special plates.
As in the first case, a double-glazed window is installed on a pre-prepared support profile and wooden wedges. The window is then leveled and checked with a level. Plates of durable metal are screwed to the window profile with self-tapping screws. They can be linear or U-shaped. The distance between the plates should not exceed 7 cm.
The plates have so-called tails with holes for anchors. During installation, the tails must be bent and pressed tightly against the wall. A dowel is inserted into the existing hole and mounted into the wall with a drill. Anchor fastening in this case is carried out in the direction from the bottom up. At each stage of screwing in the dowels, the window is checked for leveling.

Mounting the window sill

Installation of a metal-plastic window sill begins with its trimming. The shape of the window sill should be such that it easily enters the side openings and at the same time is in close contact with the lining profile. Between the side walls of the window frame and the window sill, you need to leave a small gap (about 1 cm), which will later be closed by slopes.
Having placed the window sill in the right way, you can proceed to its fasteners. To do this, several wooden wedges are inserted under the window sill, which will protect it from displacement. Then the space formed under it is filled with mounting foam or cement mortar. At the same time, you need to put some kind of load on the window sill itself to form a slight slope. This manipulation is necessary to remove condensate.
When the foam or mortar hardens, the window sill is attached to the window frame. This is done using self-tapping screws on the inside of it.
slopes

Making slopes is the final stage in the installation of metal-plastic windows. You can make them either using drywall or using PVC panels.
Drywall slopes are beneficial in cases where the surface of the inside of the window opening cannot be leveled. Such slopes are made as follows:
- a special L-shaped profile is attached along the edge of the window frame;
- the inside of the profile is filled with sealant;
- pre-prepared strips of drywall are inserted into the grooves of the profile;
- the empty space between the wall and drywall is filled with mineral wool;
- the points of contact of the slopes with the wall are lubricated with glue.
Slopes made of PVC panels are mounted somewhat easier, but they should only be used on perfectly flat surfaces. It is done like this:
- strips of the required size are cut from PVC panels;
- with the help of liquid nails, the blanks are attached to the working surface;
- the ends and joints between the slopes are closed with special plastic corners.
If you or your friends have previously used the services of companies for the installation of double-glazed windows, then you know that installation can be ordinary and in accordance with GOST. The second option is more expensive, but if all the requirements are met, then the quality will be much higher than in the first one (for more details about the standards, see GOST 30971-02).
Consists of several stages.
Note! When manufacturers do not give a guarantee if the measurements were not carried out by their employees. If the windows are installed incorrectly, they will soon begin to freeze, and if even the slightest mistake was made in the calculations, then the structure simply will not enter the opening.
However, if you study all the subtleties of the process, then there will be no difficulties during installation. Moreover, this way you can save a decent amount of money.
Video - Installation of PVC windows in accordance with GOST
Stage 1. Measurements
In most apartments there are openings without a quarter.
Note! A quarter is an internal frame 6 cm wide (or ¼ of a brick, hence the name), which prevents the window from falling out and strengthens the structure as a whole.
If there is no quarter, then the frame will be installed on anchors, and the foam will be closed with special flashings. Determining the presence of a quarter is quite simple: if the inner and outer widths of the frame are different, then there is still a quarter.

- First, the width of the opening (the distance between the slopes) is determined. It is recommended to remove the plaster so that the result is more accurate.
- Next, the height is measured (the distance between the slope from above and the window sill).
Note! Measurements must be repeated several times and take the smallest result.
To determine the width of the window, two mounting gaps are subtracted from the width of the opening. To determine the height, the same two gaps plus the profile height for the stand are subtracted from the height of the opening.

The symmetry and straightness of the opening is checked, for which the mounting level and plumb line are used. All defects and irregularities must be indicated in the drawing.
To determine the width of the outflow, 5 cm should be added to the already existing outflow for the bend. Also, the width of the insulation and cladding is taken into account (subject to the subsequent finishing of the facade).

The dimensions of the window sill are determined as follows: the size of the departure is added to the width of the opening, the width of the frame is subtracted from the received figure. With regards to departure, it should cover the heating radiator by a third.
Note! measured after installation.
Stage 2. Order
After measurements, the finished drawing should be taken to the window manufacturer, all the necessary fittings will be selected there. It is worth remembering that installation can be performed in one of two existing ways:

In the first option, you will have to pull the package out of the frame, insert it into the opening and install the glass back. In the second case, the entire structure is attached entirely. Each option has disadvantages - if you pull out the package, then it can; and vice versa, if the window is installed assembled, then it can be damaged due to its large weight.
Prices for a popular line of windows
Stage 3. Preparation
This stage of installation begins only after the delivery of the ordered windows. First, the workplace is vacated, all furniture is covered with plastic wrap (there will be a lot of dust).


Step 1. If required, a double-glazed window is removed from the window. To do this, the glazing bead is slightly tucked with a staple and pulled out. First of all, vertical glazing beads are removed, then horizontal. They are necessarily numbered, otherwise gaps form after installation.


Step 3. The bolts are unscrewed after the plugs are removed from the canopies. The handle is turned to the "ventilation mode" (in the center), the window is slightly opened and removed. Only the frame with imposts remains.
Note! Imposts are special lintels intended for dividing sashes.
Then you need to make markings for the anchors and make holes on it - two from the bottom / top and three from each side. This will require anchors ø1 cm and a drill of the required diameter.
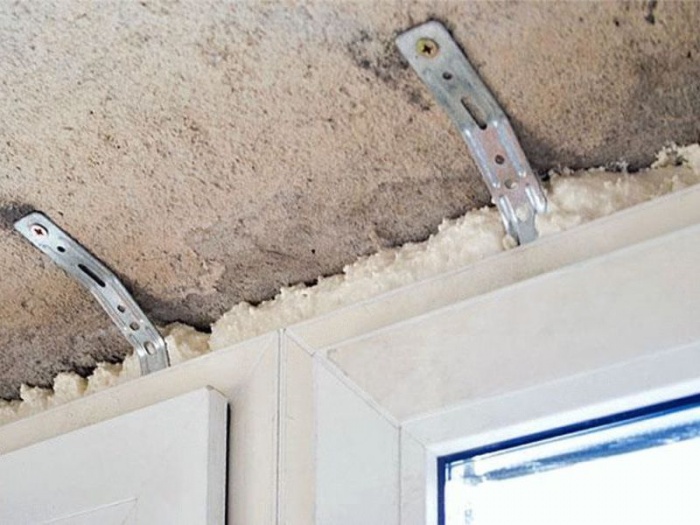
If the material from which the walls are made is loose (for example, cellular concrete), then fastening is carried out using anchor hangers. The latter should be fixed on the wall and frame with hardened self-tapping screws (eight pieces each).
Note! To avoid the formation of a thermal bridge in the window sill profile, it must be filled the day before installation. So the element will not freeze through.
Stage 4. Dismantling work
This procedure is recommended to be carried out immediately before installing a new window. In most cases, the old ones are thrown away, so the structure can be pulled out along with the mount, and, if necessary, the frame can be sawn.


Step 1. First, the seal and thermal insulation are removed.
Step 3. The window sill is removed, the cement layer under it is cleaned off.
Step 4 Adjacent surfaces are treated with a primer (by the way, many installers forget about this). In the case of a wooden opening, a layer of waterproofing material is laid around the perimeter.


Note! Installation can be carried out at a temperature not lower than -15ᵒС. Mounting foam must be frost-resistant.
Stage 5. Installing a plastic window

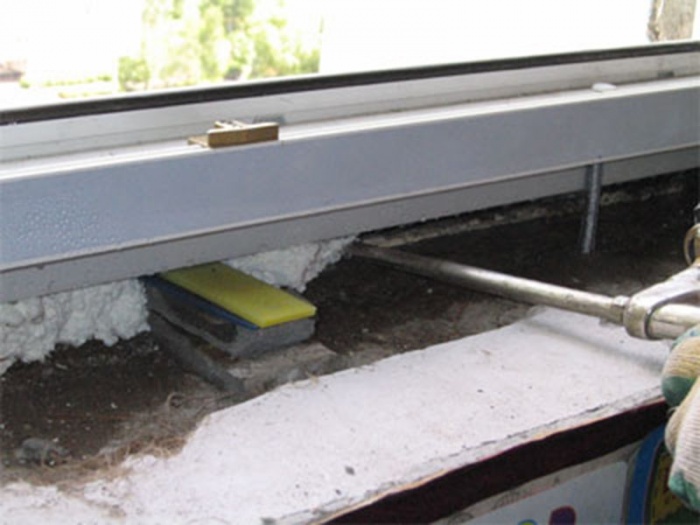
Step 1. First, wooden wedges are placed around the entire perimeter, a window is installed on them (it will be easier to align the structure), only after that it is fixed to the wall. Substrates can be left - they will serve as additional fasteners.


Step 2. The absence of a stand profile can be considered a gross violation of GOST standards, since it is not only needed for stability, but also makes it possible to install an ebb with a window sill. In the absence of a profile, they are attached directly to the frame, which violates its tightness.
The correct location of the stand profile is shown in the diagram.

Step 3. Next, the evenness of the window is checked in three planes, for which the mounting level and plumb line are used. It is characteristic that traditional bubble levels are not suitable for this due to insufficient measurement accuracy, therefore it is better to use.


Step 4. If the window is straight, then it is fixed with anchors. To do this, a wall is drilled through pre-prepared holes in the structure with a puncher (about 6-10 cm). The lower anchors are fixed (not completely), the evenness of the package is checked again, after which the remaining points are attached.
Note! The final screed is made only after the final check. Do not tighten too much, otherwise the design will “skew”.
Prices for mounting foams and cleaners for mounting guns
Mounting foams and cleaners for mounting guns
Stage 6. Drainage

Outside, an ebb is attached to the stand profile with self-tapping screws. The joints are carefully sealed with sealant to prevent moisture from penetrating into the structure.

The edges of the tide are recessed into the walls for several centimeters, having previously made recesses with a perforator.
Note! Before installation, the lower slot is also sealed.
Stage 7. Assembly of the window


After fixing the anchors, the double-glazed window is inserted back.
Step 1. The glass is inserted and fixed with glazing beads (the latter should snap into place, for which you can lightly tap them with a rubber mallet).
Step 2. The flaps open, the tightness of their fit is checked. In the open position, arbitrary opening/closing of the sash cannot occur if the window is level.
Step 3. A mounting seam is sealed on the sides. Polyurethane foam will provide high-quality waterproofing and prevent glass from fogging. Before and after sealing, the joints are sprayed with water to improve polymerization.
Note! The seams are filled no more than 90%, otherwise the structure will “lead”. If everything is done correctly, after drying, the foam will come out a few centimeters.
Step 4. The perimeter of the window is glued with a special vapor barrier tape, and a material with a foil surface is used from below.
Stage 8. Installation of the window sill

Step 1. The window sill is cut in such a way that it enters the opening and at the same time rests against the lining profile. There remains a small gap (about 1 cm) for thermal expansion. In the future, the gap is hidden by plastic
Step 2 Wooden wedges are placed under the windowsill. It must be laid with a slight slope towards the room, and then applied with something heavy for a while until the foam dries. Additionally, the window sill can be fixed with anchor plates.

Video - Instructions for installing plastic windows
conclusions
Now you know how plastic windows are installed, so you can safely get to work. The final check of all elements can be carried out only 24 hours after the end of installation (then the foam will already “grab”).
The described technology is quite applicable to, although there are some nuances there too - such as, for example, installing a parapet to create a partition.


Find out how to do it right from our new article.
Before thinking about how to insert plastic windows with your own hands, you need to prepare a number of tools that may come in handy.
Tools
Inserting new plastic windows with your own hands involves dismantling the old window structure.
Seam sealing
For dismantling
In order to remove old frames, you may need:
- Perforator
- Nozzle - blade for perforator
- painting knife
- Chisel
For mounting
And for installation you should prepare:
- A set of drills (ten and six);
- Perforator;
- Screwdriver;
- Paint knife;
- Scissors for metal;
- Construction pistol;
- Building level;
- Sealing tape;
- Hammer;
- Pegs;
- Screwdriver;
- Vertical plumb;
- Roulette and pencil.
Opening and window preparation
- Frame first;
- Then there are the constituent elements.
When disassembling the frame, you should use a screwdriver, with which you can carefully pry and pull out all the elements. When you pull out the glazing beads, despite the fact that they all seem to you the same size, you need to number both the glazing beads themselves and the places where they are inserted.
Each glazing bead can be only 1 or 2 mm less or more than necessary, and if this difference is not noticeable during insertion, then such gaps will be visible in the finished structure.
So, the glazing beads were pulled out and numbered, the window sashes were neatly folded away, then you can start inserting plastic windows with your own hands.
Insertion process
If all dimensions are made correctly, then it will be possible to insert plastic windows with your own hands both simply and quickly.
So here is the step by step guide:
- Raise the frame and place it in the opening on special pegs, which are placed on the bottom of the opening;
- Take a level in your hands and level the frame, checking its horizontalness, but for a perfect vertical installation it is better to use a centered vertical plumb;
- It will be possible to correct the evenness of the horizontal installation with the help of wooden pegs, which cannot be subsequently removed;
- Using a pencil, mark the places for drilling on the frame for installing the frame, in the same way, in the same way - mark the corresponding points on the opening;
- Carefully pull out the frame, drill holes both in the opening and in the frame structure;
- Attach the sealing tape to the top of the frame and the sides;
- If you don’t have a tape, then give gaps of about 5 mm for “free walking”, which will later need to be foamed and silicone coated on top;
- Insert the anchors into the opening, hammer in and cut off the head with a paint knife;
- Insert the frame into the opening and fasten it to the dowels to the corresponding holes;
- The joints and gaps that remain between the frame and the slopes will need to be foamed with building foam and a gun, but you don’t need to be especially zealous, since the foam has the ability to expand, and thus can warp the structure;
- Install a butovka cord on the sides and top;
- Once again check the horizontal and vertical installation with a level and a plumb line, and if anything, slightly correct it with the help of installation dowels, this is the main thing;
- Now the final stage is the insertion of sashes and glazing beads according to the numbering;
- Remove the protective film from the plastic.
So, inserting plastic windows with your own hands was not so difficult. And so that during operation you do not have problems due to installation defects, listen to the advice of experts.
- If you forgot or were too lazy to number the glazing beads and now there are some gaps, be sure to ask for gaps;
- After installing the sashes, close and open the window. The sash should move freely, if it touches the frame, you need to adjust it;
- Check the functionality of the fittings - the work should be smooth;
- When fixing the frame on self-tapping screws, act without fanaticism, otherwise, due to the fact that you drag them, your frame will warp, and will want the best;
- The protective film must be removed immediately after installation. If this is not done immediately, then after three weeks have passed, the film may firmly stick to the frame, and then it will be difficult to dismantle it.
So, here you managed to insert plastic windows with your own hands. The main thing is to follow all the steps of the installation technology. Happy repair!