Repair      07/13/2023

Wooden logs on the concrete floor. Logs in floor construction. How to get rid of a squeak

Despite the relatively short service life of multilayer wooden structures, their light weight, environmental priorities, and cost-effectiveness have a convincing effect on the owners. If foam concrete, brick, gas silicate blocks can still argue in the field of building walls with natural organics, then lumber is still in the lead in the field of flooring. Basically, for the device of multilayer wooden structures, floor logs are used, made of durable polymer compounds or wood.

What attracts the owners of the floor with a kind of air cushions formed by laying polymer or wooden bars? The list of benefits includes important points, such as:

  • excellent thermal insulation characteristics;
  • price affordability of lumber;
  • formation of a minimum load on the foundation, on beams or concrete floor slabs;
  • the ability to raise the floor plane to any level;
  • reducing the cost of building materials;
  • the speed of construction of the wooden floor structure, which does not make you expect the screed to harden;
  • availability of technological space convenient for installation of communications;
  • ensuring an optimal microclimate inside buildings or rooms;
  • the ability to perform the laying of wooden floors on the logs on their own.

The device of floors on logs - quickly, economically, reliably

In addition, a well-executed floor arrangement along the lags will eliminate the rather expensive leveling process, since it fully performs its function. The presence of ventilation voids in the floor structure will extend the operational life of the lumber used for arranging, which is still recommended to be treated with antiseptics, wood aging agents and fire retardants. Thrifty owners can use bitumen instead of an antiseptic.

Design and technical features

Floors with lags can be laid on an earthen base and on ceilings constructed from powerful wooden beams or reinforced concrete slabs. Regardless of the type of foundation, identical materials are used for floor construction.

What can logs be made of?

Lags are called transverse floor beams, on top of which the finish coating is laid. It is extremely rare that metal and reinforced concrete beams are used as lags, most often wooden blocks or progressive polymer products. Wooden bars are chosen mainly because of their cheapness, polymer ones because of the speed of construction and ease of installation.

Logs - cross beams, most often made of wood or polymer

Note. Instead of a beam, which for some reason could not be purchased, boards selected in accordance with the dimensions of the beam section, sewn together in pairs, can be used. It is permissible to exceed the dimensions of the section. In such cases, the installation of a floor lag made of stitched boards is done on edge.

To this day, builders of log houses use, instead of beams, even logs hewn on three sides with a similar diameter. In austerity mode, logs may well replace timber. The only condition: they must lie before laying for about a year in a dry room.

The right choice of section

The cross section of the bars selected for the floor arrangement along the lags resembles a rectangle with a height that is a multiple of 2, a width that is a multiple of 1.5 (the aspect ratio in the section is 2 × 1.5). If the floor is arranged on wooden floor beams, then the size of the section of the bars will be affected by the span between the elements on which they will rest.

The cross section of the log depends on the thickness and strength of the flooring

Pay attention to those who are planning to equip the floor structure with a heat-insulating layer. A ventilation gap of at least 2 cm (better than 3-4 cm) should remain between the lower plane of the finishing coating and the insulation laid between the joists. This means that the beam must be bought taking into account the size of the ventilation gap. If the floor structure rests on the ground, it will also be necessary to take into account the thickness of the roll laid on the cranial bar attached to the logs.

It is recommended for the floor along the logs to purchase a bar with a "margin" in the dimensions of the section. When constructing a floor over an earthen base, in order not to use an overly expensive large-section beam, the span is reduced by installing brick columns. The intermediate distance between the supports is 1.2 m. They are made of red brick M100, silicate is applicable only if the level of the aquifer is below two meters.

Plan of laying the floor on logs with an emphasis on brick columns

Competent laying of the floor on logs with brick columns implies the equality of the distances between the rows of supports and between the elements of the timber. Before the construction of brick supports, a foundation of 40 × 40 cm is poured under each of them. The foundation can also be poured in the form of a strip under a number of brick pillars. There are two bricks in each row of the support column, the height of the support depends on the level of the elements on which the beam will rest (lower trim beam, concrete grillage).

Lag installation step

The step between the lags is an important parameter, on the basis of which the calculations of the consumption of materials are made. You can draw a plan of rooms and calculate exactly how much timber and brick with cement will be needed if the floor is not laid on floors. This is the value between the axes of elements located parallel to each other. The step size is affected by the power of the finishing coating and its strength characteristics. That is, when laying a coating that can withstand a large load, the distance between the floor lags can be increased.

Before laying thin materials, logs will often have to be installed (0.3-0.4 m for laying boards up to 24 mm thick). For boards with a power of 50 mm, the distance between the axes of the log can be 1 m. Basically, a 40 mm board is used for home improvement, the logs are laid with a distance between the axes of 70 cm. Reducing the step between the elements, as well as increasing the cross section, will increase the strength of the structure, but also increase expenses. It is up to the owner to decide what is more important to him.

Those laying the floor on the logs with their own hands should remember that the indentation of the element extreme from the wall should not exceed the step between the logs. Usually they recede from the wall by 20-30 cm.

Geometric landmarks for styling

Orientation in space is a significant component of the correct floor arrangement. Those who wish to learn how to put logs on the floor correctly should follow the following building rules.

  • The flooring of boards in rest rooms and living rooms is carried out along the direction of the flow of natural light. Lags are located "in a cross" direction of the boards.
  • In vestibules, hallways and other rooms with heavy traffic, boards are laid according to the direction of movement, logs, of course, in a direction perpendicular to the direction of the flooring elements.

Lags are laid "in a cross" with floor boards

Note. If the floor structure is strengthened by installing two layers of timber, the top layer is laid “in a cross” with the previous one.

Mounting methods

Previously, logs were simply attached to a concrete slab or beams with nails. Not the best and not a long-term method was replaced by fixation with the help of galvanized metal corners. Instructions on "how to attach the logs to the floor" reads:

  • The corners are fixed with self-tapping screws.
  • One of the planes of the corner is attached to the beam.
  • The depth of penetration of the self-tapping screw into the timber is 3-5 cm.
  • The corner is attached to the bar of the lower trim in the same way.
  • To a brick support or concrete grillage, which must be covered with a layer of waterproofing, fastening is done with dowels.

Instead of a corner, a U-shaped mounting device can be used.

It often happens that the standard length of the timber is not enough. Elements can be stacked in two ways:

  • close to each other;
  • by cutting, called "to the floor of the tree."

Attention. The joining points should be strengthened by sewing with nails to one, and preferably to two sides of the timber, pieces of lumber 1 m long.

Ways of connecting the beam "to the floor of the log"

When installing a beam in a run-up, there should be at least 50 cm between the connection points of the beam.

The sequence of work on the floor on the ground

A practical democratic floor cake on wooden logs can be arranged before the construction of load-bearing walls, for example, a frame house, or during the period of interior decoration. Finishing the floor is recommended to be carried out after all plastering and painting operations.

When constructing a multilayer cake above the ground, work is performed with the following sequence:

  • The soil is compacted with a vibrator or the end of a simple log.
  • Compacted crushed stone is covered with a layer of 5 cm, it will perform the function of an incompressible base.
  • Cement is poured into the formwork specially made for each support or for a number of supports.
  • Brick supports are constructed (there must be a layer of waterproofing between the base for the supports and the brick).
  • Above the support, another layer of waterproofing and a soundproof gasket are placed.
  • Install and fix the lags.
  • Then a cranial block is laid and a boardwalk is made of cheap lumber.
  • Behind the reel, another layer of waterproofing is again located.
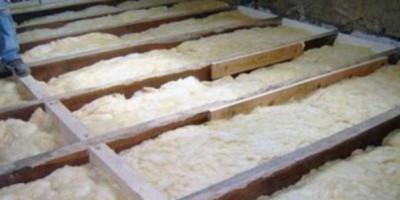
  • Insulation is placed between the lags.
  • The upper plane of the entire installed timber is leveled by scraping off excess, the presence of deviations is detected by a spirit level.
  • Be sure to leave a ventilation gap between the floor boards and the heat-insulating layer.
  • At the end, floor boards are laid with an indent from all walls along the perimeter by 2 cm. This gap is necessary to compensate for wood movements that occur under the influence of moisture and temperature. After scraping and processing with a finishing compound (you need to read the relevant articles about the implementation of these works), this gap is closed with a plinth.

Scheme of the floor device with lags on an earthen base

Leveling the beam before laying the coating

When arranging the floor above the ceilings, the process is shortened, since the logs are attached directly to the timber or to the reinforced concrete slab.

Log device with adjustment

A convenient innovative scheme is the installation of adjustable plastic logs that can withstand about 5 tons of load per m 2. The logs designed for the operational installation of the floor have threaded devices for adjusting the floor level. The logs are rigidly attached to the rough concrete surface with dowels, to the wood with self-tapping screws. Excess length is simply cut off.

Adjustable floor joists

Video example of the work

It is not too easy to build a multilayer floor cake on wooden logs, but it is he who significantly reduces the construction or repair budget. In addition to minimizing the consumption of materials, the pace of finishing production is also increasing. Thorough adherence to the technologies for arranging this floor construction scheme and following the recommendations guarantees long-term operation and aesthetic appeal.

The wooden floor on the logs allows you to do without without the use of reinforced concrete floors or other concrete foundations, the cost of construction of which is quite high.

Efficient ventilation of wooden on logs in a private house - a necessary and indispensable condition for the reliability and durability of the structure.

Wooden floor on joists

The figure shows a variant of the construction of a wooden floor on logs in a private house with an underground space.

The space under the floor is formed due to the fact that the logs are laid on fairly high columns of brick or concrete blocks. This design allows you to raise the floor level of the first floor with a minimum amount of backfilling with soil in the basement space.

Here, the plinth and plinth space under the floor are outside, outside the heat-shielding shell of the house, and will be cold.

To ventilate the underground space in opposite outer walls, above ground level, air ducts are made - through holes closed with a metal mesh to protect against rodents. The same holes should be in the internal load-bearing walls.

The movement of air under the floor is mainly due to wind pressure.

In winter, there is a danger of soil freezing in the underground space, which can lead to the movement of the floor relative to the walls on heaving soils.

To prevent freezing, it is recommended to close the vents for the winter, and insulate the base.
However, the deterioration of ventilation as a result of the closing of the vents leads to the accumulation of moisture in the insulation and wooden parts - to a decrease in thermal resistance and durability of these elements.

I must say that such an underground space device has been used in private construction since ancient times. The design was not originally designed for the use of effective thermal insulation of the floor.

In houses with poor thermal insulation of the floor in winter, part of the heat from the room penetrated into the underground space and heated it, preventing freezing, but increasing heat loss.

Modern thermal insulation of the floor practically blocks the flow of heat into the underground from the premises.It is possible to prevent the freezing of the subfloor only by saving the heat of the earth.

With modern requirements for energy saving, a cold underground ventilated through the air is not the best option. It is still used rather by inertia.

The scheme of effective ventilation of the subfloor in the basement of a private house through the exhaust duct

To ventilate the underground of a private house, a cottage, it is advantageous to use effective ventilation through an exhaust duct. Such a ventilation scheme is the only correct option for a house with an insulated basement or basement.

How to make a wooden floor on posts

In old books and building regulations, you can find floor designs on posts using NOT effective heat and waterproofing materials.

Modern floors on logs in a private house do this

Support posts are laid out of ceramic bricks or concrete blocks. The distance between adjacent posts along the log (span) is recommended to be no more than 2 m. The base of the column can be a layer of compacted crushed stone 50-100 mm, spilled with bituminous mastic. Or instead of mastic, a waterproofing film is used.

The top of the columns is leveled in one level with a solution. With a solution thickness of more than 3 cm. a masonry mesh is sunk into the solution. The top of the columns is covered with a sheet of waterproofing material.

Wooden beams-logs are laid on the waterproofing layer. The distance between adjacent beams-lags (step lag) is determined by their cross section, as well as the bearing capacity and rigidity of the overlying layers of the floor - lathing, subfloor, finish coating. Usually they take a step convenient for laying between the lags of standard mineral wool insulation boards, about 600 mm.

For the above lag step and span between the posts, taking into account the thickness of the insulation and the crate, with normal floor loads, the lag section is sufficient 100-150x50 mm. A galvanized steel mesh is attached to the bottom of the logs lying on the posts. Instead of a grid, you can nail boards into the run-up, slats with a thickness of at least 20 mm.

On top of the mesh (boards) and logs, a windproof, highly vapor-permeable film is laid.

This film prevents hinders the entrainment of insulation particles by air flow (formation of dust), but does not prevent the evaporation of moisture from the insulation and wooden parts.

A panel of a windproof vapor-permeable film is laid on top, across the log, and lowered on both sides of each log until it stops in the steel mesh so that a tray is formed between the logs. The film is nailed with a stapler to each side of all the logs.

In the formed channel between the lags, a mineral wool insulation is laid on the windproof film. You can do without a windproof film if you use special insulation boards with a compacted windproof layer for the bottom layer.

How to determine the thickness of the floor insulation

The thickness of the floor insulation is chosen according to the calculation, providing the normative resistance to heat transfer R = 4-5 m 2 about K / W. If the basement is not insulated, then the thickness of the thermal insulation of the floor is determined from the condition that the temperature of the space under the floor is equal to the temperature of the outside air. The recommended thickness of mineral wool insulation in this case is not less than 150-200 mm.

For a house with an insulated foundation and plinth, the thickness of the floor insulation can be reduced so that the sum of the heat transfer resistances of the plinth + floor is no less than the norm (see above).

How to calculate the thickness of the thermal insulation of the floor (ceiling)

A crate of bars with a thickness of at least 50 mm is laid across the log. Between the bars of the crate place another layer of insulation. Such a two-layer construction of insulation provides insulation with overlapping cold bridges through the logs. The distance between the bars of the crate is chosen within 300-600 mm., a multiple of the width of the subfloor slabs.

Such a two-layer construction of the floor base (logs + lathing bars) allows you to conveniently place both insulation boards and floor covering boards (DSP, plywood, etc.).

The insulation with the crate on top is covered with a vapor barrier film. The joints of the film panels are sealed. The junctions of the film to the walls are connected to the waterproofing of the wall and the same is sealed.

It is recommended to choose the thickness of the lathing bars by 25-30 mm. greater than the thickness of the top layer of insulation. This will allow, by lowering the film on both sides of each lathing bar, to create a ventilated gap between the vapor barrier film and the floor covering.

Vapor-thermal insulation with foam

Instead of the top layer of insulation and vapor barrier film, it is more profitable to lay penofol - a foamed polymer covered with aluminum foil, 10 mm. (produced under other trade names).

Penofol must be laid with the aluminized side up, towards the ventilated gap, across the bars of the crate and lowered on both sides of each bar. After that, penofol is nailed to each side of all the bars with a stapler so that a gap of 3-4 is formed between the aluminized surface and the floor tiles. cm.. The joints of the foam panels are sealed with aluminized adhesive tape. A layer of foam foam will provide heat transfer resistance equivalent to a layer of mineral wool with a thickness of 40 mm., and the necessary vapor permeability.

Subfloor boards are attached to the lathing bars over a vapor-tight film or penofol. Instead of boards, slabs are more often used: cement-bonded chipboard (thickness > 22 mm.), plywood (> 18 mm.), etc. Sheets, plates are placed with the long side on the bars of the crate. Spacers are fixed under the short side between the bars of the crate. All edges of the laid sheet must have a support under them - a bar or spacer.

The use of polystyrene foam as a heater, polystyrene foam boards is not recommended. Such boards serve as a barrier to moisture, which is always contained in the wood of the floor. By preventing the release of moisture from the wood, foam insulation reduces the life of the wooden parts of the floor. In addition, mineral wool insulation, due to better elasticity, adjoins the logs more tightly than polystyrene.

To protect the underground space from ground moisture, it is advisable to cover the entire surface of the soil with a waterproofing film (and not just under the posts, as in the figure). The joints of the coating panels are sealed. The adjunction of the film to the walls must be connected to the waterproofing of the wall and also sealed. The floor posts lie directly on the film.

As a result, we get a ventilated underground space, limited by sealed shells - from above (vapor barrier) and from below (waterproofing).

Such an underground space protects the house not only from moisture and cold, but also from penetration into living quarters.

Floor along the lags on the intermediate walls

In modern floor designs, beam-lags are located at a small distance from each other, which allows the use of lumber of a smaller section, and hence the cost, and it is also convenient to place insulation boards.

Instead of brick columns, it can be advantageous to lean the logs on intermediate walls laid out across the log with an interval of about 2 m. Bricks or blocks in the wall are laid in a honeycomb laying method half a brick thick, leaving increased gaps of 1/4 bricks in vertical joints to ventilate the underground space. If the wall has a height of more than 0.4 m., then at least every 2 m. the length of the wall, lay out pilasters - brick-thick columns, to increase the stability of the wall.

If the step lag is not more than 600 mm. and span less than 2 m., then the cross section of the wooden log is enough to have 100x50 mm.

Wooden floor on the ground on logs

Another version of the wooden floor along the logs in a private house is shown in the following figure:


Here, unlike the first option, the floor level is raised to the required height by backfilling the basement with compacted soil.

Floor ventilation is carried out due to the movement of air under the action of the draft of the ventilation duct.

Warm air is taken from the room and through the ventilation holes in the baseboards and the gap between the subfloor covering and the wall enters the space between the joists. Next, the air enters the ventilation duct.

To ensure ventilation of the underground space, skirting boards with holes are used or skirting boards are installed with a gap between them and the walls.

In order for the air to move more or less evenly under the entire surface of the floor, the gap for the passage of air is made of different widths - the farther from the ventilation duct, the wider the gap (2 cm.). Near the ventilation duct, holes in the baseboards and gaps between the wall and the floor covering are not made (or the gap is sealed with tape).

It is important to understand that in this ventilation option, unlike the first, the underground space is located inside the heat-shielding shell of the house, and must necessarily be warm. The outer shell of the subfloor must have a resistance to heat transfer no less than the wall of the house. Otherwise, the flow of warm air from the room may lead to condensation on the parts of the subfloor.

Make a layer of bulk soil thicker than 600 mm. Not recommended. Soil is poured and carefully rammed in layers no more than 200 thick. mm. It is still not possible to compact bulk soil to the state of natural soil. Therefore, the soil will settle over time. A thick layer of loose soil can lead to too much and uneven subsidence of the floor.

The waterproofing film is laid on a leveling layer of sand with a thickness of at least 30 mm. The joints of the film panels are sealed. The junctions of the film to the walls must be connected to the waterproofing of the wall and also sealed.

Thermal insulation is laid on waterproofing.

In this option, it is better to use polymer insulation boards - polystyrene foam (polystyrene foam). The thickness of the insulation is enough 50-100 mm., since the temperature of the soil under the house is always positive.

If the walls and basement of the house are not insulated, then along the outer walls to a width of at least 800 mm. a thicker layer of insulation should be laid, 150 - 200 mm.

At a house with multilayer outer walls with insulation outside, in order to exclude a cold bridge bypassing the wall and floor insulation, must be insulated outside(see the figure in the first part of the article).

The floor logs lie on low brick or concrete block linings.

If slabs of extruded polystyrene foam (XPS, penoplex, etc.) are used as thermal insulation, then the logs can be laid on linings cut from these slabs.

Between the thermal insulation and wooden floor joists, a gap of 3-5 cm. for free air movement.

According to building regulations, there is one restriction on the floor device. Since the space under the floor is ventilated through the exhaust duct of natural ventilation, it is forbidden to finish the floor covering from combustible materials: from boards, parquet boards and shields, etc. Or, a non-combustible base should be provided under them, for example, a prefabricated screed made of plasterboard, gypsum-fiber sheets or a draft floor made of cement particle boards.

In this option, the logs and other floor elements are in better humidity conditions than in the first case.

In this design, the ventilation duct serves to ventilate not only the underground, but also the premises of the house. About what needs to be done to save the heat emitted by the ventilation system,

Floors, soils and foundations

Floors on the ground are not connected to the foundation and rest directly on the ground under the house. If heaving, then the floor in winter and spring can "walk" under the influence of forces. To prevent this from happening, the heaving soil under the house must be made not to heave. The easiest way to do this, and the underground part

The design of pile foundations on bored (including TISE) and screw piles involves the installation of a cold base. Warming the soil under the house with such foundations is a rather problematic and expensive task. Floors on the ground in a house on a pile foundation can only be recommended for non-heaving or slightly heaving soils on the site.

When building a house on heaving soils, it is also necessary to have the underground part of the foundation to a depth of 0.5 - 1 m.

Wood is one of the most popular natural materials. Nowadays, it is in great demand, both for residents of country cottages and city apartments. The wooden floor looks simply amazing, giving the whole room a graceful and sophisticated look.

Despite the fact that the construction of a wooden floor along the logs is a rather time-consuming process, anyone who has some knowledge of technology and a certain list of tools can cope with it. In this article we will talk about the main nuances of installing it yourself. We will give some practical tips and recommendations that will allow you to create incredible comfort in your home or in the bath.

Advantages and disadvantages

Wooden floors have gained their wild popularity for a reason, because among the advantages:

  • Naturalness. Wood is probably the most ancient material used by our ancestors. Unlike modern artificial counterparts, wood is considered a "breathing" material.
  • Complete environmental friendliness. This material, even when heated to high temperatures, does not emit harmful or even dangerous substances to human health or domestic inhabitants into the air.
  • Unpretentiousness and ease of care. There is no need to use any strong chemicals to clean lumber. Enough wet and dry cleaning once a week for an apartment and, depending on how often the room is used, once a month for a bath.
  • High thermal performance. The tree is able to heat up quickly and retain heat well indoors.
  • Due to the presence of a ventilation gap and soft insulation, a large amount of noise is absorbed.
  • Possibility of laying various communications between the lags.
  • Repair. If necessary, the boards or even the logs themselves can be dismantled and replaced without much difficulty.

But, like any other material, wood has its drawbacks:

  • High price. Compared to modern analogues, wood is a rather expensive raw material.
  • Big labor costs. Naturally, unlike the flooring of the same linoleum, installing logs and processing them correctly, insulating and waterproofing is much more difficult.
  • Since the material is natural, it tends to dry out, due to which, over time, seams, cracks and other defects will form in the floorboards.

How to choose quality material?

A wooden floor will serve you as long as possible if you approach the choice of high-quality material with all seriousness. If we take into account living quarters, then conifers, such as cedar, spruce, fir, are best suited here, because they not only have an external aesthetic appearance, but also due to the presence of wood resin in the fibers, they are more resistant to moisture and more durable.

For a bath, for example, everything is just the opposite. In the steam room, where there is high humidity and high temperature, it is generally dangerous to use conifers. Since the resin, in addition to the fact that it can leave a burn on contact with the skin, it can also ignite spontaneously. Therefore, for the steam room it is better to select hardwoods, such as linden, alder, aspen and others.

In the case when it is assumed that the flooring will be varnished, it is better to choose light-colored species with beautiful natural ornaments, such as walnut or mahogany, and oak from cheaper ones.

When buying, it is important to ask the seller for the moisture content of the wood. It should not exceed 20%, since raw lumber cannot be processed, and very quickly such a coating will begin to crack and deform, forming cracks and “cold bridges”.

Immediately before installation, all raw materials must be treated with an antiseptic, and experts also recommend using anti-corrosion compounds that will prevent the destruction of wood fibers due to contact with metal fasteners (nails, screws, and so on).

The installation step of the log depends mainly on the dimensions of the floor covering, that is, if it is planned to use thin boards (thickness up to 3 cm), then the logs can be placed 30-40 cm apart, if massive boards (4-5 cm in thickness) - the distance should be increased to 80-100 cm.

So the cross section of the lags themselves depends on the distance between them. For a bath, beams with a section of 15x10 or 10x5 cm are very often used and they are placed at a distance of 0.6-0.7, depending on the size of the insulation blocks.

Wood flooring

We will divide the technology of laying on logs into several main stages:

Necessary tools and additional materials

When choosing the main building material, do not forget about the tools. You will need:

  • Hammer;
  • Drill;
  • Hardware;
  • waterproofing material;
  • Thermal insulation material;
  • Hardware;
  • Screwdriver;
  • Hacksaw;
  • Mittens;
  • And some others, depending on the intended work.

Advice! It is best to start installing a wooden floor in an apartment after the heating period, since during this period the wood has less chance to absorb excess moisture, which can spoil the appearance of the raw material.

Preliminary preparation

Consider the most commonly used option for installing a wooden floor, namely installation on a concrete screed, since this option can be used both for an apartment or house, and for a bath or sauna.

It is necessary to start all the manipulations after all other work has already been completed: the installation of door and window frames, the ceiling has been mounted and the lower concrete screed has been made, all surfaces have been thoroughly dried and plastered.

Since the boards will have to withstand considerable loads, their optimal thickness will be 3-4 cm, and given the thickness of the logs themselves and, possibly, the counter-battens, 7-10 cm, the ceiling height in the room will become somewhat smaller, so it is best to build a wooden floor along the logs in rooms with high ceilings.

Just before waterproofing, which is the next step, it is important to check the integrity of the concrete base. To do this, the floor is tapped in several places and carefully inspected. A quality screed should not have any cracks or other defects. If such areas were found, they must be replaced, after which it is important to wait about 30 days for the base to dry completely, turning into a monolith.

Waterproofing works

The main task of waterproofing is to protect the wooden elements of the floor from the harmful effects of moisture, which can lead to wood decay, and this is fraught with negative consequences, both for the wallet and for human health, especially children.

The most reliable option is considered to be gluing a concrete screed, which can simultaneously be a subfloor (more on that later), with rolled polymer materials.

A layer of rolled waterproofing (most often roofing material) is overlapped or joined on a concrete base, then the seams between the strips are glued either with building glue or special bituminous mastic, ordinary resin is also suitable. It is important that the ends of the waterproofing tapes extend 5-10 cm onto the wall. In the future, the protruding parts can be cut off.

If you want to increase the soundproofing properties of a wooden floor, you can lay a layer of rubber or compressed cork on top of the waterproofing.

A layer of 1-2 mm of special mastic is applied to the lumber itself for better bonding of wood and rolled material.

Lag installation

The life of the entire floor structure depends on the quality of this stage, so take this task as seriously as possible. The optimal section for beams is 5x10 cm.

How to lay the beam correctly? There are no specific rules. Often it depends on the intended design decisions. It is only important to adhere to one rule - the boards must be located strictly at right angles to the lag. Professionals advise to install the lag in the direction where the light falls in the room.

The lags themselves are mounted edgewise. Installation begins with two extreme logs, which are located close to the wall or at a distance of several centimeters. After laying these bars, a thread is pulled between them, which is a guideline and will help to position all subsequent beams on the same plane. In the concrete base and the logs themselves, holes are drilled for metal dowels, with which the logs will actually be attached to the base. Self-tapping screws and dowels are screwed in with a step of half a meter-meter. Sometimes small pieces of boards 4-6 cm thick are laid under the beams.

If you do not want to spend time on calculations, installation, checking for flatness, you can purchase special bars that come with special adjustable supports. So the installation process will become much easier and take several times less time. After that, you can proceed to the insulation of the floor.

Underfloor installation and insulation

In the case when you have a concrete screed, then it can be used as a subfloor, or you can do the following:

  1. On both sides of each beam, a draft beam with a section of about 2x2 cm is attached.
  2. These small bars will become the base for the subfloor.
  3. The draft itself will consist of an unedged board of the lowest grade, as this will save money, and it makes no sense to buy more expensive material, since the highest grade and the lowest grade cope with their functions in the same way, it will not be visible anyway. It is important that the boards are located as close to each other as possible without seams and gaps.
  4. A layer of waterproofing is nailed over the subfloor with a construction stapler. Geotextiles or dense polyethylene are best suited.
  5. Insulation blocks are laid on top of the waterproofing. It can be mineral wool, polyisol or some more natural materials. You can also use bulk insulation such as expanded clay. For a bath, a layer of clay and sawdust is suitable, but then it is important to lay another layer of hydro and vapor barrier on top of the insulation.

Do not forget to leave a small gap between the insulation and the finished floor for ventilation.

Finished floor installation

For finishing flooring, a high-quality edged board with a tenon-groove connection is used, as well as with a longitudinal ventilation gap. I think it’s not worth saying that the boards for the finishing floor should also be treated with an antiseptic.

When laying the floor, it is important to ensure that the growth rings alternate in direction. The boards are attached to each joist with nails so that the head is 1-2 mm deep into the thickness of the board. Don't worry about leaving holes. In the future, they can be easily covered with a corrective compound or a wax pencil. You can also use long screws, although it will be a little more difficult to install them, since you will have to pre-drill holes for each, and only then screw them in.

When connecting the boards to each other, it is worth punching with a hammer for their best adhesion.

In the case when it is not planned to paint the floor, you can use two types of fasteners:

  • Open. In fact - usually nails. They differ in that they have decorative hats, so it is important to drive them in at the same distance from each other.
  • Hidden. These are the heads of nails or screws that are driven into special grooves, which are then closed with special plugs.

Finishing

Between the walls and the floor, in order to hide the cracks, wooden plinths are mounted, under which, among other things, you can hide a telephone or Internet cable.

To achieve a perfectly flat surface, the floor must be further sanded. To do this, use a special grinder with several nozzles. A coarse grit nozzle is used for hard woods, with finer grits for soft woods. Sand the wooden floor in several stages, each time changing the nozzle to a finer one. For grinding in corners and other hard-to-reach places, use a special angle grinder.

After you have finished sanding the floor, you need to go through the vacuum cleaner in order to collect dust, small chips and other debris that subsequently formed.

After the final finishing, a special moisture-resistant varnish based on polyurethane is used. It is important to apply it in several stages. After complete drying of one layer, apply the next, and so two or three times. Various compounds are often applied under the varnish, which change the color of the floor covering.

Let's summarize

Now that you know the basic rules and nuances of installing a wooden floor along the logs, you are able to independently build a comfortable floor covering that will last you for many years.

The vast majority of floors in both private and multi-apartment buildings are made of wood. The support for a multi-layered, pie-like, wood structure is most often logs. Logs are long bars made of wood (less often of metal and reinforced concrete), laid out transversely to the finishing flooring, serving as its solid foundation. This design is installed both on a monolithic concrete floor, and on supporting posts and beams. The device of floors on wooden logs is very profitable due to the relatively low price of materials and ease of installation.

Advantages of flooring on logs

Logs installed as a support on a wooden floor are very functional. In addition to their direct duties, they also:

  • create a uniform load on the ground in a private house and overlap (if the floor is laid in an apartment building);
  • level the surface under the coating (adjustable floors with your own hands can be raised or lowered to create a perfectly flat surface, regardless of the initial parameters of the room);
  • create a free, ventilated space between the ceiling and the floor, in which communications that are undesirable for public viewing can be hidden;
  • increase the sound insulation of the room;
  • facilitate the process of floor insulation.

In addition, individual lag bars, if necessary, can be easily replaced without spending money on large-scale repairs in the house.

Structural features of the floor on the logs

The device of the finished wooden floor on the logs is somewhat reminiscent of a multilayer cake, in which it is necessary to lay boards, logs, a waterproofing layer, insulation, and a floor finish on top of the overlap with layers.

The device of the floor on the logs involves the laying of waterproofing and insulation

At the same time, regardless of the type of overlap, the insulated floor pie includes additional elements:

  • a layer of waterproofing between the ceiling and the lags;
  • log bars;
  • subfloor (preference is given to plywood boards);
  • waterproofing insulation coating;
  • the insulation and vapor barrier itself;
  • boards - finishing coating.

This design of floors on logs is relevant for the first floors in private houses. All subsequent floors do not need such serious insulation; in this case, the installation of a waterproofing layer of the cake is only necessary in direct contact with concrete and brick.


It is necessary to insulate the floors of the first floors and concrete or brick bases

Self-manufacturing technology of logs and selection of wood

Lags can be purchased at the store, or you can make your own. The second option is relatively cheaper. Wood with a moisture content of no more than 15-17% of the 2nd or third grade is best suited for these purposes. Logs can be made from pine, fir, spruce, aspen and larch.

If you make logs with your own hands, keep in mind that the cross section of the beam should be rectangular in shape. The height is approximately twice the width. The required size is determined based on the parameters of the room, to be more precise: based on the exact distance between the strapping links from the timber.


The size of the bars depends on the distance between the strapping links

In addition, it is imperative to take into account the thickness of the insulation layer and the size of the spans.. In the illustration you can see approximate calculations with laying the log at a distance of 70 cm from each other.

If your room has an intermediate size between the indicated values, it is worth taking a larger value as a basis. So you will have some stock of material, which will allow you to lay it without gaps and make the structure more durable.

To make a wooden floor with your own hands, you can use both edged and tongue-and-groove boards. The second option is much more preferable, because its device involves a groove and a spike, therefore, the installation of a fine finish coating is no longer so relevant.


It is preferable to use tongue-and-groove boards thanks to the tenon-groove system

Cedar, larch, spruce, aspen and pine floorboards can be used. The most expensive and durable materials are oak and pine wood: provided that the installation is carried out correctly, they will last for several decades. In turn, larch is great for rooms with high humidity, because it is not subject to decay, and healthy aspen and alder boards are great for sleeping rooms.


Oak and pine boards will last a long time

If you purchase first-class floorboards, you can not spend money on the final flooring, but at the final stage, just sand the boards and open with varnish.

The main thing is that before laying, be sure to treat the boards with antiseptic antifungal drugs and soak them with a water-repellent compound.

If you install a wooden floor with your own hands, be careful about the choice of wood: the boards should be dry, but not overdried. Wet wood after drying and under the pressure of furniture can be deformed. Always buy boards with a margin of 15-20% in case of need for trimming, mistakes and scrap.

How to independently calculate the required distance between the lags?

When you install the floor on the logs, follow the rule: the thicker the floor board, the wider the installation and the farther apart the logs are.

For example, for a board whose size is 5 cm, you can take a step (the distance between the lags) of one and a half meters.

If you are using thin boards, you can take a small step so that there is no deflection of the board. The most frequent step length between lags is 50-70 cm.


The distance between the lags is most often 50-70 cm

Also keep in mind that you will need additional distance to make it convenient to lay the insulation inside. If the base size does not match the values ​​in the table, then it is calculated upwards.

Basic rules for installing a lag

When installing the log yourself, you should strictly follow the following rules:


Installation of wooden logs for the floor

Wood is a floor covering that has been tested by time and centuries of experience. Laid correctly, it can serve for decades and not lose its visual appeal. In addition, this is the most environmentally friendly, "breathing" floor, which guarantees a high degree of heat and sound insulation of the premises of both a private and an apartment building.


Wooden floor construction along the lags

To make the laying of the wooden floor on the logs quick and comfortable, you will need the following tools: a level, a puncher, a saw and an ax, a hammer, a nail puller, a drill, a screwdriver and keys. As well as the following materials: floorboards (sometimes the role of the subfloor is assigned to plywood boards), logs, insulation material, fasteners (anchor bolts, self-tapping screws and nails).

If all the necessary materials for installation are available, you can start laying the log on top of the soundproofing material. As already mentioned, the surface must be leveled by checking its horizontalness with a building level. Boards are attached to the logs with dowels.

Now it is worth considering in more detail the entire technology of flooring on logs in a private house.

The first step is marking the working area and preparing the base. First, you should compact the soil and fix the formwork with ten-centimeter sides. A reinforced mesh is laid on the bottom and then the concrete mixture is poured. For the concrete to dry, you need to wait a couple of days. After that, a waterproofing polyethylene film is laid on top of the concrete floor, and then the supporting structures are built.

If the floor is cold, the space that remains under it after its construction must be covered with sand or expanded clay (do not fill up to the top, you need to leave about 5 cm of free space).


You can insulate the floor with expanded clay

The second step will be to work to ensure normal ventilation of the space under the floors.. For these purposes, small holes are made along the perimeter of the plinth (for every 15 sq.m), which, in order to prevent mice from entering the house, are closed with a non-ferrous metal mesh.

The next step is floor insulation.. For these purposes, expanded polystyrene, isospan or heat-insulating roll material is perfect. This material is laid on the waterproofing layer of isolon, which is attached to the logs in advance with the help of an industrial stapler.

After laying the insulation, you can proceed to laying the boardwalk over the log. Installation must start from the corner of the room. The boards are screwed directly to the joists using self-tapping screws.


Scheme of the device of a wooden floor

If the boards are processed and well sanded, they can play the role of a finishing, fine flooring. If a finishing layer is expected (laminate, parquet, linoleum, etc.), you can start laying it immediately after finishing work with fastening the boards to the logs.

Thus, the installation of a floor on logs made of wood has many advantages over laying the floor directly on top of a concrete or ground floor. In addition to the fact that it smooths out all the unevenness of the floors and distributes the load evenly, it also perfectly insulates the home and contributes to noise absorption.

Construction technologies are constantly changing. Modern methods are often more effective, but not always cheap. In particular, one of the most affordable flooring technologies is a subfloor along logs. Yes, it is not perfect, but so far this is the cheapest way to make a floor. In any case, in those regions where the price of wood is still low.

In the construction of the floor, the rough flooring can perform two functions. The first is to serve as the basis for laying heat-, hydro-, sound-proof materials. The second function is to serve as a support for finishing flooring or floor screed under the floor covering. Moreover, insulating materials can also be used to improve performance.

One of the options for underfloor heating and tiles using

Is it possible to make a finishing floor without a draft? Basically, it is possible, but in this case it is more difficult to achieve the required characteristics. If the requirements are not too high (dacha, summer or guest house, technical building) and it is important to get only the necessary minimum, you can do without a subfloor.

If the requirements are high (for a residential or heated building), as a rule, a construction without a rough flooring requires more money. Why? For the subfloor, inexpensive materials are used. The main selection criterion is durability. They do not pay attention to the appearance and this allows the use of inexpensive materials. For example, unedged board (after appropriate processing), construction plywood, lean concrete slab. Other materials are laid on the rough base and claims to their strength are minimal. The main emphasis is on "protective" characteristics. After all, the load falls on the floor structure and rough flooring, and not on these materials. And they are usually relatively inexpensive.

All draft bases can be divided into two large groups: dry and wet. Wet include all types or. But this is not about them. We will talk about dry ones, and along the lags and beams.


To date, there are more modern technologies, but the subfloor on the logs remains the cheapest. This is a traditional version that has been modified to meet modern requirements for comfort and economy. But even with the changes, it is difficult to achieve those parameters that are considered the norm today. In particular, sound insulation, and thermal insulation cannot be ideal. You can only get closer to the norm. But the solution will not be the cheapest.

Ceilings on wooden beams

Beams in a floor structure are wooden or metal elements that rest on the foundation and serve to transfer the load. Since wood is still the cheapest tool for us, most often our beams are wooden. They are made from timber - solid, glued, or spliced ​​beams (from several boards) are used.


Beams can only rest on the foundation, they can have intermediate supports. In houses with a subfloor, piers serve as intermediate supports; in the absence of a subfloor, brick columns are folded or columns are made of reinforced concrete. Waterproofing is laid on these supports in two layers (roofing material or something like it, but not a film), and beams or logs are supported on the waterproofing.

Beams and logs - the difference

How are beams different from lag? In short, beams are load-bearing structures, but logs are not.

Beam - a linear element of load-bearing structures, based on both ends (unlike the console) and working mainly in bending. As a rule, the section of the beam is rectangular or square. In wooden houses, they are also made from hewn logs. The installation step of the beams and their cross section is considered during the development of the project. Logs are also prescribed, but they are not so critical, so their characteristics can be changed during the construction process.


The logs are not elements of the supporting structure and they are simply made of a thick board, which is often placed “standing up” - they are supported on a narrow part. With such an installation between the lags, it is convenient to lay the insulation - when choosing the installation step of the lag, the width of the insulation is also taken into account. The draft floor along the logs can also be with the location of the insulation on top. This type is called a floating floor, since the finish coating does not have direct contact with the base (in this case, with the rough flooring).


There are two important points. The first - when using mineral wool as a heater, it is necessary to measure the actual width of the roll or plates. It doesn't always match what is advertised. The second - the distance between the lags should be 3-4 cm less than the width of the insulation. Then it can be put in a thrust and it will be held due to the force of elasticity. This makes installation easier. But there is another advantage to this solution. Even if the insulation “bends” a little or dries out during operation, no gaps will appear between the cotton wool and the lag, as the material will straighten out.


When laying insulation, the main thing is not to leave gaps and minimize cold bridges

When using polystyrene foam, polystyrene foam, polyurethane foam as a heater, the step lag (and their cross section) is also better to choose. But in this case, "compress" it will not work. The plates are cut into pieces of a slightly smaller width than the distance between the lags, and the gaps are filled with mounting foam.

Lag installation step

The installation step depends on the board from which the lags are made:

  • for a board with a thickness of 40 mm, the distance between the centers of the support is 80-90 cm;
  • 50 mm - distance 100-110 cm;
  • board thickness 60 mm - 120-130 cm.

The draft floor is the basis for the finishing floor, so it must be leveled to the horizon. The smoother the base, the less problems when laying other materials. Therefore, already when installing the lag, their edge is brought out at the same level.


One of the possible options

If the step of the beams is small - up to 80 cm, the rough flooring can be laid immediately, without a log (board 40 mm). With a large step of the beams, logs are laid across, and the flooring of the subfloor is laid on them.

A couple of comments about the wide board. If the budget is limited, you can save money by making prefabricated logs. Two boards 25 mm thick cost less than one board of the same length 50 mm wide. We buy two boards, put them one to the other, connect them with nails or self-tapping screws (preferably nails). We put fasteners on both sides in a checkerboard pattern. They put the logs “on edge”, so that they even surpass the board in strength - there is less chance of a crack appearing along the wood layer. There is one more nuance that will help to avoid the "torsion" of the prefabricated log: we arrange the boards so that the annual rings are located towards each other.

Floor structures on wooden beams

When constructing a subfloor, a board is more often used. Basically, it serves only as a basis for laying insulation. The load from the insulation is small, so you can not knock down the flooring tightly, but leave a gap of up to 1 cm. But such a sparse laying is suitable for materials with sufficient density. When using bulk thermal insulation, you will have to make a continuous crate.


With a large length of beams or lags, intermediate jumpers are also made for a more stable geometry

Draft floor along the lags under the screed (floating floor)

Can be done if necessary. The only question is that the beams can withstand the load. This is calculated separately. How good is this design? The fact that:

  • The usual "cold" floor can be made warm. You can even make it heated (if the beams withstand).
  • On top of the concrete slab, you can lay tiles, lay sheet material and lay coatings that are demanding on the base - laminate, PVC tiles, linoleum.

By the same principle, you can make a rough floor on wooden logs without cement. As a top layer, you can lay plywood, OSB and other sheet materials that you consider suitable in two layers. On such a base, again, you can lay tiles and any other type of finish.


What lags and board to use? It is possible / necessary to select, since the thickness of the board depends on the installation step of the lag:

  • the distance between the lags is 80 cm (permissible up to 100 cm, but not under a screed or tile, under lighter coatings) - board 40 mm;
  • installation step lag 50-60 cm, board 30-35 mm;
  • for boards less than 30 mm, support is required with a distance of 35-40 cm (depending on the specific thickness).

The draft floor in this case may not be solid, but with gaps. Under a concrete slab, it is best to take extruded polystyrene foam, high-density polyurethane foam as a heater. You can foam glass (foam glass), but it is very expensive. These materials normally withstand the weight of a monolithic screed. By the way, since it fits on an unstable foundation.

How to ensure long-term operation

With this design of the floor on wooden beams, it is important to protect the subfloor board from decay as best as possible. If the subfloor is below, care must be taken to ensure that it is ventilated (ventilated) and that the humidity in the subfloor is as low as possible. We need a blind area around the house (better insulated), as well as a drainage system.

As an additional measure, a film with sand is used. A dense PVC film is spread on the ground in two layers - the joints are glued with adhesive tape, brought to the foundation and fixed there. A layer of sand is poured on top of the film (at least 5 cm, but more is better). The film does not let in most of the moisture (if it is intact and the joints are well glued), and the sand absorbs the excess, and then slowly dries up. The same method is also used using any other draft floor along the logs.


Draft floor from OSB (OSB). You can remove the rough flooring from the board and lay the slab in two layers

As already mentioned, the subfloor board can be edged or unedged. A prerequisite is operating humidity. Few people will lay chamber drying, but the board must be dry - at least 6-9 months of drying. If the floor of the first floor is laid, the material must be treated with protective compounds. Humidity in the underground will be high, so the quality of processing should be good. It is better to process several times. Chemistry for wood today is more than enough. You can select properties. If folk remedies are needed, this is processed oil.

Ground floor above ventilated subfloor

The overlap of the first floor over an unheated underground is different in that it must be well insulated. If you are not going to do floor heating, you need to make sure that it is comfortable even with working products. To do this, it is better to make two layers of insulation and place them in different directions.

In this design, the rough flooring is only a support for the first layer of insulation, so taking a thick board here does not make sense. Usually they take 25 mm, process it and use it for filing. In the construction shown in the figure, a cranial bar is nailed to the bottom of the beams. Usually its cross section is 25 * 25 mm. A rough roll board is placed on the cranial bar. The segments are short - the length is equal to the step between the lags. Substandard length can be taken on this flooring, but there is less waste if the length is a multiple of the lag step.


Waterproofing is laid on the boards. Please note that if mineral wool is used as a heater, the material must be vapor-permeable. It should make it possible to remove moisture from the insulation. If the insulation is foam, polystyrene foam, foamed glass, they themselves do not conduct steam and this layer is generally irrelevant.

The thickness of the insulation should be such that its upper edge is 2-3 cm below the edge of the beam. This is necessary to ensure the ventilation gap. Wood changes humidity and it is necessary to give this opportunity, leaving a ventilation gap.

A cross frame is laid across the beams. These are lags. Their height depends on the required thickness of the insulation, and the installation step depends on what kind of flooring you plan on top. The dependence of the board thickness on the lag step is described above. But it can be not only a board, but also any sheet material.


Waterproofing flooring at a distance of 2-3 cm from the surface of the insulation

A vapor barrier is laid on top of the insulation. This time, the material should retain both vapor and liquid. In the case of using mineral wool, it is better to use a membrane with one-sided vapor permeability (for example, or Izover, other brands). It must be laid so that steam can escape from the heater. This solution is better, as it makes it possible to maintain normal humidity in the floor cake.


There are also options with one layer of insulation (pictured above). This method is convenient if, according to thermal engineering calculations, the thickness of the insulation is not too large.

What is the rough floor made of on the logs

The draft floor can be made from boards (edged or unedged without bark) and any sheet material, including drywall. Sheet materials include:


Now we are not talking about the environmental safety of the listed materials. Here everyone makes his own decision. The point is that any of these materials can be put on logs. These materials fulfill their role as foundations. The thickness of each material depends on the installation step of the beams or lag. Once you decide on a specific material, it will not be difficult to choose the thickness.


In a house with external multi-layer walls with insulation on the outside, a cold bridge is formed through the basement and the bearing part of the wall, bypassing the wall and floor insulation.