Probably, every needlewoman has seen beautiful flowers and elegant jewelry, which are made of an interesting material - cold porcelain. And here he is in his hands, sculpt - I don’t want to! And here begins the so-called creative crisis - what exactly to sculpt? There are so many options, but what exactly will be easy and what will be difficult? In this article about real cold porcelain crafts, which is suitable for beginners, you can read useful tips that will help you further work with this material.
How to work with cold porcelain for beginners
So, if you first picked up cold porcelain, you should remember that he is very very sticky. Any dirt and dust instantly settles on porcelain, which significantly spoils the appearance, especially if the mass is light in color. Carefully monitor the cleanliness of hands and the working surface before and during the sculpting process.
You can paint the material yourself - with oil paints, colored pigments (for example, pastels) or varnish. The last to cover the product can only be after drying.
Do not use acrylic paints, the water they contain can lead to mold in porcelain!

After sculpting, the product must dry. The term depends on the thickness and usually takes from a day to a week. If it has dried up by about 30%, it has become strong and hard - it means that it has dried up to the end and is completely ready for use.
So that the mass does not stick to your hands, lubricate them with baby cream or cosmetic oil. Vaseline coat the walls of the bag or bag in which the porcelain will be stored (inner walls), this will prevent mold.
What to sculpt from such material?
Start with the easiest, especially if you haven't sculpted at all before. Knowledgeable needlewomen believe that the simplest thing in modeling is flowers. It is not difficult to sculpt them, and as the process progresses, everyone will understand all the subtleties of working with porcelain. Below you can see detailed step-by-step instructions for making cold porcelain flowers.
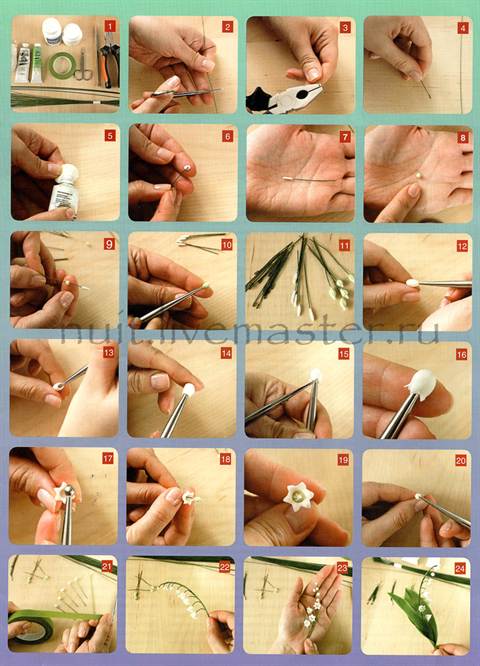
Bouquet of lilies of the valley.
Blooming bud.

Naturalistic iris petal.

White bud.

If you have modeling experience, try making a toy. For beginner needlewomen, this will be a little difficult, so get on with the figurines after some practice.


These are pretty easy master classes on creating crafts from real cold porcelain, which is easy to do with your own hands.
What is rarely molded from cold porcelain is fruits, vegetables and berries. Firstly, such a dense product will dry for a very long time. Secondly, this material does not become stone, it retains a little softness, so such rounded figures are quite easily deformed. The product loses its attractive appearance and can be safely thrown away.
If you plan to use such products as decorations (that is, they will simply lie in some place), then you can mold them, since the chance of damage to the figurine is significantly reduced.
We create bright jewelry with our own efforts
Cold porcelain can be used to make wonderful and unique jewelry. The principle is as follows: various parts are made, and after drying with PVA glue, they are attached to the fittings. Let's say you want to make flower earrings. Blind them, put them on some oblong object (for example, a needle) and leave the flowers to dry. After the elements are ready, pull out the needle - you will get a hole through which you can stretch the thread or fishing line. Excellent details for making jewelry come out.
Photo of cold porcelain jewelry:
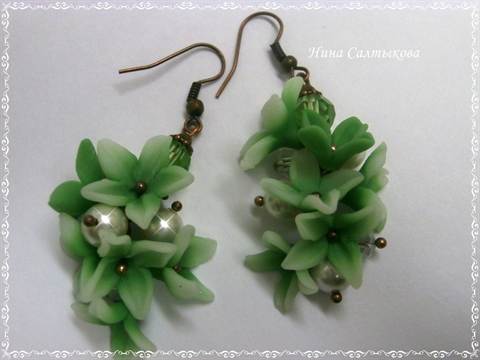

For decoration, you can use various materials - beads, beads, crystals, pendants, shells. Their combination looks very beautiful and elegant.
The most interesting thing about cold porcelain is that you can make it yourself. But this is not a very easy process, and before you try to do it, it is better to practice modeling with a purchased one - what if you don’t like working with porcelain? In addition, it is difficult for beginners to make quality material on the first try, and if the cold porcelain does not come out very good, you may be disappointed in ceramics and not understand that a completely different work process occurs with well-made cold porcelain.

This mass for modeling is prepared from starch (corn or rice gives the mass a white color, potato serite material), PVA glue, glycerin, cream and citric acid. Starch and glue create porcelain itself, while PVA gives it the property of self-hardening in the open air. There are several cooking methods - with cooking, without cooking and in the microwave. Such porcelain is stored in tight packaging, with minimal air penetration, from 3 weeks to six months. This is a very approximate recipe, which each needlewoman tries to improve on her own. If you enjoy working with cold porcelain, then try to make it yourself in the future - this is a fun process that will save you money. In addition, after experimenting, you can come up with your own recipe for the perfect cold porcelain.
Various figurines, figurines, flowers, paintings made of such material as cold porcelain impress with their realism and fascinate with their beauty. Sometimes it may seem that innate talent and skill are needed to master modeling, but this is absolutely not the case. Modeling from cold porcelain is a very simple task and anyone can master it. This article will tell you step by step how to make cold porcelain at home, and will also present step-by-step flower sculpting workshops.
The material got its name due to the fact that the finished product from it is absolutely similar to real porcelain, and it is called “cold” because there is no need to give heat treatment to solidify, since this material dries quite quickly in a natural way.
Today, any master can purchase material for modeling in a specialized store for creativity, but it is not difficult to make cold porcelain on your own. For this you will need:
- corn starch - 1 cup with a volume of 200 grams;
- glycerin - 2 teaspoons;
- PVA glue - 3.5 cups;
- water - 100 grams.
Pour water, glycerin and PVA glue into a saucepan or bowl with a thick bottom and mix all the ingredients well. The container should be heated over low heat. by stirring the contents regularly. Next, starch is gradually added, it is worth noting that during the introduction of starch, stirring should become more intense and faster in order to avoid the formation of lumps and allow the starch to combine with the rest of the components evenly.
Cold porcelain should be boiled, p until it looks like dough and does not form a solid lump, after which you need to remove the container from the stove and put the mass on a damp towel and wrap it. For ten minutes, the cooked mass must be kneaded well, but at the same time it is not necessary to get it out of the towel, and when the cold porcelain has cooled down, it should be divided into pieces.
In order for the product to look bright, it is necessary to color the material, food coloring, acrylic paints or pigments may be suitable for this. As soon as the kneaded porcelain has been divided into parts, a coloring element must be added to it and kneaded again, until the color distribution is uniform.
There is also dyeing technology for finished products, for this you need food paint and cotton swabs. Finished, frozen elements of the product are painted in the desired color and kept over steam of hot water for a minute. In order not to get burned, it is best to hold the product with tweezers.
Gallery: cold porcelain flowers (25 photos)


Cold porcelain flowers for beginners - how to sculpt with your own hands
Cold porcelain roses - master class
This composition will be several red roses, which will be located on a wire stem and connected into a bouquet with a decorative ribbon. For the master class you will need:

 While working with plastic, you should generously lubricate your hands with a nourishing, greasy cream so that the material does not stick to your hands and does not interfere with work. To start it is necessary to make blanks in the form of stems from wire, on which roses will be held. A small drop of cold porcelain is attached to the tip of the wire, this will be a bud.
To make petals, you will need a stack that looks like a device with a rounded tip on a skewer. It can be purchased at any special store for creativity or made on your own, a large bead can serve as a round tip.
 A small piece of red porcelain needs to be kneaded and given the desired shape, and the excess is cut off. With the help of a stack, a petal shape is shaped by smoothing. It is worth noting that, like the petals of fresh flowers, their edges should be thinner than the middle and lower part.
The finished petal is smeared with a small amount of PVA glue, and attached to the bud, forming a rose flower.
 This should be done a few more times until you get a whole flower. Each time the size of the petal needs to be increased.
The last petals will be the largest. When the flower is ready, it must be placed in a jar or vase, bending the wire so that the flower is facing down.
In order to make leaves, you can use ready-made forms that are sold in specialized stores.
 Green cold porcelain should be rolled out on a flat surface, which is smeared with hand cream, into a very thin layer (thickness should not exceed 1–1.5 millimeters) and squeeze out the leaves with a mold.
If you don’t have such a shape at hand, you can gently squeeze out the shape of the sheet yourself with a knife or toothpick, but it’s worth remembering that in this case, you need to sculpt very quickly. After the porcelain has taken the form of a sheet, it needs to be given a natural relief. Next, the wire is wrapped with floral tape, and then the prepared leaves are attached to it using PVA glue. Excess glue must be removed with a napkin.
When all the flowers have been collected, they should be left to dry, and then made into a bouquet and secured with a decorative ribbon.
Such cold porcelain bouquets can be use in home decor or present to relatives and friends as a souvenir, after putting them in a vase.
Sakura flowers - a master class on modeling from cold porcelain
Such a master class is suitable for beginners in working with this material. For the master class you will need:

To begin with, white and soft pink cold porcelain should be shaped into small blocks (the blocks should be the same size). Next, you need to put them on top of each other and use a clerical knife to cut into small rectangles.
1. COLD CERAMICS AND TOOLS FOR MANUFACTURING DECORATIVE FLOWERS
Sculpting all kinds of crafts - one of the most popular and useful leisure options for the development of the child. Little kids having fun sculpt with their own hands different animals and fairy tale characters plasticine or salt dough . School-age children can help parents make flowers, original crafts and decorations from plastic or natural clay. Products from polymer clay or natural after modeling should be subjected to heat treatment (bake in the oven) so that the crafts harden.
But there is a universal material for making hardened durable crafts, which is perfect for both children's pastime and parents' leisure - this is cold porcelain.
In this article, we will tell you about a wonderful material called cold porcelain. This is a very plastic material and is ideal for making a wide variety of crafts, including artificial flowers . Below you will find video tutorials, master classes with photos on cold porcelain modeling, tips on choosing tools and recipes for making this plastic mass for modeling at home.
The advantages of modeling flowers and other crafts from cold porcelain are obvious: it is non-toxic and harmless, which makes it popular for modeling with children, it is very plastic, it hardens in air after making crafts (unlike baked plastic: cernit, fimo, scalpi).
According to many masters, cold porcelain (along with foamiran ) is an ideal material from which you can sculpt a variety of flowers of any size. Cold porcelain flowers look very realistic and are used to decorate interior objects, photo frames, boxes , women's jewelry. From such homemade flowers, craftsmen make chic wedding bouquets that will remind newlyweds of vivid impressions for many years. after the wedding . Flower compositions made of cold porcelain can often be found at exhibitions dedicated to arts and crafts.
One of the most important properties of this material for craftsmen is the ability to change the shape of flower petals. even after the crafts have dried, since cold porcelain is extremely plastic and durable. Sculpting a flower from soft cold porcelain with your own hands is easy and simple. Flowers can be painted with oil paints, giving the petals and leaves a natural color, achieving natural transitions and shades, which increases the realism of the craft. 
Caring for such artificial flowers is very simple - sometimes it is enough to blow them with cold air from a hair dryer. They do not darken and do not fade under the sun's rays. Even a novice master, guided by lessons on making crafts from cold porcelain, can mold with his own hands flower and even bouquet hard to tell from the real one!
Such artificial flowers organically combined with the styles that are popular today, which are used in the work of interior designers. Therefore, they are increasingly used for decorative solutions in the design of premises. Some needlewomen make stunningly beautiful artificial compositions with their own hands. flowers to decorate gift wrappings and boxes. In such compositions, flowers from cold porcelain are beautifully combined, foam and satin ribbons (kanzashi).
Tools and materials that you may need to make cold porcelain crafts:
√ stacks are wide and narrow;
√ rolling pin;
√ tweezers;
√ scissors;
√ wire cutters;
√ flexible wire;
√ decorative cosmetics for tinting and tinting;
√
acrylic paints;
√
acrylic varnish (fix finished crafts after drying);
√
construction PVA glue;
√ wet wipes for wiping fingers while sculpting. Cold porcelain very noticeably absorbs any dirt from the hands, which can ruin the look of the craft.
2. HOW TO MAKE COLD PORCELAIN WITH YOUR HANDS (WITH BOILING AND WITHOUT BOILING INGREDIENTS) AT HOME
Option number 1- preparing the mixture and cooking cold porcelain with your own hands:
Ingredients:
Glycerin (pharmacy) - 1 tablespoon;
PVA glue (for construction work) - 1 glass;
Starch (the best option is corn starch, but potato starch can also be used) - 1 cup;
Citric acid - 1 teaspoon;
Oily hand cream - 1 tablespoon.
Recipe (with cooking).
The container for preparing the mixture is a saucepan or a deep aluminum bowl. Mix all the ingredients in the indicated proportion very carefully.
Put the container on the fire and continue to place the ingredients with a spoon without interruption
First lumps should appear, then the mixture will quickly turn into a thick mass.
When the contents of the pan gather in a solid lump, turn off the burner.
Spread the oilcloth on the table, grease with baby oil and put the prepared mass on the greased oilcloth.
Knead the mass until a consistency suitable for modeling is formed. Cold porcelain is ready to use! As you can see, it’s not so difficult to make excellent material for sculpting crafts with your own hands.
Option number 2- how to make cold porcelain with your own hands without cooking:
Ingredients:
- vaseline without additives (or vaseline oil) - 1 tablespoon;
Corn starch (potato starch is also possible) - 2 tablespoons;
Baking soda - 50 gr. ;
Watercolors (or tempera);
PVA glue - 30 gr.
Recipe (without cooking):
3. MASTER CLASSES. LEARNING TO MAKE FLOWERS, BOUQUETS AND COMPOSITIONS FROM COLD PORCELAIN AT HOME
Master class number 1:
FLOWERS FROM SELF-HARDENING ARTIFICIAL CLAY OWN HANDS. LEARNING TO MAKE PETALS FROM COLD PORCELAIN, FOLD FLOWERS FROM THEM AND FORM LEAVES.
Master class number 2:
GRACEFUL TULIPS FROM COLD PORCELAIN. WE FORM FLOWER DETAILS ACCORDING TO TEMPLATES, MAKE A BEAUTIFUL BOUQUET FROM ARTIFICIAL TULIPS.
Master class number 3:
HOW TO MAKE COLD PORCELAIN WITH YOUR HANDS - RECIPE WITH PHOTO STAGES. WE MAKE BEAUTIFUL ROSES FROM THE PREPARED MIXTURE.
Master class number 4:
SOME MORE WAYS OF MANUFACTURING COLD PORCELAIN FOR MODELING CRAFTS AT HOME AND MK FOR MANUFACTURING SAKURA OR LILAC FLOWERS FROM THIS MATERIAL.
Master class number 5:
HOW TO MAKE BEAUTIFUL ORCHID FLOWERS WITH YOUR HANDS. LESSON WITH PHOTO AND DESCRIPTION OF STAGES OF WORK.
Master class number 6:
HOW PROFESSIONAL
Content
Such material for creativity as "cold porcelain" is very popular among craftsmen. Beautiful and very durable crafts are made from it. Today you can buy it in almost any specialized needlework store or via the Internet, or you can save money and make the material for modeling yourself.
cooking recipes
Making cold porcelain with your own hands is quite simple. There are many different recipes for preparing this material for modeling, but the main difference in preparation is the presence or absence of heat treatment of the mixture.
Advice! For beginners, it is better to use recipes without cooking, as this process requires certain skills.
In this case, recipes where you only need to thoroughly mix all the ingredients are perfect.
Recipe one
For this recipe you will need:
- starch, it is best to take corn - 2 tbsp. spoons;
- a few drops of vaseline;
- baking soda - at the tip of a teaspoon;
- PVA glue - 2 tbsp. spoons.
Cooking:
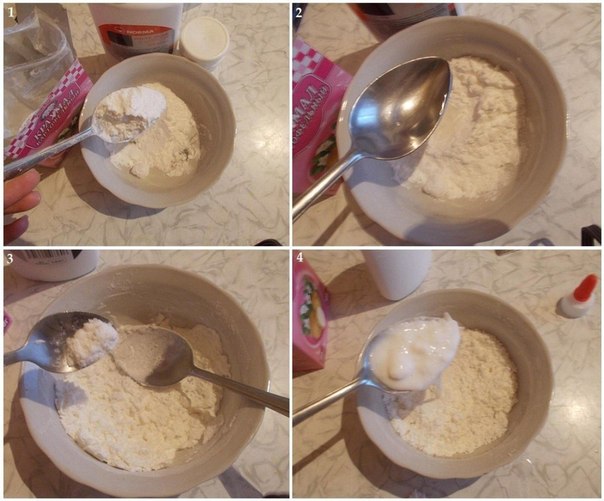
Pour starch into a bowl. Then add vaseline oil to it and mix everything well. After that, add a few drops of Vaseline to the mass, and then soda. At the very end, carefully pour in the glue. We mix everything thoroughly.
Recipe two
For cooking you will need the following ingredients:
- corn starch - 1 cup;
- PVA glue - 100-150 ml;
- cream for children - 1 tbsp. spoon;
- vaseline - 1 tbsp. spoon;
- vaseline oil - 1 tbsp. spoon;
- citric acid - 1 teaspoon.
Cooking:
All of the above ingredients must be thoroughly mixed. After that, put the resulting mixture on a slow fire. Boil the mass until a dense lump is formed and the liquid is almost completely evaporated.
Recipe three
To prepare the material in this way, you will need the following ingredients:
- building glue PVA;
- corn starch;
- glycerol;
- any hand cream (ideal if it is greasy);
- citric acid or lemon juice.
Attention! Cornstarch makes the mass more elastic and almost transparent, which is important for the manufacture of beautiful and high-quality products.
Cooking:
First, mix all the ingredients in a deep bowl. Then we put it on a small fire and start cooking. The mass must be constantly stirred. When one large and rather dense lump is formed, the mass must be removed from the heat, put on a table previously lubricated with baby oil, and after the mass has cooled slightly, knead it thoroughly with your hands. If you need cold porcelain of different colors, then you can add dyes of the color you need while kneading. You can use both food and synthetic coloring pigments.
Important! When staining with synthetic dyes, it should be remembered that only an adult without allergic contraindications can work with the resulting mass.
It is better not to give such a mass to a child, in order to avoid the appearance of irritation, skin itching and all sorts of allergies.
Recipe Four
To prepare cold porcelain in this way, you will need:
- corn starch;
- baking soda;
- water.
Cooking:
We mix all the components and then put on a slow fire. Cook until a homogeneous dense mass is formed.
The basis for crafts is ready, now you can safely start making original and useful household items, jewelry, dolls and even paintings from cold porcelain.
You can learn another recipe for making cold porcelain without cooking from the video:
DIY options for beginners
For beginners, an excellent option for crafts from cold porcelain that you can make with your own hands are flowers that are simple in shape (lilies of the valley, hibiscus, peony, roses), the simplest figurines of animals and birds, jewelry with a small number of decorative elements.

Master classes on making jewelry with your own hands using cold porcelain are very popular.
Here is one of the options for making the simplest flower bud from cold porcelain with your own hands. The whole sculpting process is shown in detail in the photo.
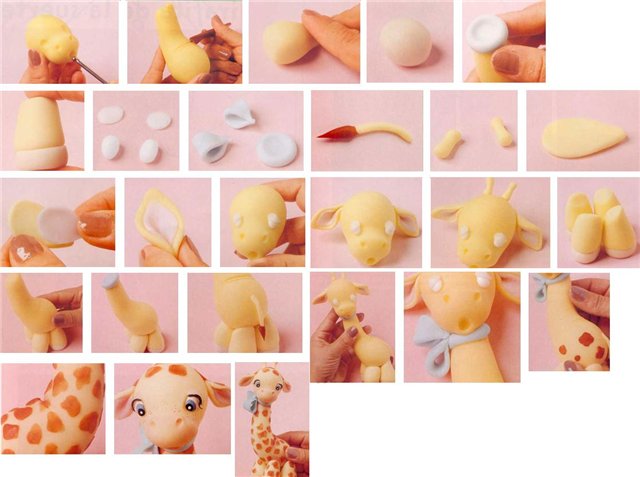
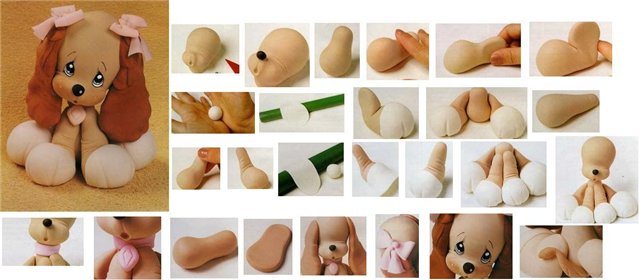
Animal lovers can try to fashion a cute giraffe or a sad puppy. Below are step-by-step photos of the entire process of sculpting these crafts.
After acquiring a certain amount of skills in cold porcelain modeling, one can begin to make more complex decorative elements and, therefore, more complex objects or decorations. The photo shows just a few ideas for creating jewelry using do-it-yourself cold porcelain rosebuds.
Cold porcelain is the most accessible, inexpensive and very convenient material for modeling.
It is completely safe to work with it, and to create crafts you do not need special skills in sculpting, even a preschooler can sculpt from porcelain.
You can make cold porcelain with your own hands at home.
Do-it-yourself cold porcelain: a recipe for making
There are a great many recipes for making cold porcelain, and each master has his own secrets and components. They have one thing in common: this is PVA glue (white, construction), 1 part, 1 part of starch (it is recommended to take corn starch), 2 tablespoons of glycerin (sold in a pharmacy), 1 table. a spoonful of baby cream (or any other).
Glue is poured into a pan or saucepan, cream is added, the whole mass must be continuously mixed with quick movements, the saucepan is put on fire to heat, starch is gradually poured out, and stirring continues.
The mass thickens almost immediately, and will resemble unmixed dough, gradually a “snowball” is obtained in a saucepan, it must be put on a surface greased with cream and allowed to cool slightly. Then, the mass is kneaded until smooth. In this form, the mass can be stored for up to 2 days, but it is better to use it immediately.
Cold porcelain as a material: do-it-yourself crafts for beginners: a master class
Lilac flower making:
To begin with, a white flower is molded, and shades of color are applied later.
The mass dries pretty quickly, so you need to cover it with a piece of plastic wrap after each pinching.
1. Pinch off a piece of mass the size of peas.

2. With the help of fingers, the pea is shaped like a drop.

3. With small scissors, the drop is cut in width, several times so that petals are obtained. Then, gently straighten the resulting petals.

4. The flower comes out in about three approaches, the finished product is shaped with tweezers.
5. For the manufacture of the stem, a wire is taken, cut to the desired length, folded in half and twisted. The fold must be dipped in PVA glue, with a tip - pierce the flower in the middle, and pull the wire all the way. The product is installed in a vase until the glue dries. When the glue dries, the petals need to be closed.

6. We carry out a flower with petals of a different shape. A droplet is also molded, but now not its wide part is cut, but a narrow one. We continue to act step by step, as with the first flower.

7. Another version of the flower is a lilac bud. To do this, the pea must immediately be strung on a wire with glue. Directly on the wire with your fingers, the bead is shaped like a drop. Scissors slightly cut the very top. Everything, the bud is ready!
8. We do this several times until a sufficient number of buds and flowers are created.

9. To get a colored flower, you need to tint the mass during the kneading process. To do this, a piece of the mass is plucked off, a little lilac acrylic paint is dripped inside. It is important not to overfill, otherwise the mass will not mix well. Now you need to knead until smooth.
10. After making a sufficient number of flowers, you need to send them to dry in a place where there are no drafts. Approximately, this will take a day. After drying, the flowers decrease in volume by twenty percent.
11. Now you can collect inflorescences, for this the wire is twisted. Inside the flower, the center is stained with a drop of paint.
12. Leaflets are cut with scissors from a pre-rolled green mass. The veins are made in a stack (sticks for modeling).
13. A bouquet is being assembled. All is ready! You can admire!

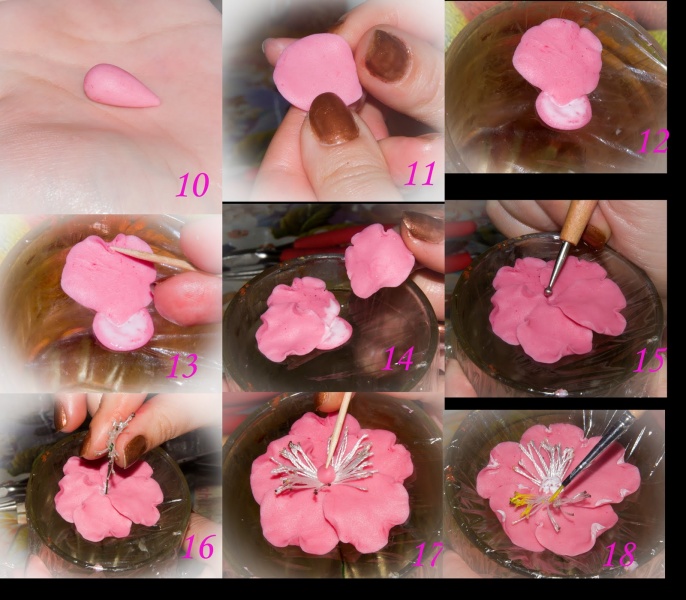
Making sakura flowers
1. Sakura is no less interesting to sculpt. For this, two “sausages” are rolled from the mass: unpainted and tinted with pink. White sausage should be twice as big as pink sausage. Now they need to be folded together and shaped into a block. Then, it is cut into cubes.

2. A petal is molded from the cube.
3. Petals are collected in a flower, they need to be fastened with a small amount of PVA. The collected petals are pierced with wire under the stem.

4. Buds are made similarly to lilac buds. Do not forget about a drop of glue on the wire.
5. Sakura sepals consist of five petals, they can be tinted with cosmetic shadows. We repeat the operations - wire, glue, a bud and a sepal are going.
6. A branch of sakura is collected in the same way as a lilac branch. It is necessary to take into account its natural appearance (you can first look at the photos of sakura on the Internet). A brown mass is applied to the twig in a small layer, imitating the bark of the twig. Fingers need to give characteristic cracks and protrusions.

DIY cold porcelain rose
To make a rose, you will need everything in the photo:
1. A small ball is rolled out.
2. A drop is formed from it.
3. The tip of the toothpick is dipped in PVA and the resulting drop is strung on it with a wide base down. This is the base of the flower. For fixation and stability, you need to stick the end of the toothpick into the foam or sponge.
4. It is better to prepare the pistil of the flower in advance so that they have time to dry.
5. We form the ball again. With a finger, the ball is shaped like a drop.
6. On the palm of our hand, we spit our droplet, forming a rose petal. Make sure that the edges are not thick.
7. A drop of PVA is applied to the base of the rose for adhesion and the first petal is applied, it should slightly “hug” the middle.

8. Repeat steps 5-7, forming the desired number of petals. Starting from the second petal, each subsequent petal must overlap the previous one.
9. We look at a photo of a rose flower and adapt to a real flower (we perform tucks and bends in the right places)

From these flowers, you can later make a decorative topiary - a beautiful tree on a long stem. Branches of lilac and sakura can decorate the house, or give to someone.
From cold porcelain, you can make not only flowers, but also various figurines, key rings, panels, decorate flower pots with stucco molding, make interesting bas-reliefs and many more different crafts.